Showing posts with label My Sweet Petunia Stamp Set. Show all posts

Saturday, July 31, 2021

My Sweet Petunia Makes My Heart Smile

 Hi Friends! It's Cheryl with the Inkon3 Creative Team! I'm really in love with the My Sweet Petunia Clear Stamp set. Sometimes it's nice to just have to deal with one stamped image for a card!

I googled Petunias to see what different color variations there were and I absolutely fell in love with this white and purple petunia!

First stamp the Petunia bouquet onto white cardstock. Then color with the Copic Markers listed below, or with your choice of coloring medium. Fussy cut the stamped image.

Then on white cardstock and black ink, stencil in the Squiggles background using the Squiggles 6x6 stencil. Trim the stenciled cardstock down to 5" x 3.75".

Trim down grey patterned paper down to 5.25"x4". Adhere to a 5.5"x4.25" card base, then adhere the stenciled cardstock over the grey patterned paper. Next, adhere the Petunia bouquet onto the stenciled cardstock as shown in the pictures. 

Then die cut a sentiment tag using white cardstock. Then stamp the sentiment "You make my heart smile" from the My Sweet Petunia Clear stamp set. Adhere the sentiment onto the bottom of the card.


Copic Colors:
Purples: RV99, RV95, RV93, RV91
Greys: W3, W1, W0
Greens: G99, YG67, YG63, YG17, YG21

Products Used:


Sunday, July 25, 2021

Making Cards and Mistakes with Erica

 Hi guys! 

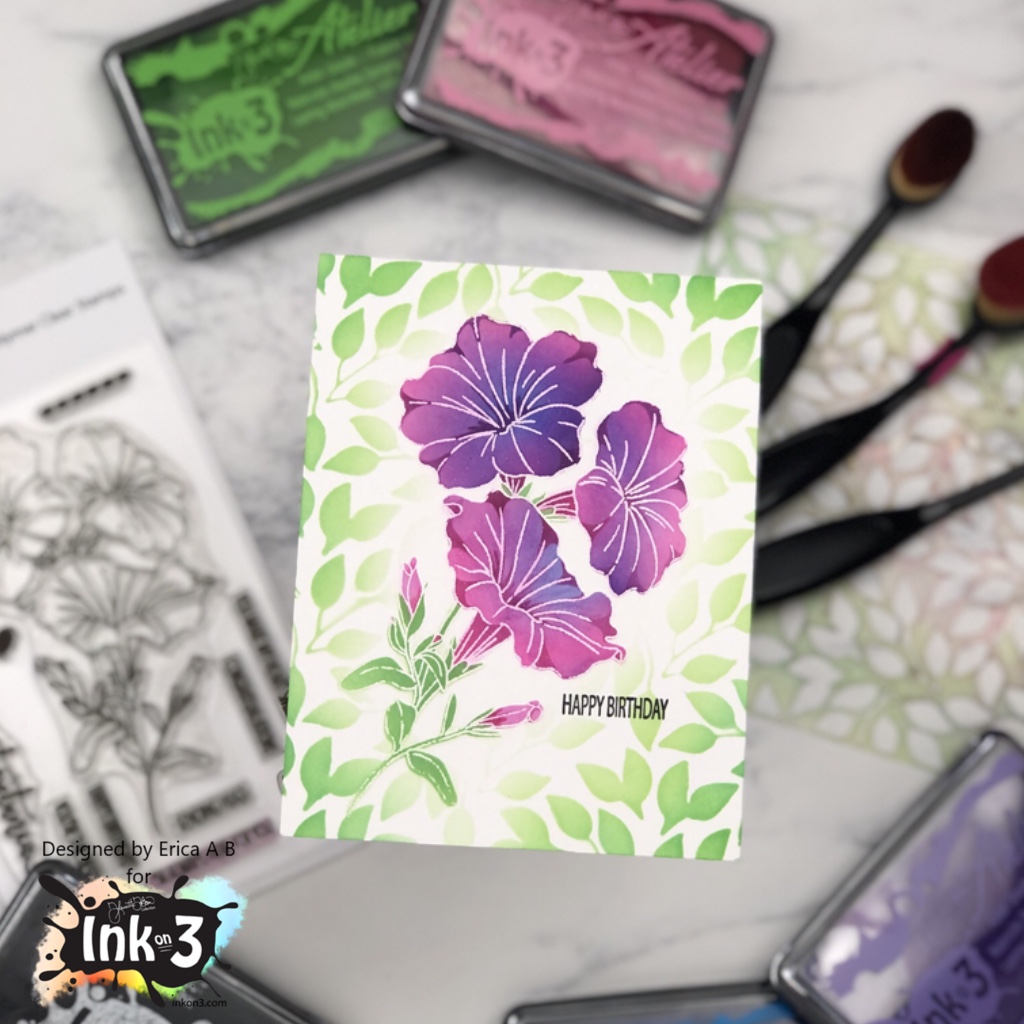
It’s Erica back on the Ink On 3 blog with another card using the My Sweet Petunia stamp and layering stencil set. On this one I made a big mistake, and thought I’d share it with you so you can avoid it yourself. 

If you saw my last blog post, I used this set for those cards too, but on those I ink blended first and then heat embossed the outline stamp on top. For this card, I did not do that.. and it ended up a bit meh… not going to lie. Take it from me, if you want a white heat embossed outline, do that last. 

So I started out by heat embossing the gorgeous My Sweet Petunia stamp on white card stock. I’m not sure why I did it this way, I should know better by now, really. Anyway, I grabbed Sweet Petunia Pink, My Jam Purple and Peacock Blue Atelier Inks, some Life Changing Blender Brushes and the My Sweet Petunia layering stencils. 

Right off the bat, I realised what a mistake I had done as the inks are so pigmented and vibrant, they instantly discoloured the white embossed lines. I SHOULD know better by now! And yeah, I said it again, because I really don’t know what I was thinking here. 

Anyway, onward and upwards. I ink blended the My Jam Purple and Peacock Blue to create a deep, vivid look for the flowers and then went softly with Goddess Green for the stem and leaves layer. I tried cleaning up a little, but it’s very easy to smudge and leave marks on the project when doing this, so I did what I felt I could do safely without making too much of a mess. 

Around the flower I also ink blended more Goddess Green using the Leafy Forest Stencil, just to add some softness to the card, which is a true one-layer card if you can believe it! A quick Happy Birthday was stamped up with Blackout Ink and that was it. 

Super simple, and it can work for so many occasions. Just change up the colour scheme and sentiment, and you are good to go! Oh, and ink blend FIRST, and heat emboss when all the ink is dry. Maybe best to leave it overnight to make sure. Take it from me, don’t do it my way, because that did not work out very clean. Having said that, that’s only with white embossing powder, I guess? Maybe gold will be fine? Ok, I’m off to best that theory! See you next time! 

Lots of love and happy crafting from Erica 

Saturday, June 26, 2021

My Sweet Petunia Layering Stencils Slim Line Card

I'm am so in love with the My Sweet Petunia Layering Stencils from InkOn3 that I had to use them twice on one card! 


I love that you can use the My Sweet Petunia Layering Stencils with or without the coordinating My Sweet Petunia Stamp Set! I chose to go without the outline from the stamp set for an easy no line coloring look - and really ... it doesn't get any easier than this! The My Sweet Petunia Layering Stencils have little numbers cut out of the bottom corners and I like to start with number 1. I started in the bottom left of my card and ink blended Trinity Teal, Peacock Blue, and Goddess Green Atelier Inks to build up my first floral cluster. I moved my stencils up to the top right and ink blended Sweet Petunia Pink, Marilyn Red, and Goddess Green Atelier Inks for my second cluster. I only quickly wiped my stencils with my Ink Off Cloth so some of the blue inks transferred onto my pink flowers and I LOVE the happy accident! 


I needed something simple to pull the background of my card together. There was just too much white space, so I used a tiny dot stencil and some Blackout Hybrid Ink to add little polka dots in between my petunias. I finished the card off with a die cut "hello" and covered it in Liquid Pixie Dust for sparkle. 


Thanks so much for stopping by! See you again soon!