Monday, October 28, 2019

Simple Sweet Posies Card

Hello Crafty Friends! It's Cheryl with the Inkon3 creative team here to share a sweet and simple card using the Posies stamp set. 

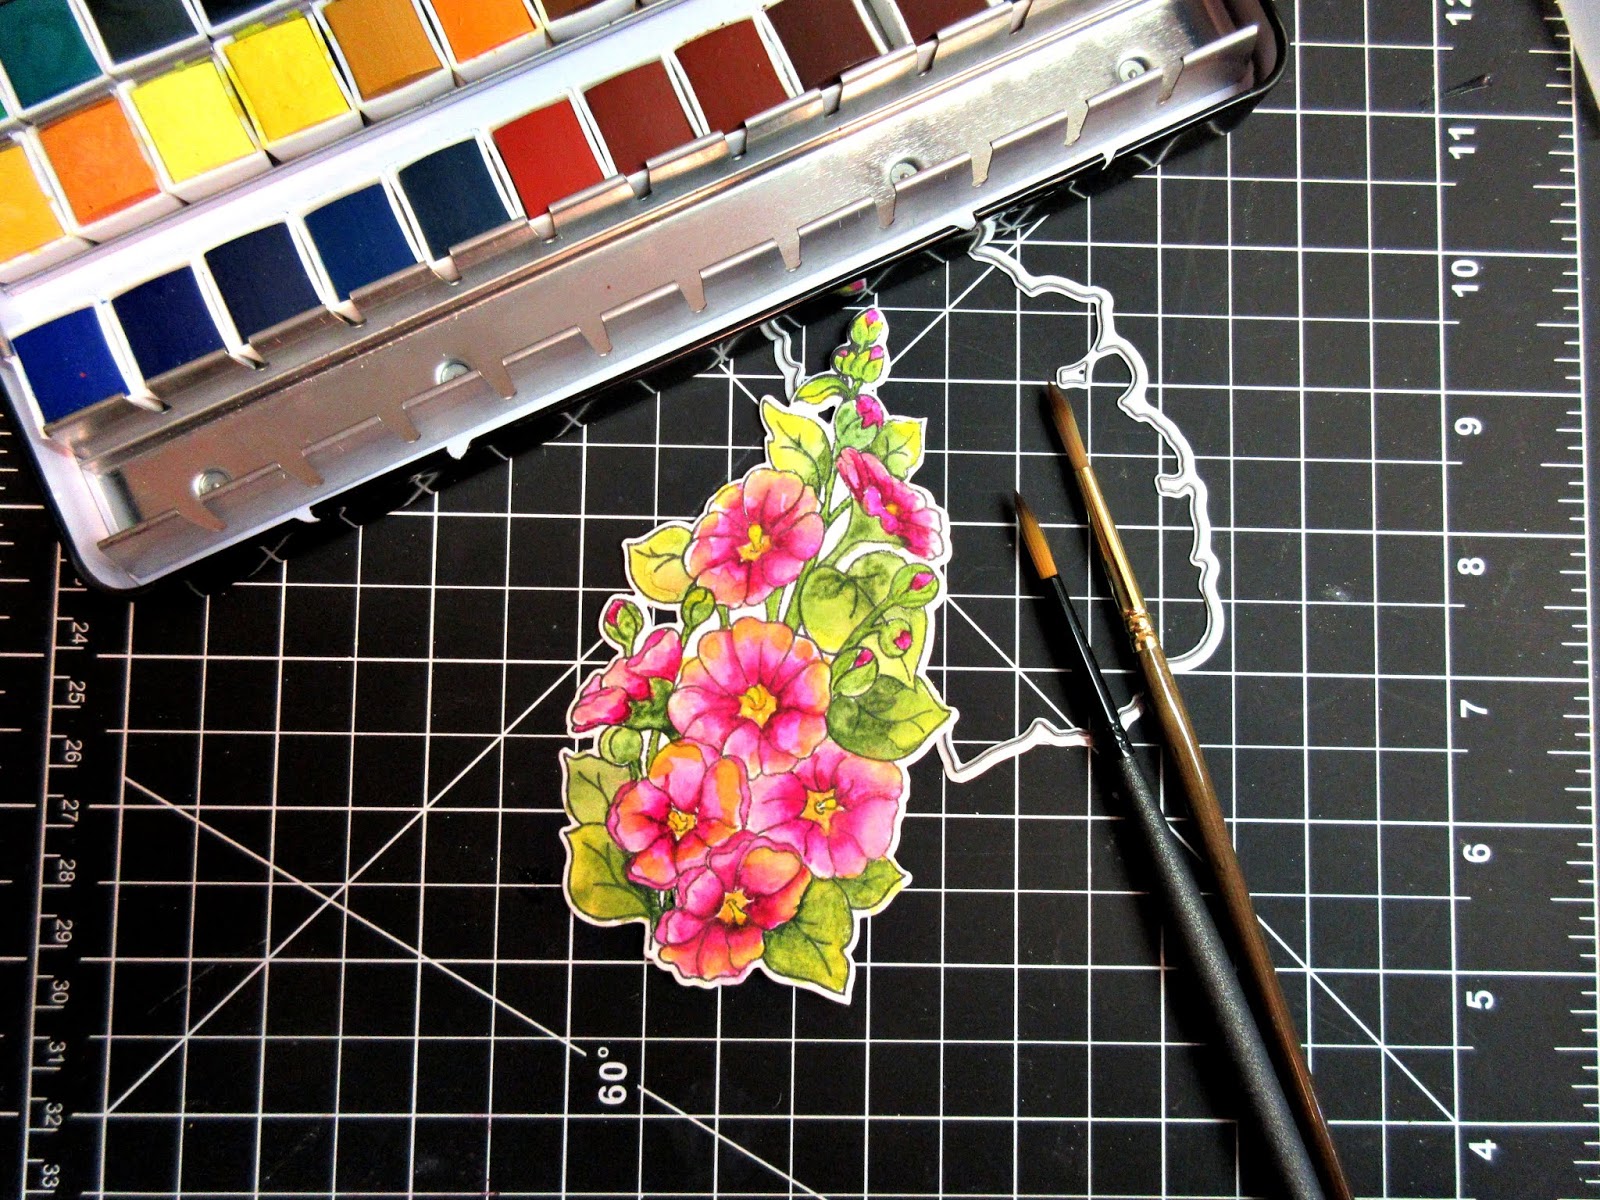
I stamped the water pitcher, stem, and posies using the Fadeout No Line Coloring Detail ink onto white card stock. I love how the ink fades away, meaning no need to mask! I simply stamped where I wanted the flowers, and colored the flowers in! Once the image was colored, I fussy cut the stamped and colored image.
Copic Colors Used:
Pinks: R81, RV00, V0000
Blues: B0000, B000, B00
Blue-Greens: BG10, BG000
Greens: G43, G40, G24, G20
 

Next, I die-cut a few scalloped squares, one large square and two small ones. I used distress inks to add color to each of the squares. Then I used some water to activate the inks to give some subtle details to the background. 


Then I cut out a large scalloped rectangle using beige patterned paper. I chose beige so that it doesn't overpower the soft no-line colored image.

I then heat embossed the sentiment "You're the Best" onto the large square and then assembled the card. I adhered the large scalloped rectangle onto the base of the card. Then I adhered one small scalloped square on opposite corners of the larger rectangle. Next, I adhered the large square over the two smaller square. Once all the squares have been placed onto the card, I adhered the colored in image of the Posies in the glass pitcher.  Lastly I used some Nuvo jewel drops to add a few clear drops onto the card.


I hope you liked this tutorial! <3

Products Used: 


Saturday, October 26, 2019

Dia dos Muertos - You're Sugar Sweet Skull Card


Happy Weekend friends, Ilda here!

This year the Day of the Dead is celebrated on November 2, typically it is November 1st the day after Halloween. "Día de Muertos" is a Mexican holiday celebrated throughout Mexico. The day is viewed not as a day of sadness but as a day of celebration as their loved ones awake and celebrate with them. This day is also known as all Saints Day and is celebrated by many Catholics around the world. So I thought it would be fun to create a card in honor of this special day.

CARD DETAILS

The stamp I am using today comes from Ink On 3's SUGAR SKULL stamp set. I began by stamping out with Versafine Onyx Ink and then heat setting the image with CRYSTAL CLEAR embossing powder. I then fussy cut the simple image.


Next, I colored in the skull using a variety of shimmer powders that I had watered down to watercolor with. I then stamped the sentiment using BLACKOUT Ink onto the card base and popped the skull image in place.


To embellish this simple card, I added some flower petals sequins and finished the centers with a seed bead. I also added glossy accents to the image for some added dimension.

I hope this very simple yet colorful Sugar Sweet Skull Card inspired you today. Thank you all for stopping by. Have a wonderful crafty weekend!

Ilda

SUPPLIES
Sugar Skulls Stamp Set
Shop at:
 IO3
BLACKOUT INK
BLACKOUT INK
Shop at:
 IO3
Crystal Clear Ultra  Powder
Crystal Clear Ultra Powder
Shop at:
 IO3
Tsukineko VersaFine ONYX BLACK Ink Pad
Shop at:
SSS | AMZ | SB | HBS
Strathmore Bristol Pad
Shop at:
SSS | AMZ
Mini Misti Tool
Mini Misti Tool
Shop at:
SSS | AMZ | SB | SK
Shimmer Powder - Green Parade
Shop at:
TS US | TS UK
Shimmer Powder - Lilac Waterfall
Shop at:
TS US | TS UK
Shimmer Powder - Solar Flare
Shop at:
TS US | TS UK
Shimmer Powder - Blue Blitz
Shop at:
TS US | TS UK
Shimmer Powder - Catherine Wheel
Shop at:
TS US | TS UK
Shimmer Powder - Cherry Bomb
Shop at:
TS US | TS UK
Luminous Lavender Petals
Shop at:
SSS | SK
Radiant Pineapple Petals
Shop at:
SSS | SK
Dazzling Celery Petals
Shop at:
SSS | SK
SILVER DUST | SEED BEADS
Shop at:
SSS | SK
STUDIO KATIA GLUE
STUDIO KATIA GLUE
Shop at:
SSS | SK
Double-Sided Foam Tape
Shop at:
SSS | AMZ
Glossy Accents
Glossy Accents
Shop at:
SSS | AMZ | SB | HBS

Thursday, October 24, 2019

Oh Deer Creative Blog Hop Inkon3


“Oh Deer” the holiday season is near, but have no fear the new Ink On 3 stamp set is here!!!

Come one, come all and prance along with the Ink On 3 Creative Team for some amazing holiday card ideas and inspiration!

Enter to WIN a $25.00 Ink On 3 shopping spree!!!

To enter ~ leave a comment on each Creative Team Members' blog hop stop. That’s it! The full lineup is listed below.
The last day to enter is on Monday, November 4, 2019 and we’ll announce the winner on Wednesday, November 6, 2019 over on the main Inkon3 blog.

Scroll down for the 1st project on the Oh Deer Creative Blog Hop
Here's the lineup:
Hi Fleurette here and thanks for joining us!!!
Now for my project using the new ink On 3 ~ Oh Deer 4x6 Stamp set & Coordinating Dies. I had so much fun illustrating this stamp set, but even more fun coloring it as an actual stamp set! I know you will love this set too, as it is so versatile. It's perfect for the holidays and also great for the rest of the year for beautiful friendship projects.


I decided to create my project as a Youtube tutorial, showcasing this set along with the new and coming soon Atelier ~ Artist Grade Fusion Inks (for a limited time you can grab them at a very special price too, click on the Atelier Ink for details). So sit back grab your favorite beverage and watch as I color this cutie step by step. All links to products I used will be listed in the description. Remember to subscribe if you enjoy creative projects <3


Thanks again for joining us and don't forget to comment on each stop on the hop, to be entered to win that $25.00 Ink On 3 Shopping Spree :D

Remember there is still a little time to Pre-Order your New Atelier Artist Grade Fusion Inks

Get 25% Off when you put all 8 beautiful colors in your cart! Use Coupon Code ~ ATELERFULLSET ~

Watch our fun Sneak Peek Video


Here's the lineup Again so you don't have to scroll back up to hop along:

Happy Crafting

Tuesday, October 22, 2019

Product Focus - Water Lily Stamp Set + Video


Hi everyone, welcome back to the Ink On 3 blog!  It's Jaycee Gaspar, and today I wanted to share the creative process on this deconstructed scene card using Ink On 3 - Water Lily Stamp Set.  I wanted to incorporate all the photopolymer images onto my card, including the dragonfly image.  Below is a video over on my YouTube Channel on how I made this card by utilizing the patterned/repeat stamping technique to make a statement background to perfectly frame the focal point.


Hey thank you so much for checking out my video on how I made this card!  Do you all have stamp sets from Ink On 3 that you would like me to use in a future project?  Let me know in the comments below!  If you like what you've seen from me, make sure you subscribe to my YouTube channel and give me a follow over on Instagram!  Talk to you all very soon!

Materials:
Ink on 3 - Water Lily Stamp Set
Ink on 3 - Blackout Detail Ink
Ink on 3 - Juicy Clear Embossing Ink
Ink on 3 - Gold Rush Embossing Powder

Vellum
Copic Markers: R00, R81, R83, R85, R89, YG91, YG93, YG95, Y0000, YR01, Y02, YR21

Neenah Solar White 80lb Cardstock


Jaycee Gaspar

YouTube | Instagram | Blog

Thursday, October 17, 2019

Pumpkin tag tutorial

Hello my fabulous friends!

Welcome to the Inkon3 blog! Kassi here with a fun fall gift tag tutorial! 
As a kid, I was taught to say 'thank you' when people did something nice for me... I remember one time, while cooking dinner for an important event, our cheese grater broke... we didn't have time to go to the store, so I mom called our neighbor and asked if we could borrow theirs... It wasn't a big deal, and they were happy to lend it to us. However, before returning it the next day, my mom had me stick suckers into each of the grater holes, turning it into a candy bouquet... She wanted to make sure they knew that she was grateful... both for the borrowed cheese grater, and their friendship.  

That's why I make so many 'thank you' cards and treats...

Let's take a look at how to make this fabulous fall tag!

Tuesday, October 15, 2019

Hello, Judy Woodland here, and it's my great good pleasure to be your guest designer for our Ink On 3 Blog today.

I don't know about you, but sometimes I just like to color. One of my favorite Ink On 3 stamp sets is the Hollyhock Set, because it's so conducive to doing just that.

Here is my card:

For this card I began by stamping the image with Ink On 3 Blackout Hybrid Detail Ink onto watercolor paper. I love this ink for it's intense black color, and it is compatible with both alcohol and water based materials. Then I got out my water colors and spent some time in the zone just coloring those beautiful flowers. When I was happy with it, I cut the image out with the companion die. As a final touch I added some Liquid Pixie Dust to the centers of the flowers.

I cut a panel of white card stock and dry embossed it with a quilted embossing folder.

Then I cut the Thank You greeting from the Hollyhock companion die set. I also stamped the "my friend" greeting with Ink On 3 Juicy Clear Watermark & Embossing Ink onto black card stock, and heat embossed it with Ink On 3 Arctic White Ultra Fine Embossing Powder.


Finally, I put it all together. I want to point out that, while the Hollyhock image was meant to be used vertically, it works fine to use it horizontally as well. It's kind of fun to think outside the box, and you never know what new thing you will come up with.


I hope you have gotten some inspiration from my card. Consider coloring an image with your favorite medium and making a simple card, it's so satisfying and great fun. Thanks for stopping by!

Until next time, here's celebrating your creative muse.

Wednesday, October 9, 2019

Poinsettia: Non-Christmas Card

Hi everyone! It’s Jeannie (InsideoutJeans) on the blog today to share a card I created using Inkon3’s Poinsettia stamp set. Yes, I know what you're thinking … Christmas cards already? Nope! I actually decided to use this set in a non-Christmas way by just using a non-holiday sentiment. I even used Christmasy colors. Sneaky!

I pulled out this set and was actually all set out to do a Christmas card but changed my mind last minute. I stamped all the images using Blackout ink and masked them to create a cluster of the poinsettia. I love that in this set there are three different sizes. Whenever I do clusters of floral images, I prefer different sizes so it looks more natural.


Once I colored my images, I knew that the top left hand would look really empty so I grabbed one of my red distress inks and softly blended the color concentrating on the corner. To finish off the background panel, I pulled out some metallic watercolors and splattered a combination of red and gold paint.

For my sentiment, I built it using a couple sentiments from the Hollyhocks stamp set. I stamped them using Juicy ink on black cardstock and used Gold Rush embossing powder for heat embossing.


One last touch I added was some black gems around the sentiments and floral cluster. I kept it limited to maintain the clean and simple look.

I’ve had this set for awhile now and it’s about time I use it. You definitely can use the stamp set for Christmas or an everyday card. I hope you get inspired to create!


Thanks for stopping by! Come back soon!