Tuesday, June 30, 2020

Video Tutorial: Create STUNNING Floral Bouquets Using this ONE Rule.


Hi everyone, welcome back to the Ink On 3 blog!  We often talk about coloring, inking techniques, coloring mediums, etc.  Color is just one part of the art equation.  Another element of art that is just as important is composition--or how elements are arranged on your canvas.  In the video tutorial below, I will show you a very basic introduction to floral composition that can be applied to other card themes such as animal scenes.


Hey thank you so much for checking out my video on how I made this cards!  Do you all have stamp sets from Ink On 3 that you would like me to use in a future project?  Let me know in the comments below!  If you like what you've seen from me, make sure you subscribe to my YouTube channel and give me a follow over on Instagram!  Talk to you all very soon!


Materials:


Jaycee Gaspar


Friday, June 26, 2020

Masculine Koi Pond Card

Hi Crafty Friends! It's Cheryl with the Creative Team here to show you how I made some cards for the important men in my life, the cards read "Happy Father's Day", but change up the sentiments and these cards can be used for any occasion!

I made the card in portrait and landscape orientation! Which one do you prefer?

First I created a 5.5"x 4.25" card base using white card stock. Then I used a rectangle die to cut out a panel that's slightly smaller than the card base. Next, I used distress oxide ink in Tumbled Glass and a blending tool to add a light blue background to the lower right hand corner of the card. Place the Wavy stencil over the light blue background and with a blending tool and Peacock Blue Atelier Ink, blend in the atelier ink concentrating on the lower right hand corner and lightly bring in the color towards the center of the card to create an ombre look.


From the Koi Pond stamp set, stamp out the Koi images of your choice using Blackout Hybrid Detail Ink, color with your choice of coloring medium and then fussy cut. For the Lily Pads, I first stamped the largest lily pad stamp using the Goddess Green Atelier Ink, then I used the Peacock Blue on the next layer, and Marigold Orange on the last layer. The Atelier Inks worked so well when layered! Fussy cut the lily pads.


Then I die cut some flags for the sentiments, for a perfectly coordinated sentiment flag, I die cut white card stock and applied Peacock Blue Atelier ink with a blending tool. I stamped the sentiments with embossing ink, used Arctic White Ultra Fine Embossing Powder and heat set.


Adhere the panel with the stenciled waves onto the card base. Then position the fussy cut images, and sentiment flags onto the card front as shown in the picture above. Trim off any excess of the sentiment flags that extends beyond the Koi. Adhere the fussy cut images and sentiment flags onto the card and there you have it!

Copic Colors Used: 
Reds: R29, R27, R24, R22
Oranges: YR27, YR68, YR14, YR12 

Products used:

Wednesday, June 24, 2020

Watercoloring Fun with Atelier Inks - Guest Designer Laura


Hi everyone! It's Laura Volpes here and today I am back with my fourth and last post as a guest designer for InkOn3! In this post I will be sharing a card and a video tutorial and I will be showing how to use Ink On 3 Atelier inks to watercolor.

Before that, though, I want to take a moment to thank InkOn3 for having me as a guest this month - I had a blast creating with their fun stamps and great inks!
My card today is a scene card - my favorite kind! I started by creating the elements for my scene out of some watercolor cardstock. I used the Heffy Doodle Imperial Stitched Rectangles, the Lawn Fawn Stitched Pond and the Heffy Doodle Grassy Lass Border dies.

I watercolored each piece separately using Atelier inks in Peacock Blue and Goddess Green and I added some splatters and some Liquid Pixie Dust for extra fun and shimmer!

I set the panels aside to dry and started working on my images.
Like I did last week, I used images from the Platy-rrific Pondies stamp set. I did some no line coloring this time around, so I stamped the images with InkOn3 Fadeout ink and I colored them with Illustrator markers. I then used the coordinating dies to die cut them out.
I assembled the scene on a top-folding A2 card base and I then stamped my sentiment with InkOn3 Blackout Ink.
I finished off the card by adding couple of white pen gen details and by coating the balloons with more Liquid Pixie Dust!

And, as promised, here is my video for you! I hope you like it!


A huge thank you again to InkOn3 for having me as a guest this month and to you all for stopping by!
Have a great day!

Tuesday, June 23, 2020

No Line Koi Pond Watercolor

I'm using a couple of the newest released products from InkOn3 today to make a fun summery Koi Pond card with a bit of easy no line coloring.


This card is simple to make, but just look at those koi swimming around! They're the best! I stamped the koi images as well as the air bubbles from the Koi Pond Stamp Set onto watercolor cardstock with Fadeout No Line Ink. The fabulous thing about this ink is you can stamp it 2 or 3 times to build up the color (for people with bad eyes like me!) and the ink will still fade back to give you the no line effect! I used a Small Fine Tip Watercolor Brush to color the koi with Marigold Orange Atelier Ink. Check out the video above to see just how easy this is! The Fadeout Ink grabs the color and makes no line coloring a BREEZE!


I needed a fun background for my koi, so I used the new Pondie Stencil along with some Goddess Green Atelier Ink. These inks are so juicy and wonderful! I didn't even have to re-ink my blending foam to do the background!


I added the koi with foam tape to my stenciled background and stamped a coordinating sentiment from the Koi Pond Stamp Set with Blackout Hybrid Detail Ink in the bottom corner of the card. I added some Liquid Pixie Dust to the bubbled and koi using a Small Fine Detail Watercolor Brush to finish the card. Thanks for joining me!

Friday, June 19, 2020

Watercolor Blooms


Hello Everyone!
It's Ceal, here to share a card with you today using the BeYOUtiful  set from our latest release. I love the big bloom in this set it is super fun! 
To create this card I started with a top folding white card base, a black panel and a panel of watercolor paper. I randomly stamped the blooms using Fadeout noline coloring ink to cover the watercolor panel. I used the Atelier inks to watercolor the blooms. There are so many colors you can make by mixing the inks.
 To finish the card I added the sentiment from the Bunny Hugs set and the hugs die from the coordinating die set. 
After I was done stamping I used the Ink Off pad and cloth to clean and condition my stamps. 


Wednesday, June 17, 2020

Stamping with Atelier Inks - Guest Designer Laura


Hi everyone! It's Laura Volpes here and today I am back with my third post as a guest designer for InkOn3! I am continuing my experiments with InkOn3 Atelier Inks and today I will focus on stamping! Make sure to also check out my video to see all the fun things I tried out!

For my card today I used the Bad & Boujee and Platy-rific stamp sets - I had lots of fun mixing images from the two! As a first step, I created a DIY patterned paper effect on my background, by stamping one of the images in the Bad & Boujee  stamp set with Marilyn Red Atelier Ink. I was super happy with how vibrant and defined my stamping was!

Since I was having lots of fun stamping, I also did a few experiment to see how Atelier Inks layer - more about this in my video!

The focal images are two of the adorable critters in the Platy-rific  stamp set. I stamped them with Blackout Ink and I colored them with Illustrator markers. Once the coloring was done, I die cut them with the coordinating dies.

I then created three die cut hearts with some dies in my stash and pearlescent vellum.
I die cut the stamped background to 4 x 5.25" and I glued it to a black A2 sized card base. I glued the die cut hearts and the images to my card, raising the images over some foam squares.

I heat embossed my sentiment with white embossing powder over black cardstock and finished off my card with some red heart crystals.

As promised, here is my video tutorial, showing how to make this cute thinking of you card as well as my stamping experiments with Atelier Inks!

https://youtu.be/oFpmDkBiDZM

Thank you all for stopping by and have a great day!

Tuesday, June 16, 2020

BeYOUtiful Friend

Hi everyone! It’s Jeannie (InsideoutJeans) on the blog today with Ink on 3’s stamp set named BeYOUtiful stamp set. This is one of the newest stamp sets that is part of the BeYOUtiful Waters bundle. If you know me, I love any kind of florals and this is no exception. 

I stamped out the main floral image (which is really large!) using Ink on 3's Fadeout Ink. Since this ink is used for no-line coloring, I was able to add the leaves and additional florals without needing to mask. I wanted to create a corner of florals using the BeYOUtiful stamp set. 


I went ahead and colored everything in using alcohol markers (colors listed below). Originally, the florals were going to be in the bottom right hand corner of the card but I decide to flip it around so the card panel read horizontally and the florals ended up in the bottom left corner. 

I pulled out my Goddess Green Atelier Ink and ink blended in the top right hand corner. I didn't want to be too heavy handed and wanted a soft ink blend. I decided to use the new Wavy stencil to add a bit of interest to the background. I just went over the area I already blended with additional ink along with the stencil and it added a subtle interest to the background. I wanted to add a bit of balance so I added a little bit of the Goddess Green Atelier Ink to the bottom left hand corner as well. 


For the sentiment, I was able to pick and choose my own sentiment and stamped it using Ink on 3's Blackout Ink. To finish off the card, I used some embellishments to surround the sentiment and added a bit to the remaining white space. 


Thanks for stopping by today and I hope you get inspired to create. Come back again soon for more inspiration and ideas! Happy Crafting! 


→ SUPPLIES USED ← 
Items marked with an asterisk (*) were provided by a store or the manufacturer for review and use. All other items were personally purchased. Affiliate links may be used at no cost to you. 

STAMP SET(S):
*Ink on 3 - BeYOUtiful: https://bit.ly/2Ug0bKy
STENCILS: *Ink on 3 - Wavy: https://bit.ly/2Ug131A
INK:
*Ink on 3 - Fadeout Ink:  http://bit.ly/2RulfMP
*Ink on 3 - Blackout Hybrid Ink: http://bit.ly/2YAStuf *Ink on 3 - Goddess Green Atelier Ink Pad : http://bit.ly/3aXAZzk
COLORINGCopic Sketch - R20: http://shrsl.com/1f3o5  Copic Sketch - R22: http://shrsl.com/1iznz  Copic Sketch - R24: http://shrsl.com/1ah3c   Copic Sketch - R27: http://shrsl.com/17ydv   Copic Sketch - YG01: https://shrsl.com/2bikp 
Copic Sketch - YG13: http://shrsl.com/1ah3f 
Copic Sketch - YG17: http://shrsl.com/1erwt  Copic Sketch - YG67: http://shrsl.com/1ah3h Copic Sketch - E25: http://shrsl.com/172a2  Copic Sketch - E27: http://shrsl.com/1erwo  Copic Sketch - E29: http://shrsl.com/172a5 

Monday, June 15, 2020

Making Your Own Patterned Paper with Erica

Hi guys!

It's Erica back on the Ink On 3 blog today. Sadly due to some unforeseen circumstances, cough cough (covid-19) I have not had the latest release yet. I was holding out and holding out as we sporadically get mail here in Spain still, but no luck.

Instead I've grabbed my beloved Magical Unicorn stamp set again BUT don't roll your eyes and groan "oh man, she ALWAYS use that one". I mean, I do, I love it. However, for these I have used some of the smaller images and made my own patterned paper with the help of the Atelier inks!


I do love a nice patterned paper but have a terrible habit of hoarding it instead of using it. It's madness, really. So, I decided to make my own so I can make as many as I want, whenever I want!

I lined up my Atelier inks in the order I wanted to use them: Bee Sting Yellow, Marigold Orange, Marilyn Red, My Jam Purple, Peacock Blue and Goddess Green. The photo below is from when I was swatching the inks.


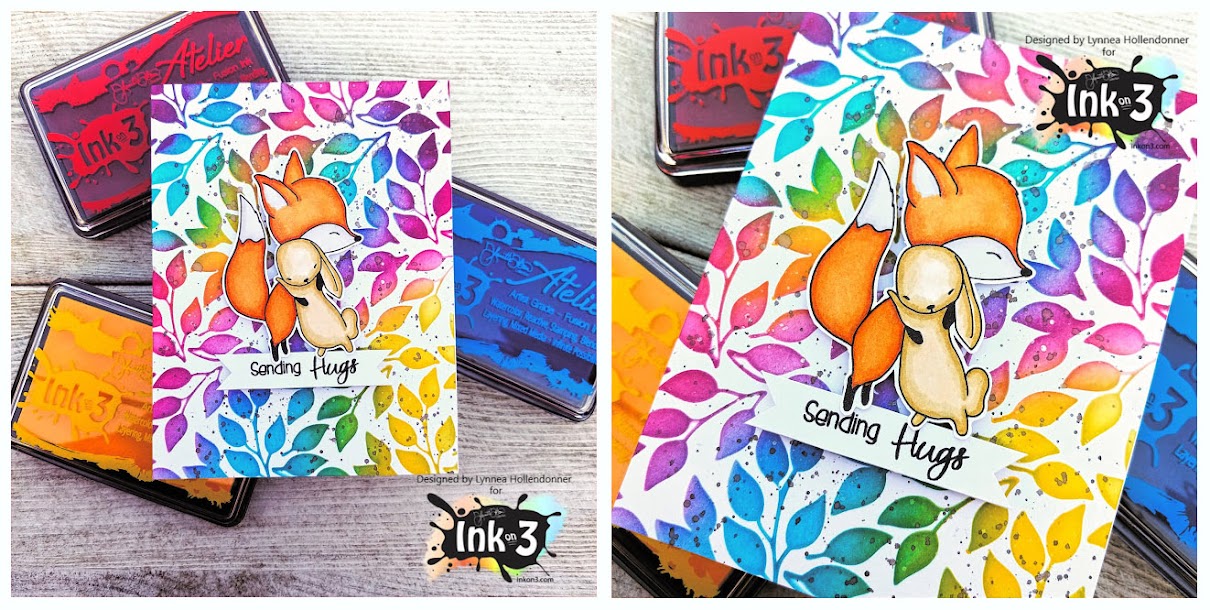
On my first panel, I used two of the star stamps and just placed them close together on an acrylic block. Then I stamped from one corner to the opposite one, at an angle, one colour to the next. On the second panel I did them straight across.


I probably added a little bit too much yellow at the top of this one, which lead to not a lot of green at the opposite corner. But oh well, you live and learn.


For the second panel, I used only the clustered stars stamp and stamped horizontally. For more even colour, it would probably be smarter to do the middle line first and then work your way out. If you aren't bothered about that, just stamp away.


I love how these turned out. So fun!

To finish these off, I stamped up 'hugs' in Blackout Detail Ink, with the help of my MISTI. The 'hugs' is from the Bunny Hugs stamp set. When that was dry, I added these to white card bases. It was so tempting to add a little something else, but I wasn't sure exactly what so in the end I decided to keep them as they were. I know, shocker!


Thanks for stopping by today. I hope you have found some inspiration here today and will look at your stamps with new eyes and step outside the box with me.

Lots of love and happy crafting from Erica

Wednesday, June 10, 2020

Heat Embossing Surprise with Guest Designer Laura


Hi everyone! It's Laura Volpes here and today I am back with my second post as a Guest Designer for InkOn3 this month! I experimented some more with the Atelier Inks, and this time I wanted to try using them with heat embossing. The results were surprising - make sure to check out the video at the end of this post to see what happened!

For the background of my card I used the Leafy Forest Stencil. I started by blending some My Jam Purple ink through the stencil on some watercolor cardstock. I then heat embossed the leaves with clear embossing powder, so that I could go over the entire background with Peacock Blue ink without covering the leaves. I also added some shimmer with Liquid Pixie Dust.


For my focal point today I used the Forever Friends stamp set. I stamped the image with InkOn3 Blackout ink and I colored it with Karin Brush Markers Pro. Here is a list of the markers I used
  • Fox: Copper Brow, Warm Grey 1, Blush
  • Bunny: Warm Grey 3, Blush
Once I was done coloring, I cut out the image with my scissors.


I die cut a panel out of some white cardstock and I glued it to the background. I heat embossed the sentiment with white embossing powder over some black cardstock and I finished off the card with some blue crystals.

Don't forget to check out my video for a step by step tutorial and to see what happened with my heat embossing experiment!


Thank you all for stopping by and have a great day!

Tuesday, June 9, 2020

Faux Watercolored Backgrounds with the Mirror Image Stamp

Hi! You guys know I'm all about easy cards that pack a punch, right?! Today I'm going to show you a super quick way to add a faux watercolor background to your cards using the Mirror Image Stamp from InkOn3!


I really like to show products being used in different ways. The Mirror Image Stamp is intended to be used for ... well ... mirror image stamping! Haha! I decided to take the stamp and twist it and use it to create a full background. I used Atelier Inks because I love how vibrant they are and how they move with water. I used a stamp positioner for this technique and I highly recommend one. It made it a lot easier!

I positioned the Mirror Image Stamp so that it would stamp in the center of a piece of A2 sized watercolor cardstock and used all of the rainbow colors of Atelier Inks for my four backgrounds! I used Marilyn Red, Marigold Orange, Bee Sting Yellow, Goddess Green, Peacock Blue, and My Jam Purple. I just inked up the Mirror Image Stamp with three different colors of Atelier Ink and sprayed it with water and stamped it onto my watercolor cardstock for the faux watercolor look! I love it!


I dried each panel with a heat tool and added some bold white heat embossed images to the front. I love the big floral image in the new BeYOUtiful stamp set! It's big and bold and perfect for being the center piece on a card! I lined up the flower, some leaves, and the sentiment from the BeYOUtiful Stamp Set and stamped them with Juicy Watermark Ink and heat embossed them with Arctic White Fine Detail Embossing Powder. Rinse and repeat for the rest of the set!


You definitely want to check out my process video above! This technique is so easy! I finished off the cards by adding a quick coating of Liquid Pixie Dust to the flowers and that's it! Clean and simple and quick and easy faux watercolored backgrounds with the Mirror Image Stamp and Atelier Inks. I hope you love them!

Friday, June 5, 2020

Hello Magnolia Friendship Card


Hello Friends, Ilda here and happy Friday!

Today I am sharing a card featuring the BIG BOLD MAGNOLIAS Stamp set, that I previously had colored for the last Kathy Raccosin's coloring challenge. I love participating in her challenges because I end up with a ton of colored pieces ready to go on a card.

CARD DETAILS

So to begin, I stamped out the images first onto Bristol paper using BLACKOUT INK. I then colored the images in with Karin Brush Marker Pro Brushpens that were new to me and I wanted to test them out. Once the water coloring was dry I went back to add some pencil detailing. I then place the colored images back into the stamp positioner and re-inked the images using JUICY INK this time. 


Next, I sprinkled GOLD RUSH EMB. PWD. over the panel and then heat set the lines in. As you can see some of the BLACKOUT INK is still showing through some areas, but that didn't bother me as it looks like a shadow line. Please note, when you watercolors the paper will warp a little so linning it back may not be perfect unless you use non-waterbased media. I then die cut each flower up using the BIG BOLD MAGNOLIAS coordinating dies and glued them on to a strip of cardstock that I had added the same gold embossing using the LEAFY FOREST STENCIL.


To finish, I die cut, stacked and glued together the Hello from the DOGWOOD coordinating die set. Before adhering it all to the card base I diluted some of the red I used on the flower and added splatters onto the card front.

I hope you have been inspired by this Magnolia Friendship Card. 

Thank you for stopping by 😊
Until next time... Happy Crafting 👋


SUPPLIES
BIG BOLD MAGNOLIAS
BIG BOLD MAGNOLIAS
Shop at:
 IO3
BIG BOLD MAGNOLIAS DIES
Shop at:
IO3
DOGWOOD FLOWER DIES
DOGWOOD FLOWER DIES
Shop at:
IO3
LEAFY FOREST STENCIL
Shop at:
IO3
BLACKOUT INK
BLACKOUT INK
Shop at:
IO3
JUICY INK
JUICY INK
Shop at:
IO3
GOLD RUSH EMB. PWD.
GOLD RUSH EMB. PWD.
Shop at:
IO3
MED. WATER BRUSH
MED. WATER BRUSH
Shop at:
IO3
MISTI TOOL - ORIGINAL SIZE
Shop at:
SSS | AMZ | SB | HBS
NEENAH SOLAR WHITE 110
Shop at:
SSS | AMZ | HBS
KARIN BRUSHMARKER PRO
KARIN BRUSH MARKER PRO
Shop at:
SSS | AMZ
PRISMACOLOR PENCILS
PRISMACOLOR PENCILS
Shop at:
SSS | AMZ
GEMINI JR. DIE CUTTER
Shop at:
SSS | AMZ | SB
STUDIO KATIA GLUE
STUDIO KATIA GLUE
Shop at:
SSS | SK
FOAM TAPE - WHITE
FOAM TAPE - WHITE
Shop at:
SSS | SK