Thursday, October 15, 2015

Autumn Shaker Box

Hello again! Becki from the Happy Card Factory here and back with an adorable little Fall shaker box. I just love how it turned out. Such festive boxes for candy favors at your next holiday party. 
The Holly Days collection for Christmas by Fleurette Bloom Designs has some of the cutest gift giving elements, but I wanted to make an Autumn themed shaker box. Using the Holly and Bow box, I broke the holly out of the front panel and replaced it with one of the leaves from the Harvest Happenings- Leaf card SVG. See how having multiple kits in your crafting arsenal can help you make any design your heart desires? :)
A little glitter here with a few sequins there and you won't be able to stop shaking this little guy. Super easy and such a beautiful touch to gift giving! If you want a some more information regarding how I put this shaker box together, head over to HCF for details.

Thanks for stopping by and checking out the Design Team's projects week after week. We appreciate it. Please leave a comment to let us know how we are doing or any kits/designs your would like to see featured. Then head over to the store to pick up the amazing SVG files from Fleurette. Your electronic cutting machine will thank you. ;)


Sunday, October 4, 2015

Banana Split Stamped, Watercolor, Copic Colored Card

Hi, Fleurette here today :)  Hope everyone had fun creating cards for World Card Making Day!  I had fun playing and created this fun, colorful Birthday Card from our "Ice Cream Party" Clear Photo Polymer stamp set.  

I did a tutorial on coloring this cute stamp with Copic markers Vs Colored Pencils
You can watch it by clicking here 

I also did a fun Periscope on assembling it on WCMD
You can watch it by clicking here 

#clearphotopolymerstamps #icecreamstamp #happybirthdaystamp #stamping #watercolor #worldcardmakingday #svgcutfiles #svgcuttingfiles
To create this fun card, I simply watercolored on heavy weight cardstock, using the SVG Kit "Rockin Quick Cards" Motorcycle card base and overlays.  On the second overlay I stamped the sentiment "Your The Cherry On Top" with embossing ink and white powder, creating my own patterned paper.  I think it gives a fun contrast, almost like a chalkboard. 

Thanks for popping in and hope to see you again soon! 


Stamps and SVG Kits Used:

Ice Cream Party                      Stamp Bundle Pack - Sale                     Rockin Quick Cards SVG Kit
 6x6 Stamp set                         4 - 4x6 stamp set bundle                                         Card Kit
  

Friday, October 2, 2015

Spooktacular Halloween Moon Spinner Card

 Hi Guys! Ilda here, and it's my turn again to share with you all my latest Fleurette Bloom DT Project!

So, were any of you able to catch a glimpse of the Blood Moon this past Sunday Evening? Here is a pic we snapped just in case you missed it! I was in awe of this beautiful sight!

Anyways, it seems like the stars were all aligned as I had been working on this cool Halloween Spinner Card for my next Project!


My baby sister celebrated a birthday recently and thought I would make her a non traditional Birthday Card. So happy with how it turned out, it couldn't be any cooler!


Files for this card come from Fleurette Blooms Halloween Card Kit/Collection SVG files and Printables

The Moon and Happy Birthday Stamps come from Fleurette Blooms Sun Moon and Stars Clear Photopolymer Stamps


Here is a photo breakdown of how this card was put together.

#clearphotopolymerstamps #stamps #stamping #moonstamp #svgcutfiles #svgcuts #watercolor #svgbat #Halloween #bloodmoon #halloweensvgs
Hope you liked my "Spooktacular" Halloween Moon Spinner Card. If you have any questions leave them in the comments and I will happily reply back to you :)

Thanks for stopping by!
Happy Crafting  :)

Thursday, October 1, 2015

Halloween Bat Shaker Card

Good morning!  Beth from Beth's Beauties here, and I am blessed to be guest designing for Fleurette again today!  I made this spooky bat card using the Halloween Card Kit from Fleurette Bloom.  


I knew it was perfect to alter for a shaker card as soon as I saw it!  The card design is fairly simple, so it really showcases the sequins well. 

I used mostly Lime Licorice Batty Sequins (Look at those bat sequins!!) with a little Orange Licorice Batty Sequins and I also added a few white ones to bring out the colors on my striped paper.  The Lime Licorice Trendy Twine I used matched those sequins perfectly!

#halloween, #halloweencard, #svgcutfiles, #svgcuts, @svgcutfilebat, #svgcutfileshalloween
This kind of a card would be a hit for anyone on your card list.  For more links and descriptions, stop by my blog HERE.

I hope you have a wonderfully crafty day!


Wednesday, September 30, 2015

Happy Birthday Burger Box


Hello! I'm Becki from the Happy Card Factory and I am back today with another project for you. Who doesn't love a happy meal box? Especially when they are filled with treats. I finally got a chance to play with the new Fleurette Bloom stamps. After seeing this happy burger, all I could think of was a happy birthday burger box shaped after those fast meals with the toys that kids love. I think it came out similar without getting in trouble. ;)


There were a few sets I used to get my happy burger box. To make the house box, I used the Christmas Memories 3D luminary house. I had to do a little renovation on it by releasing the compound paths to delete the windows and door. I also added a rectangle to the peaks of the roof so there wouldn't be a hole where the chimney is supposed to go. The scalloped mat is from the I'm Wishing kit's Lace card. With the addition of the burger stamp and sentiment from the Fast Foodies, it makes one adorable, fast happy burger box.


I wanted a handle similar in style to the "m" you get on the other box. Since this will be filled with birthday goodies, it was decided to add the occasion sentiment as the "handle." I used the Arial font, welded the letters together with little tabs. The tabs were then inserted into the slits I cut with an Exacto knife into the flat peak of the roof. The tabs were then glued down on the underside to give it stability. Now the box can be picked up with the "HB2U" instead of the decorative wire. Add a twine bow and sentiment, you're done. How cute! It's a very happy box to give to the birthday boy or girl.

Thanks for stopping by. Feel free to leave some love in the comments sections and have a very crafty day!

Supplies:
Christmas Memories 3D kit - luminary house
I'm Wishing 3D kit - scallop from Lace card
Fast Foodies stamp setSpectrum Noir markers 
American Crafts cardstock 
Trendy Twine Cherry Latte

Friday, September 25, 2015

Sea Critters Watercolor Gift Tags!

Hello!
I've been taking some time to really explore the brand New Stamp Sets and SVG Kits by Fleurette Bloom [FB] and I must say they are just so much Fun! 

I used Rockin Quick CARDS SVG kit and Sea Critters Stamp Set to make my Gift Tags. These Tags are going to work Perfectly to gift my sewing project [to reveal in another post].

FBSeaCrittersStampSetTAG1byKimberlyRaeWEB

I especially like how Flawless they stamp out and the ease it takes with just one press.  I used Versa Mark ink and then a Dye ink over that to get the colored stamped images and heat set it with my heat tool.

To make the background for all my tags I used various Distress inks and also sprinkled the ink with a wet brush onto the paper while it was damp and then heat dried it. Using the Sea Critters Stamp Set, I stamped a bunch of bubbles in different sizes onto watercolor paper.   Love how these backgrounds came to life!

FBSeaCrittersStampSetTAGTurtlebyKimberlyRaeWEB

Then, I use my Zig Real Brush Markers to watercolor the stamped images. I love the look!!   Have you given the Zig Real Brushes a try yet?  I know you will love them as much as I do.  

FBSeaCrittersStampSetTAGFishbyKimberlyRaeWEB

Now, you must know I'm not a professional stamper, But I do Love the art of stamping and watercoloring and I'm having a lot of Fun with it all!  With that being said, you will see I've went out of the lines in some places, but I think that's ok....let's call it Character for these sweet images! ha

Lesson learned: [color After image is cut out] When cutting my stamped images and "Tags" from the Rockin Quick CARDS Svg set, my Scan N Cut2  found every edge and it was very Easy to cut my stamped images out.  I had to giggle--it even found my 'character' flaws and so eloquently went around them [see sea star]! LOL!!  So Much Fun!

FBSeaCrittersStampSetTAGOctopbyKimberlyRaeWEB

To finish up my Sea Critters I used some Wink of Stella Clear here and there on the Sea Star, Octopus and the fish's fins.

Be sure to Hop on over to Fleurette Bloom Designs to get your Sea Critters STAMP Set and with a purchase of only $8.98 you will get the Rockin Quick CARDS Kit  FREE!!

Thank you for stopping by and please feel free to leave your comments and questions in the comment box below and have a Crafty day :)
Hugs and Blessings,
KimberlyRae's Blog

SUPPLIES
Free gift w/purchase!   Sea Critters by FB

Thursday, September 24, 2015

Moon & Stars Card With Watercolor Envelopes! FB Stamps

Hello! KimberlyRae, here with another project created with Fleurette Bloom's 
These two kits were perfect to make my shaker card and and my card envelopes.  I just love the way they look and hope my daughter will love her card :)

ToTheMoonNBackCARD-ENVELOPEbyKimberlyRaeWEBFB

For the CARD, I started out with my favorite watercolor paper and cut a circle, cut the stars and moons out of TIP: Contact paper and adhered them tossed over the circle keeping them more over on the right side [I knew I wanted my moon on the left side].  Then, watercolored [is that a word..lol] my paper up and set aside.
My 'Happy Birthday' sentiment was stamped from the Sun Moon and Stars Stamp Set by Fleurette Bloom! [see below in the SUPPLY list]

ToTheMoonNBackCARDbyKimberlyRaeWEBFB

While that was drying I watercolored my moon  and the front of the shaker part.  After your background has dried carefully take off your stars and moons contact paper to reveal the white paper!
Then, to assemble I placed some acetate on the backside of the background and placed scotch double sided foam tape [twice] around so there wasn't any holes for the sequins and pearls to fall out.  TIP: Before putting your shaker goodies inside BRUSH WITH Antistatic powder around the inside of the foam tape and the goodies won't stick].  I placed my circle over your background and viola done!

ToTheMoonNBackCARDENVbyKimberlyRaeWEBFB
#svgcutfiles #clearstamps #moonstamp #svgcuts #svgcuttingfiles #digistamps #watercolor  #moonsvgcuttingfiles #envelopesvgcutfiles
Now, to make my envelopes, I cut the Envelope file from Rockin  Quick Cards SVG Kit and used a small brush and Resist Liquid to draw my letters and the address and hearts.  Then, I watercolored the front and a lil on the back flap, splattering some of the ink on top between heat settings.   You are the artist here...go wild!  ha
Hugs and Blessings,
KimberlyRae Blog
Supplies I used:
sun_Moon_Stars_online_pk      Free gift w purchase Full all rockin quick cardsLOGO  

Wednesday, September 23, 2015

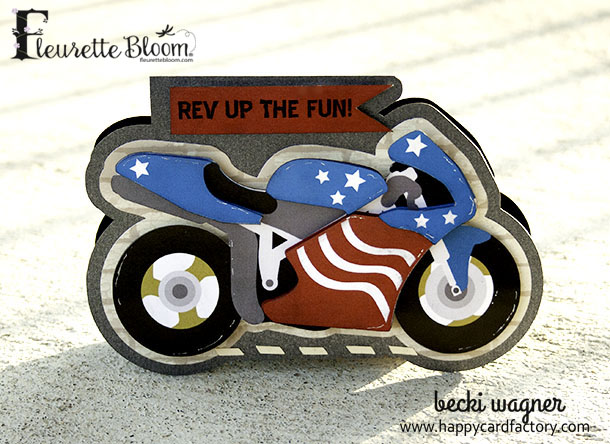
Motorcycle Birthday card


Motorcycle birthday card 3

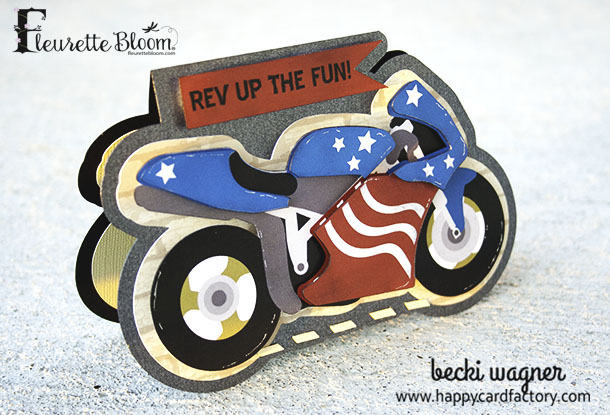
Becki from Happy Card Factory here with a new project! My nephew loves motorcycles, he helps his dad "fix" the ones in his shop. So Fleurette Bloom Designs Motorcycle Racing set was the way to go. Even though the set doesn't come with a motorcycle birthday card, it is real easy to make one with the included elements. I was intrigued by the motorcycle box, but sending it all the way to Ohio wasn't a good idea to me. Instead, I used elements from various parts of the kit. 

Motorcycle birthday card 1

I used the offset from the box to make a mat for my motorcycle and the card base. To keep the card quick and easy, the Stars and Stripes motorcycle printable (no need cutting all the little pieces of the bike and reassembling them) and the decorative bike pieces from the SVG (made into a Print n' Cut) gave the motorcycle a dimensional, pieced together look fast. The flag shape and sentiment (made by me) was added to the cycle offset card base along with the kit's highway lane stripe to complete my shaped motorcycle birthday card. 

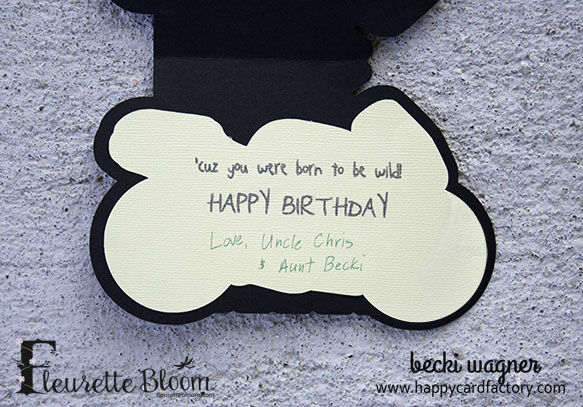
Motorcycle birthday card 2

For the inside, I added a sentiment on another offset. Adds a nice little touch. I really hope that kid likes his card. Chances are he will probably destroy it within an hour. 

To make your own motorcycle card, check out the Motorcycle Racing 3D SVG kit!


Tuesday, September 22, 2015

You Rock - Star Shaker Card

Hi All! 
Ilda back with you today to share my You Rock - Star Shaker Card.

I have to say I had so much fun creating this card! 
Despite the glittery mess I made, I  love how it turned out :)


The files to create this card come from Fleurette Bloom's  recently released Rockin' Quick Cards and are now available as a FREE gift for a limited time! Click the link for details.
The stars I used to create the shaker portion of the card come from Stars & Stripes Frame.

Here is a visual breakdown of the card...
Recently Amy from the DT did this, I thought it was GENIUS! 


Hope this has inspired you to make your own Rock Star card. 


Thanks for stopping by!
Happy Crafting  :)

Monday, September 21, 2015

Rockin Piano Card - Free Gift & Announcement!

Hello Crafty Friends!  KimberlyRae here with some Exciting news to share with you.  I have come back to join Fleurette Bloom's design team!  WooT!  Thank you, Fleurette, I'm so happy to be Back!  [Happy Dance]   I'm looking forward to working with you and the rest of the team :)

I just love all that Fleurette Bloom Designs has to offer!    Here's a Piano Card, I made from Rockin' Quick Cards by Fleurette Bloom Designs.  

This kit is Awesome!  You will enjoy every quality file and  you will also enjoy Free files to create your very own card.

RockinPianoQuickCardbyKimberlyRaeWEBFB

To make this card, I started out with my favorite watercolor paper, for my cardbase [any will work] and then cut the Shoe CardBase and all the elements of the Rose file, located within the SVG files of the kit.

Then, with FB's Rose Stencil [FREE for a limited time @ fbstamps.com] and placing the stencil here and there on the paper, I water colored the INSIDE  of the cardbase with my Zig Real Brush Markers [any die ink or distress inks will work, too]. I used the same markers for the rose and leaves.

RockinPianoQuickCardCUbyKimberlyRaeWEBFB

For the stamped "Happy Birthday" sentiment, I used FB's Stamp Set called "Ice Cream Party" and embossed it with White embossing powder.  Love it on the black background.

The FREE Piano Keys file  and FREE Rose Stencil are only available for a limited time. Make sure you Hurry on over to Fleurette Bloom Designs to get your Free Kit [with a purchase of only $8.98] and check out All she has to offer including SVGs, 3D file Kits, Printables, digital papers and her NEW STAMPS!

I hope you give this FUN set a go.   All the supplies I used are listed below for your quick review.  A complete list of supplies are listed on my Blog.

Thank you for stopping by and have a Crafty Day!
Hugs and Blessings,
KimberlyRae's Blog

Supplies I used:
Free gift w/purchase
 
 FB Ice Cream Party Stamp Set       
   FB Rose Stencil

 FB Piano Key Overlay

Wednesday, September 16, 2015

To The Moon And Back - Water Color Stamped Card


Well....new news, lol! I had a sabbatical from Fleurette Bloom design team. It has been a rough year for me and I just needed a break from lots of things. And, now I feel ready again, and Fleurette was so kind to welcome me back. 
And what a time to return!!! She now is designing stamps! And I've been having a lot of fun playing with different techniques, such as water color, Copics, colored pencils...and on and on. So, my first project back is a shaker card.


I used a piece of Tim Holtz water color paper and set out to create a starry sky. I used various colors of blue. Dried in between layers to get the great water color look. After it was totally dry, I used my anti static powder tool to get rid of any static. I then stamped the stars in Versamark ink and used white embossing powder. I then went back and used some metallic gold water color and painted in those stars. The white embossing acts as a dam and the water pretty much stays put. I like the shimmery look it gives.
 
I then grabbed a circle die and cut a circle in that background piece. This became the shaker window. I backed it with clear acetate and applied foam tape to the back. I filled the window with tiny seed beads in colors of golds and clear. A piece of plain white cardstock covered that to hold the tiny bits in place.


I then created some watercolor in yellows, several layers, then stamping and white embossing the moon. I cut by hand because it was easy and I wanted it right up to the line. I mounted that on foam tape and positioned on the acetate where I wanted it. I then cut out the stars from the cut circle piece and positioned those with foam tape as well. Stamped and embossed the sentiment and cut to create a flag. Added it on foam tape...I love foam tape, lol!
Glued down a few sequins here and there and called this card finished!

Here's your shopping list.

Fleurette Bloom
Sun Moon and Stars stamp set 


Hope you take some time and craft today! Whatever you do, make it fun!

#clearphotopolymerstamps #clearstamps #craftstamps #cardmaking #diy #moonstamp #starstamp #sentimentstamp #iloveyoutothemoonandback #watercolor #stamping #stampin