Saturday, July 31, 2021

My Sweet Petunia Makes My Heart Smile

 Hi Friends! It's Cheryl with the Inkon3 Creative Team! I'm really in love with the My Sweet Petunia Clear Stamp set. Sometimes it's nice to just have to deal with one stamped image for a card!

I googled Petunias to see what different color variations there were and I absolutely fell in love with this white and purple petunia!

First stamp the Petunia bouquet onto white cardstock. Then color with the Copic Markers listed below, or with your choice of coloring medium. Fussy cut the stamped image.

Then on white cardstock and black ink, stencil in the Squiggles background using the Squiggles 6x6 stencil. Trim the stenciled cardstock down to 5" x 3.75".

Trim down grey patterned paper down to 5.25"x4". Adhere to a 5.5"x4.25" card base, then adhere the stenciled cardstock over the grey patterned paper. Next, adhere the Petunia bouquet onto the stenciled cardstock as shown in the pictures. 

Then die cut a sentiment tag using white cardstock. Then stamp the sentiment "You make my heart smile" from the My Sweet Petunia Clear stamp set. Adhere the sentiment onto the bottom of the card.


Copic Colors:
Purples: RV99, RV95, RV93, RV91
Greys: W3, W1, W0
Greens: G99, YG67, YG63, YG17, YG21

Products Used:


Friday, July 30, 2021

Miss You


Happy Friday! 
It's Ceal, here.  Today I am sharing a card using the My Sweet Petunia 3 Layer Stencil. I love how by using this stencil it gives you a no line watercolor look. 
To create this card I started with a white to folding card base and a white panel in which I stenciled on. I used the My Sweet Petunia Layering Stencils along with the Atelier Inks in Sweet Petunia Pink, My Jam Purple and Goddess Green
I laid down the stencils in different direction so my flowers would be along the side of my card.
The Miss you sentiment is by Concord & 9th. With the flowers going along the side I wanted a big greeting. 


Thanks for stopping by and Happy Crafting! 

Sunday, July 25, 2021

Making Cards and Mistakes with Erica

 Hi guys! 

It’s Erica back on the Ink On 3 blog with another card using the My Sweet Petunia stamp and layering stencil set. On this one I made a big mistake, and thought I’d share it with you so you can avoid it yourself. 

If you saw my last blog post, I used this set for those cards too, but on those I ink blended first and then heat embossed the outline stamp on top. For this card, I did not do that.. and it ended up a bit meh… not going to lie. Take it from me, if you want a white heat embossed outline, do that last. 

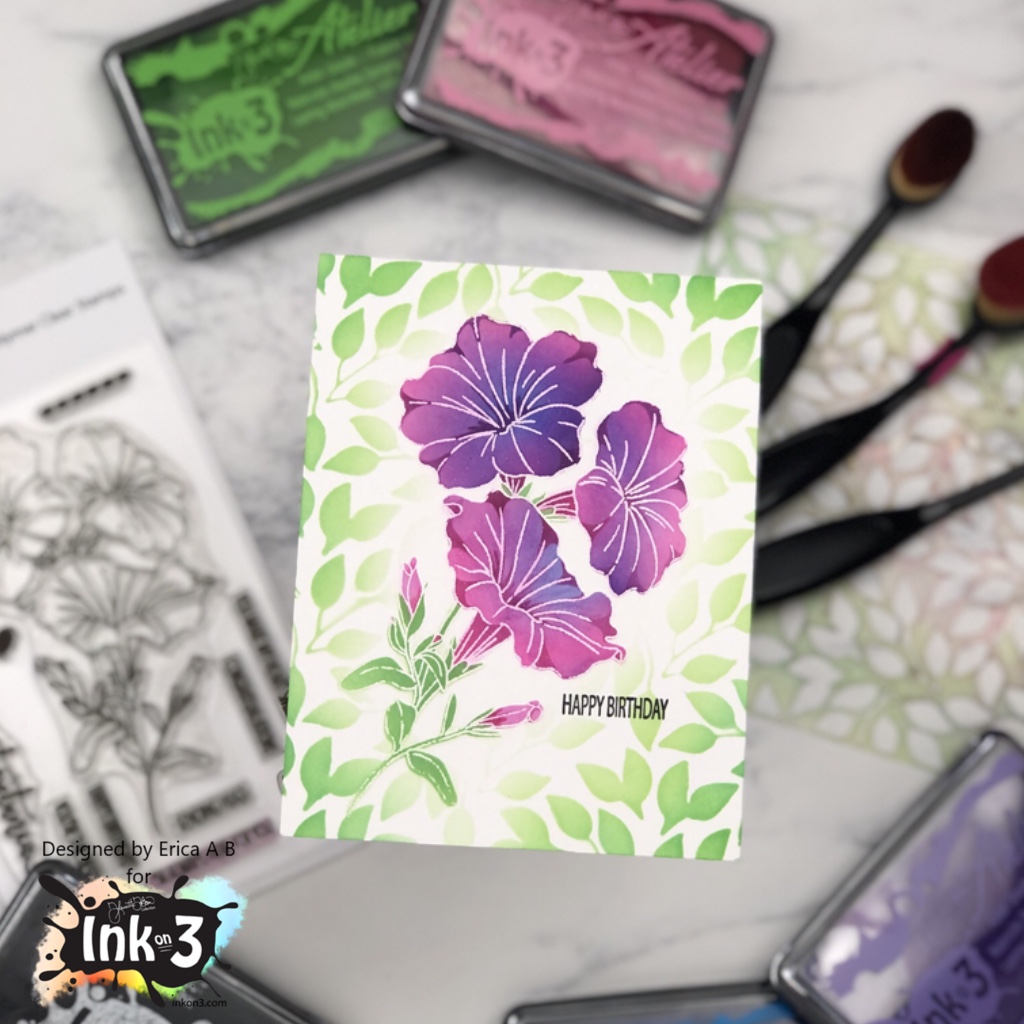
So I started out by heat embossing the gorgeous My Sweet Petunia stamp on white card stock. I’m not sure why I did it this way, I should know better by now, really. Anyway, I grabbed Sweet Petunia Pink, My Jam Purple and Peacock Blue Atelier Inks, some Life Changing Blender Brushes and the My Sweet Petunia layering stencils. 

Right off the bat, I realised what a mistake I had done as the inks are so pigmented and vibrant, they instantly discoloured the white embossed lines. I SHOULD know better by now! And yeah, I said it again, because I really don’t know what I was thinking here. 

Anyway, onward and upwards. I ink blended the My Jam Purple and Peacock Blue to create a deep, vivid look for the flowers and then went softly with Goddess Green for the stem and leaves layer. I tried cleaning up a little, but it’s very easy to smudge and leave marks on the project when doing this, so I did what I felt I could do safely without making too much of a mess. 

Around the flower I also ink blended more Goddess Green using the Leafy Forest Stencil, just to add some softness to the card, which is a true one-layer card if you can believe it! A quick Happy Birthday was stamped up with Blackout Ink and that was it. 

Super simple, and it can work for so many occasions. Just change up the colour scheme and sentiment, and you are good to go! Oh, and ink blend FIRST, and heat emboss when all the ink is dry. Maybe best to leave it overnight to make sure. Take it from me, don’t do it my way, because that did not work out very clean. Having said that, that’s only with white embossing powder, I guess? Maybe gold will be fine? Ok, I’m off to best that theory! See you next time! 

Lots of love and happy crafting from Erica 

Saturday, July 24, 2021

Fruity Atelier Ink Blended Cards

My current obsession? Layering stencils! I used a few colors of InkOn3 Atelier Ink Pads and blended up some fruity backgrounds! 


I love the look of layering stencils! Such an easy way to create customized patterned paper! And I used Atelier Inks for effortless blending! 


My first card uses the Watermelon Slices Stencil Set. I blended Sweet Petunia Pink and Goddess Green Atelier Inks and used Blackout Hybrid Detail ink for the seeds. Blending with the Blackout Hybrid Detail Ink always gives such crisp black details! 


Lemons are my favorite thing about summer! They're so bright and happy! I used the Lemon Squeeze Stencil Set with Bee Sting Yellow and Goddess Green Atelier Inks and again used Blackout Hybrid Detail Ink for the detail layer. 


This last card reminds me of fruit salad! I used the Mixed Fruit Stencil Set and blended Sweet Petunia Pink, Bee Sting Yellow, and Goddess Green Atelier Inks and used Blackout Hybrid Detail Ink for the final layer. 


I finished off all three of the cards by cutting down the panels with a Stitched Rectangle Die and adding the Oh Happy Day Word Die cut from Gold Holographic Cardstock. This set of cards makes me so happy and I hope it brightens your day as well! 

Tuesday, July 20, 2021

Dripping Roses Tutorial with Video! for Ink on

Hello and thanks for stopping by! Today I'm happy to share a project with you using the Triple Roses stamp set and Atelier Inks with a fun technique, including a video.


Using a fun technique to create a handmade card is half the pleasure for me. Traditional watercoloring with Atelier Ink Refills are one of my favorites but it's cool to have something different at times. In the recent release, Ink on 3 has a beautiful new stamp set called Triple Roses. There are giant blossoms that are really versatile to color. Perfect for a fun technique!

I call this dripping roses because it's like the name, the color drips from the edges which are reminiscent of the painted roses from Alice in Wonderland. It can be created by first stamping with Ink on 3's Fadeout Ink pad on watercolor paper. Once stamped and dry, use a paint brush or a water brush from Ink on 3 to add color from Atelier Ink Refills. I keep a paint palette full of them all the time. The Fadeout ink picks up the color and the stamped lines change! Then hit this with a heat tool until dry and add some drips of ink at the edges. Be sure to check out the video tutorial for a full process on coloring this card.


Here is an easy step by step how-to video for creating this card.


SUPPLY LIST:

Does this project bring you lots of new ideas for creating? We would love to hear from you! Thank you for visiting us today and I look forward to sharing again with you soon!

Jenny Hall


Friday, July 9, 2021

Christmas in July Poinsettia Card

It's no secret that I LOVE all things winter and Christmas! I get so happy when July comes around because it gives me an excuse to share Christmas cards again! 


I wanted to have bold images against a wintery background, so I placed a snowflake stencil over a piece of black cardstock and used Shark Tooth White Atelier Ink to create the background for my card. For a bit more interest I spattered on some Liquid Pixie Dust. I love how easy it can be to create a magical background! 


I stamped out flowers, leaves, and twigs from the Poinsettia Stamp Set with Blackout Hybrid Detail Ink and colored them with Copic Markers and cut them out with the coordinating Poinsettia Die Set. I arranged them onto my background with foam tape for dimension. I wanted a simple sentiment that wouldn't take away from the background and bright images, so I stamped a sentiment from the Merry & Bright Stamp Set with Juicy Watermark Emboss Ink and heat set it with Arctic White Ultra Fine Embossing Powder


No Christmas card is complete without adding even more shimmer so I covered my colored images with Liquid Pixie Dust! Now they sparkle and shine and make my heart so happy! Thanks so much for joining me! 

Wednesday, July 7, 2021

Squiggles Birthday Wishes Rainbow Card

Simple, Squiggles Stencil,  Birthday Wishes, Rainbow, Card,Inkon3,Card Making, Stamping, Die Cutting, handmade card, ilovedoingallthingscrafty, Stamps, how to,Sweet Petunia,

Hello friends!

I hope you are having a wonderful week. My week has been crazy busy here at home and as well as work, but I managed to squeeze a little time for this sweet and simple birthday card featuring goodies from Inkon3

CARD RECIPE
  • Using the Squiggles Stencil Ink blend in rainbow order using Atelier Inks linked below. Overlapping a few of the inks will give you the rainbow gradient colors.
  • Using a stamping tool, line up sentiments from the Sweet Petunia Stamp Set and stamp them using Blackout Ink.
  • Trim panel and glue onto the card base.
  • Add coordinating colored pearls to the blended background for embellishments.
Simple, Squiggles Stencil,  Birthday Wishes, Rainbow, Card,Inkon3,Card Making, Stamping, Die Cutting, handmade card, ilovedoingallthingscrafty, Stamps, how to,Sweet Petunia,

This was a super simple card to make and came together fairly quickly. I hope this rainbow Squiggles Birthday Wishes Card inspired you today.

Thank you for stopping by and until next time... Happy Crafting!
Ilda 👋

SUPPLIES
Squiggles Stencil
Squiggles Stencil
Shop at:
IO3
Sweet Petunia Stamp Set
Shop at:
IO3
ATELIER SWEET PETUNIA
Shop at:
 IO3
ATELIER BEE STING YELLOW
Shop at:
IO3
ATELIER PEACOCK BLUE
Shop at:
IO3
ATELIER MY PURPLE JAM
Shop at:
IO3
BLACKOUT INK
BLACKOUT INK
Shop at:
IO3
NEENAH SOLAR WHITE 110
Shop at:
SSS | AMZ | HBS
INK BLENDER BRUSHES
INK BLENDER BRUSHES
Shop at:
SSS | SK
New Mini Misti
New Mini Misti
Shop at:
SSS | SB
AMETHYST PEARLS
AMETHYST PEARLS
Shop at:
SSS | SK
BUBBLEGUM PEARLS
BUBBLEGUM PEARLS
Shop at:
SSS | SK
RIPE PERSIMMON PEARLS
Shop at:
SSS | SK
LEMON BURST PEARLS
LEMON BURST PEARLS
Shop at:
SSS | SK
SEAFOAM PEARLS
SEAFOAM PEARLS
Shop at:
SSS | SK
BEARLY ART PRECISION GLUE
Shop at:
SSS | AMZ
Tim Holtz 8.5 Inch Trimmer
Shop at:
SSS | SB | TS UK
To make supplies easy for you to find, I have linked them above. If something is no longer available I will link to a similar product. Affiliate links may be used depending on the product linked. Please help support my blog by using these links while shopping at no additional cost to you. For more information about the affiliates I use, please visit my disclaimer here. Thanks so much for all your support!