Showing posts with label Leafy Forest Stencil. Show all posts

Sunday, July 25, 2021

Making Cards and Mistakes with Erica

 Hi guys! 

It’s Erica back on the Ink On 3 blog with another card using the My Sweet Petunia stamp and layering stencil set. On this one I made a big mistake, and thought I’d share it with you so you can avoid it yourself. 

If you saw my last blog post, I used this set for those cards too, but on those I ink blended first and then heat embossed the outline stamp on top. For this card, I did not do that.. and it ended up a bit meh… not going to lie. Take it from me, if you want a white heat embossed outline, do that last. 
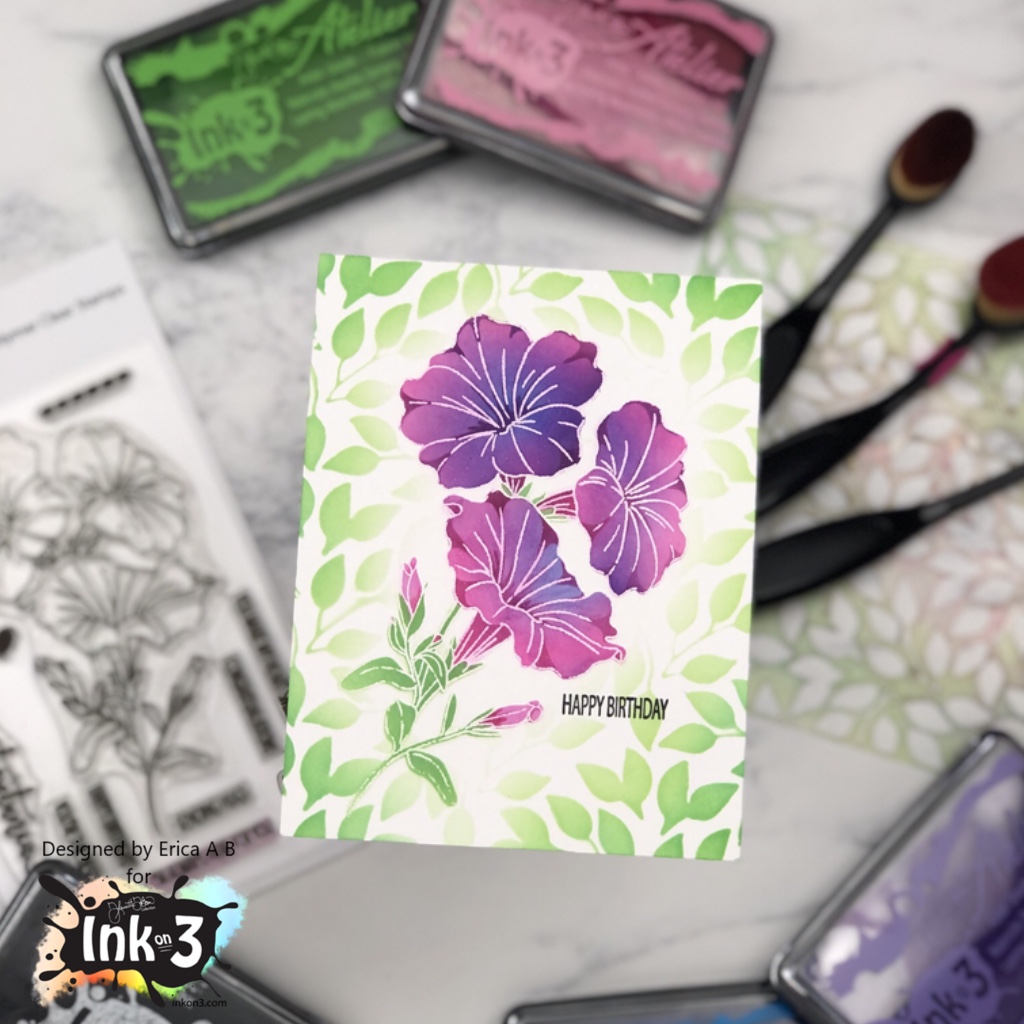
So I started out by heat embossing the gorgeous My Sweet Petunia stamp on white card stock. I’m not sure why I did it this way, I should know better by now, really. Anyway, I grabbed Sweet Petunia Pink, My Jam Purple and Peacock Blue Atelier Inks, some Life Changing Blender Brushes and the My Sweet Petunia layering stencils. 

Right off the bat, I realised what a mistake I had done as the inks are so pigmented and vibrant, they instantly discoloured the white embossed lines. I SHOULD know better by now! And yeah, I said it again, because I really don’t know what I was thinking here. 

Anyway, onward and upwards. I ink blended the My Jam Purple and Peacock Blue to create a deep, vivid look for the flowers and then went softly with Goddess Green for the stem and leaves layer. I tried cleaning up a little, but it’s very easy to smudge and leave marks on the project when doing this, so I did what I felt I could do safely without making too much of a mess. 

Around the flower I also ink blended more Goddess Green using the Leafy Forest Stencil, just to add some softness to the card, which is a true one-layer card if you can believe it! A quick Happy Birthday was stamped up with Blackout Ink and that was it. 

Super simple, and it can work for so many occasions. Just change up the colour scheme and sentiment, and you are good to go! Oh, and ink blend FIRST, and heat emboss when all the ink is dry. Maybe best to leave it overnight to make sure. Take it from me, don’t do it my way, because that did not work out very clean. Having said that, that’s only with white embossing powder, I guess? Maybe gold will be fine? Ok, I’m off to best that theory! See you next time! 

Lots of love and happy crafting from Erica 

Thursday, November 26, 2020

Two-for-One Ink Technique with Erica

 Hi guys! 

Erica here on the Ink On 3 blog today with a couple of cards, using the same basic supplies but with VERY different looks! Like an utter nutter though, I didn’t get a photo of the backgrounds before I cut them up... Ay, mama! 


Oh well, hopefully I can explain it well enough so you get what I’ve done. If not, I can always make a video and show you! 

Right, let’s get to it: Before I did anything else, I took the Leafy Forest stencil and sprayed it with a very generous layer of Pixie Spray and let that cure for a few minutes. While that was doing its thing, I got some card stock out for ink blending and also water colouring. Oh and ALL THE ATELIER INKS! 

Oh yes, I used pretty much all of them: Bee Sting Yellow, Marigold Orange, Sweet Petunia Pink, Marilyn Red, My Jam Purple, Peacock Blue, Trinity Teal and Goddess Green. The only two I didn’t use for the ink blending were Paint It Black and Twiggy Brown. Using a different Life Changing Blender Brush for each colour, I blended the colours on the diagonal, and vividly, for the first panel. 

Then to get a two-for-one and not wasting all that ink, I got a water spritzer out and misted the stencil. It’s important to give the water a bit of time to activate the ink though. Then, in quick and firm moves, place a panel of water colour card stock on top of the stencil, trying not to move it too much. Press down, again, without moving the paper too much and turn it over quickly. Set aside to dry, or use a heat tool to speed this step up. 

This technique gives a lovely soft, water coloured look with very little hassle. I absolutely love doing this, and do it practically every time I ink blend as it makes me feel like I get the most out of my supplies. 

So, back to the first panel. This one I used a scalloped rectangular die on to trim it down, as well as a celebrate word die in the middle, before adding it to a white card base. The celebrate word die I cut out of black card stock three times and layered up with liquid glue. To make the top layer, with the ink blended pattern, pop a little bit more, I heat embossed it with Clear Gloss embossing powder before adding it to the card. That’s it! 

With the second panel, I did a similar thing: I used a rectangular stitched die to trim it down. This one I added to a black panel, before adding that to a card base. The black really made the stencil print pattern stand out. 

I wanted to add more to this, so I grabbed my Mini MISTI and the flower from the BeYOUtiful stamp. This I stamped up with Paint It Black Atelier ink, all over the panel. I really love how this turned out! To finish this card off, I simply cut a ‘hello’ diecut out of black card stock three times and layered these up. This I added to the card and with that, the second card was done too. 


I hope you like these cards and will give this stencil printing technique a go! If you prefer, you can skip the ink blending and just dab your ink pads on the stencil, mist it and then place your paper on top. 


Lots of love and happy crafting from Erica 

Saturday, November 14, 2020

Little Birdie Cardinal Card

There's a new stamp set in the InkOn3 shop and it covers all of your bases! There are flowers, twigs, lots of sentiments, and of course a little birdie! 


I saw the Little Birdie Stamp Set and immediately wanted to create a Christmas cardinal card! I wanted a simple background, so I grabbed the Leafy Forest Stencil and Goddess Green Atelier Ink. As I blended the ink over the stencil I realized that my background was looking too "spring." The Goddess Green Atelier Ink is a gorgeous green color, but a little too bright for my Christmas background. I added a little bit of Twiggy Brown Atelier Ink over the Goddess Green Atelier Ink and the result was a pretty olive green colored background. Perfect! 


I used Blackout Hybrid Detail Ink to stamp the bird, branch, and berries from the Little Birdie Stamp Set and colored them with Copic Markers. I used scissors to trim them out and added them to the card with a mix of liquid adhesive and foam tape. I keep my Liquid Pixie Dust in a Small Fine Tip Water Brush Pen and added shimmer to all of the red areas of my coloring. 


I used Blackout Hybrid Detail Ink to stamp a sentiment from the Little Birdie Stamp Set at the bottom of my card - and that's it! I hope you check out the Little Birdie Stamp Set - it's in the shop NOW

Tuesday, July 14, 2020

No Coloring with Vibrant Stenciled Backgrounds

Have you heard my top secret-est secret of all time? I don't enjoy coloring! Gasp! I know I know! But it stresses me out! Good news for me - leaving an image completely uncolored seems to be all the rage right now! So you know I hopped on that train using the gorgeous large floral from the BeYOUtiful Stamp Set from InkOn3!


I quickly made a set of 4 cards using the Leafy Forest Stencil, the BeYOUtiful Stamp Set, and a rainbow of Atelier Inks! And of course some Liquid Pixie Dust!


I always try to bring interest to my cards in one way or another. Since I'm not doing any fancy coloring on this card I decided to use my vibrant Atelier Inks to make pretty backgrounds!


I made four backgrounds with the rainbow of Atelier Inks and I kept the inks darkest at the bottom and lighter towards the top for each background. I temporarily held the Leafy Forest Stencil in place on a piece of white cardstock and blended my inks with a blender brush. I mixed together colors next to each other in the rainbow to get pretty blends - Peacock Blue with My Jam Purple and Marilyn Red, Marigold Orange, and Bee Sting Yellow. Then I made two backgrounds with just a single color of Atelier Ink - Paint it Black for one and Goddess Green for the other.


Now let's add something on top of the pretty backgrounds! I used Blackout Hybrid Detail Ink to stamp the large flower and a few leaves from the BeYOUtiful Stamp Set and then trimmed them out with scissors. I added them with foam tape because every card needs a little pop, right?! I used Blackout Hybrid Detail Ink and stamped a couple of different buildable sentiments onto the cards.


It's so hard see in the photos ( so definitely watch the video! ), but I jazzed up the flowers and leaves with some Liquid Pixie Dust! I keep mine in a Small Fine Detail Waterbrush so I can easily brush some glitter on my images! I hope you enjoyed this pop of white! See you soon!

Wednesday, June 10, 2020

Heat Embossing Surprise with Guest Designer Laura


Hi everyone! It's Laura Volpes here and today I am back with my second post as a Guest Designer for InkOn3 this month! I experimented some more with the Atelier Inks, and this time I wanted to try using them with heat embossing. The results were surprising - make sure to check out the video at the end of this post to see what happened!

For the background of my card I used the Leafy Forest Stencil. I started by blending some My Jam Purple ink through the stencil on some watercolor cardstock. I then heat embossed the leaves with clear embossing powder, so that I could go over the entire background with Peacock Blue ink without covering the leaves. I also added some shimmer with Liquid Pixie Dust.


For my focal point today I used the Forever Friends stamp set. I stamped the image with InkOn3 Blackout ink and I colored it with Karin Brush Markers Pro. Here is a list of the markers I used
  • Fox: Copper Brow, Warm Grey 1, Blush
  • Bunny: Warm Grey 3, Blush
Once I was done coloring, I cut out the image with my scissors.


I die cut a panel out of some white cardstock and I glued it to the background. I heat embossed the sentiment with white embossing powder over some black cardstock and I finished off the card with some blue crystals.

Don't forget to check out my video for a step by step tutorial and to see what happened with my heat embossing experiment!


Thank you all for stopping by and have a great day!

Thursday, April 30, 2020

5 Easy Stenciled Background Cards + Video


Hi everyone, welcome back to the Ink On 3 blog!  Stencils are a great way to lay down a lot of color at once.  If you mix stencils with different mediums, you can even introduce an element of texture to your cards/scrapbook pages/bullet journals/etc.  In the video below, I will showcase five easy backgrounds using one stencil and turn them into cards.  You can mix and match techniques for more dimension or more coverage, depending on what you need for your future Ink On 3 projects!


Hey thank you so much for checking out my video on how I made these cards!  Do you all have stamp sets from Ink On 3 that you would like me to use in a future project?  Let me know in the comments below!  If you like what you've seen from me, make sure you subscribe to my YouTube channel and give me a follow over on Instagram!  Talk to you all very soon!


Materials:


Ink On 3 - Atelier Fusion Ink
Ink On 3 - Blackout Ink


Jaycee Gaspar


Tuesday, April 21, 2020

Fox and Bunny Hugs - New Release

Hi everyone! It’s Jeannie (InsideoutJeans) on the blog today with Ink on 3’s stamp set named Fox and Bunny Hugs stamp set along with the Leafy Forest stencil. These two are part of the new release and there's a bundle on sale right now, which you can find here


Also, today is the last day for the 25% sale that Ink on 3 is having in conjunction with the Spread Joy, Not Germs blog hop. Use the code: SPREADJOYNOTGERMS for 25% on the Ink on 3 site. 

I have a video for these two cards but generally for both my cards, I decided to use Atelier Inks re-inkers mixed with some shimmer paste, specifically Goddess Green and Bee Sting Yellow with the Leafy Forest stencil. I had leftovers of the shimmer paste mixture so I added the excess a second card. 


I colored up the Fox and Bunny Hugs main image stamped in the Blackout ink and Fadeout ink so I could do a normal coloring and no-line coloring. I wanted to create two different looks for the cards. 


If you're interested in all the steps for how these cards came together, come by the YouTube channel for the full process video HERE

Thanks for stopping by today and I hope you get inspired to create. Come back again soon for more inspiration and ideas! Happy Crafting! 


Tuesday, April 14, 2020

Encouragement Card with Atelier Inks and the New Release

Hiiiii!!! I've been keeping a HUGE secret! I've joined the InkOn3 design team and I'm SO excited! Honestly I wanted to join this AMAZING team a while ago, but the timing wasn't right for me. AND NOW IT IS!! Ahhhhh!!! So let's jump right in to my first project!


I started with the NEW Leafy Forest Stencil. It's so detailed with leafy goodness! I sprayed the back with Pixie Spray and adhered it onto the front of my card and blended on some Atelier Inks. This is my VERY FIRST TIME using these inks and they are even more AMAZING than I thought they would be! They are so thick and creamy and wonderful! And I got all of this color with just 3 inks! I used Marilyn Red, Bee Sting, and Peacock Blue - the primary colors - and I made sure to overlap them to get the orange, green, and purple colors. I love that you can blend these inks together to get even more colors!


Once my background was done I thought it needed a bit more oomph. I keep some Liquid Pixie Dust in a Small Watercolor Brush, so I flicked some all over my background for subtle shine and texture. But of course that wasn't enough! I smooshed some Paint it Black Atelier Ink onto my work surface, added a bit of water, and spattered the ink onto my background.


The new Fox and Bunny stamp set is adorable! And perfect for sending a paper hug during these questionable times. I stamped the image and the sentiment onto white cardstock using Blackout Hybrid Detail Ink. This ink has been a staple in my craft room for quite some time! I love that it stamps crisp and black and you can use a variety of coloring mediums with it. I cleaned off my stamps with an Ink Off Cloth and the NEW Ink Off Stamp Cleaner. This cleaner is so fun! It comes in a stamp pad and it cleans BEAUTIFULLY!


I colored my image with Spectrum Noir Triblend alcohol markers and cut it out with scissors. I popped it up onto my card with foam tape and added a coating of Liquid Pixie Dust to the fox and bunny.


That completes my card! I hope you love this first project for InkOn3! You can head over to the InkOn3 shop to pick up these AMAZING products! I'll see you soon!
