Saturday, February 12, 2022
Coloring With Ink Blending
Wednesday, December 9, 2020
Basic Starter Watercoloring with Guest Designer Melinda
Happy hump day beautiful people! Today I’m going to share a card technique that I love because the painting is pretty quick and simple. This one will be great for those of you learning to watercolor.
* Cut card base 4x9 inches and top piece at 3 3/4x 8 3/4 inches
* Take the Pondie stencil and some texture paste and smear across the center of your top piece. Set aside to dry while you make the rest of the card.
* Cut 6 1/2 x 8 inch piece of watercolor paper and lay down the large floral and the leaves in the lower left corner of your paper. Stamp the flower with My Jam Purple and the leaves in Trinity Teal. The bud I stamped the top in purple and the lower part with the teal. Flip your paper and repeat the stamping. If you have a stamp positioner leave your stamps in position. If you don’t, no worries you’ll just skip a step.
* Smear some Peacock Blue, My Jam Purple, Trinity Teal and Goddess Green Atelier inks on your craft mat or a plate like I used. Wet the whole flower with your water brush, pick up bits of blue and purple, dab them randomly and just let the ink flow and do it’s thing. Paint the leaves with teal and green.
* After you color everything let it dry. Repeat the stamping process to bring back the detail. Skip this if you don’t have a positioner.
* Move your stamps to the lower right corner and repeat the above steps.
* Stamp the centers of the large flower in black and use a black pen for your bud. Add some white gel pen highlights.
* Fussy cut everything out and set aside the extra flower and bud. I used all my leaves.
* I used a slim line frame to frame my center and arranged the flowers and leaves until I was happy with the look. I popped one of the large flowers at each corner and glued everything else to the top panel. I needed a birthday card so I used this sentiment, that like the frame was kicking around on my desk.
I hope you’ll give this technique a try. It’s great for playing around with and getting a feel for watercolors. Have a great rest of the week and be well!
Monday, July 6, 2020
Stencil Watercoloring - Guest Designer Judy
Friday, June 26, 2020
Masculine Koi Pond Card
I made the card in portrait and landscape orientation! Which one do you prefer?
First I created a 5.5"x 4.25" card base using white card stock. Then I used a rectangle die to cut out a panel that's slightly smaller than the card base. Next, I used distress oxide ink in Tumbled Glass and a blending tool to add a light blue background to the lower right hand corner of the card. Place the Wavy stencil over the light blue background and with a blending tool and Peacock Blue Atelier Ink, blend in the atelier ink concentrating on the lower right hand corner and lightly bring in the color towards the center of the card to create an ombre look.
From the Koi Pond stamp set, stamp out the Koi images of your choice using Blackout Hybrid Detail Ink, color with your choice of coloring medium and then fussy cut. For the Lily Pads, I first stamped the largest lily pad stamp using the Goddess Green Atelier Ink, then I used the Peacock Blue on the next layer, and Marigold Orange on the last layer. The Atelier Inks worked so well when layered! Fussy cut the lily pads.
Adhere the panel with the stenciled waves onto the card base. Then position the fussy cut images, and sentiment flags onto the card front as shown in the picture above. Trim off any excess of the sentiment flags that extends beyond the Koi. Adhere the fussy cut images and sentiment flags onto the card and there you have it!
Tuesday, June 16, 2020
BeYOUtiful Friend
I went ahead and colored everything in using alcohol markers (colors listed below). Originally, the florals were going to be in the bottom right hand corner of the card but I decide to flip it around so the card panel read horizontally and the florals ended up in the bottom left corner.
I pulled out my Goddess Green Atelier Ink and ink blended in the top right hand corner. I didn't want to be too heavy handed and wanted a soft ink blend. I decided to use the new Wavy stencil to add a bit of interest to the background. I just went over the area I already blended with additional ink along with the stencil and it added a subtle interest to the background. I wanted to add a bit of balance so I added a little bit of the Goddess Green Atelier Ink to the bottom left hand corner as well.
For the sentiment, I was able to pick and choose my own sentiment and stamped it using Ink on 3's Blackout Ink. To finish off the card, I used some embellishments to surround the sentiment and added a bit to the remaining white space.
*Ink on 3 - BeYOUtiful: https://bit.ly/2Ug0bKy
*Ink on 3 - Fadeout Ink: http://bit.ly/2RulfMP *Ink on 3 - Blackout Hybrid Ink: http://bit.ly/2YAStuf *Ink on 3 - Goddess Green Atelier Ink Pad : http://bit.ly/3aXAZzk
Tuesday, April 21, 2020
Fox and Bunny Hugs - New Release
Thursday, January 16, 2020
Quick But Bright You're Special card with Erica
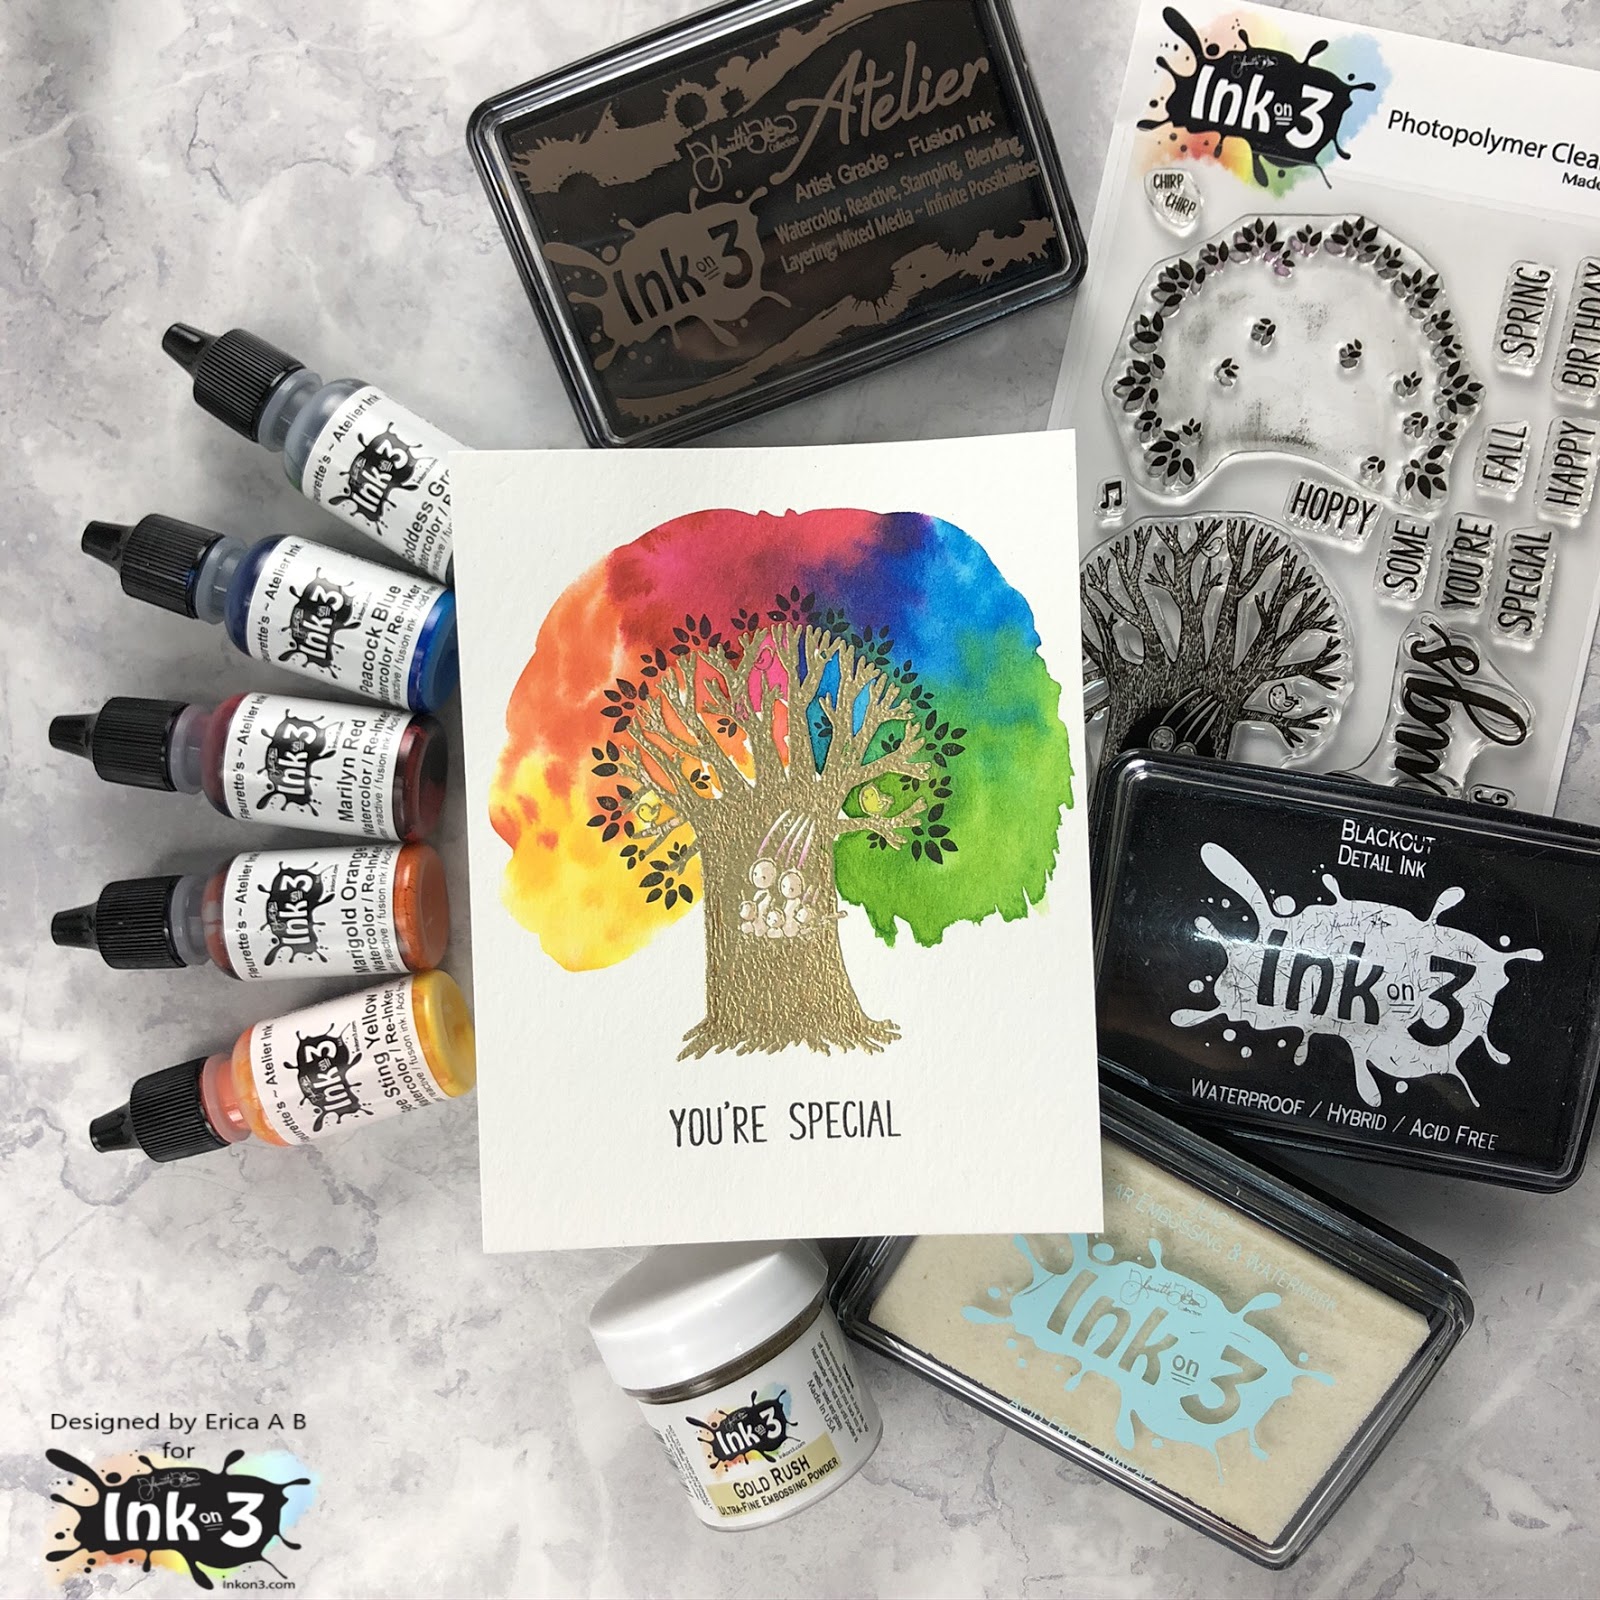
Erica back on the Inkon3 blog today with a quick but very bright card! I have used a new-to-me stamp set, Bunny Hugs, and I used the Atelier Inks to add colour.
To start with, I heat embossed the tree trunk in Gold Rush embossing powder. I used the Juicy pad to stamp it up before sprinkling the embossing powder very generously over the panel. This is water colour paper, Canson XL, that's been cut down to 4.25"x5.5".
After adding some colour to the actual tree trunk, with the help of the Twiggy Brown ink pad as I don't have the re-inker yet, I got the canopy part of the tree very wet and added colour to it by dabbing a paint brush filled with ink in it. Doing it this way, I feel, adds a bit of texture and you get that lovely natural spreading of the colour.
From left to right I have used Bee Sting Yellow, Marigold Orange, Marilyn Red, Peacock Blue and Goddess Green.
To make sure the canopy was dry, before I stamped up the leaves, I used my heat gun on the panel to set the colours. With the help of the MISTI, I then stamped the leaves with Blackout Ink until they were nice and solid. I also added a sentiment 'You're Special' from the Bunny Hugs set, under the tree.
I love a bit of heat embossing and a splash of colour for a quick card! What do you think?
If you are in the Phoenix area this weekend, Jan 18-20th, and are attending Creativation, make sure to stop by the Inkon3 and the Picket Fence Studios booths as I, and the rest of the teams, will be demoing the Atelier inks there! You will get to see these in action and try them out for yourself too!
Thanks for stopping by today, I hope you found this inspiring and will give it a go yourself. Oh, I made a video too! It's over on my YouTube channel if you wanted to have a look.
Lots of love and happy crafting from Erica
PS If you do attend Creativation, make sure to some up and say hello!
Saturday, November 9, 2019
Atelier Inks & Big Bold Magnolias
- Artist Grade Quality
- Specialty, Water Reactive, Fusion Ink, Acid-free and archival
- Water coloring (remains bright even after dry)
- Stamping, Blending, Embossing
- Color Layering
- Artistic, Bright, Crisp Impressions,
- Alcohol / Copic Marker friendly (air dry or heat set)
- Full coverage on solid stamp images
- Fun effects - After inking surface, spritz with water.
- Buttery Smooth - Create beautiful blended backgrounds, using a blending tool or brush.
- Blend over stencils.
- Works on most paper surfaces.