Tuesday, November 30, 2021

Love Birds Planner Pages

Hello Crafty Friends! I'm going to go back to my roots and start creating planner layouts from scratch again! I like starting off with some dot grid pages because it provides some points of references, but from a distance, you can hardly notice that the pages has a grid at all! The planner layout below is for a B6 ring planner, but you can adjust the boxes to whatever planner you like to use!


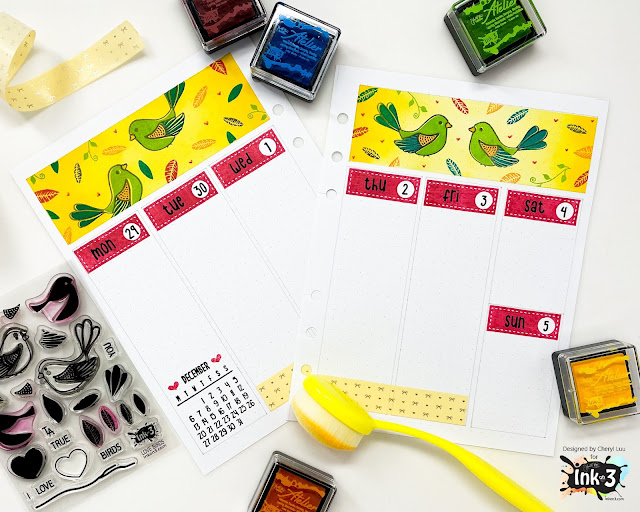
The daily boxes are 1.5" wide, which is standard for most planners, the top rectangle is 1.5" high and the width to match the three daily boxes. 


First, I masked off around the large top rectangle. Then I used a blender brush and applied the Bee-Sting Yellow Atelier Ink to create a background. You can saturate the color on the sides to create an ombre look.  Leaving the mask on, stamp the birds, and feathers from the Love Birds Clear Stamp Set. I also used a vine from the Holiday Wreath Clear Stamp Set. With a red pen, draw little hearts in random open spaces.


Remove the mask, and then use date stamps or stickers for each day of the week. Stamp a calendar on the lower left hand corner of the left planner page. Then add some washi tape to the bottom for a little more deco!

Isn't this such a fun and pretty layout!?


Inkon3 Products used:


Saturday, November 27, 2021

Easy Masking with Dies

I love easy techniques and I have an easy masked background to share with you! I used Atelier Inks and some Reverse Confetti stamps and dies for this wintery card. 


I stamped a bunch of snowflakes all over my card with Blackout Hybrid Detail Ink and then used the coordinating die set to cut masks for each image from masking paper. 


I placed the masks over the stamped images and then pulled out some Atelier Inks to blend over my background. I started with My Jam Purple at the bottom, Trinity Teal in the middle, and Sweet Petunia Pink at the top. I added some spatters of shimmer watercolor and removed the masks. I love the look! The masks leave a sort of 'halo' around the stamped images that's so fun! 


I planned to make this a one layer card, but I forgot to stamp a sentiment when I was stamping the snowflakes, so I stamped one onto white cardstock, trimmed it out, and popped it up onto my card. 


Thanks so much for joining me! I'll see you soon! 

Saturday, November 13, 2021

NEW RELEASE! | Faux Watercolor with Atelier Ink Cubes

There's a new release from InkOn3 and I used one of the new stamp sets and some Atelier Ink Cubes to create an Autumn themed faux watercolored card. 


The new Thankful For You Stamp Set has solid and outline leaves that you can use together or separately. I lined up the solid images on my card using my Misti and inked them up with Marilyn Red, Marigold Orange, and Bee Sting Yellow Atelier Ink Cubes. I spritzed them with a bit of water and stamped them onto my card giving me a faux watercolor look. 


I stamped the outlines with Blackout Hybrid Detail Ink but I offset them to add to the whimsy of the background. I added some flicks of gold watercolor to fill in any empty spaces. 


I used Blackout Hybrid Detail Ink to stamp a sentiment from the Thankful For You Stamp Set, cut it into strips, and lined the bottom with red cardstock and popped up the strips with foam tape to finish the card. Thanks for joining me! 

Friday, November 5, 2021

Thankful for You


Hello Everyone! 
It's Ceal, here. Today I am sharing a card using the Hey Gorgeous set and the Thankful for You set that just released. 

To create this card I started with a top folding white card base and a white panel. I stamped the image using Blackout ink and colored it using alcohol markers. I stamped the  image again on some patterned paper and fussy cut out the hat and then added some of the leaves from the Thankful for You set to the hat. 
To finish the card I added a sentiment. 


Until next time Happy Stamping!

Wednesday, November 3, 2021

Just Breathe Encouragement Card - Rainbows with Atelier Inks

Just Breathe, Encouragement Card,Penguin Palace, Ink On 3,Collaboration Hop,Ink Blending,Coloring with Atelier Inks,Rainbow, Koi, Fadeout Ink, Card Making, Stamping, Die Cutting, handmade card, ilovedoingallthingscrafty, Stamps, how to,

Hello, again my friends, Ilda here πŸ‘‹

I am back with a card I created as part of a collaboration Hop between Inkon3 and Penguin Palace Stamps which is happening over onπŸ‘‰ Instagram

We teamed up to celebrate the Penguin Palace's 3rd Anniversary! Still plenty of time to join.  You can hop along with us on Instagram for your chance to win one of two $25 gift cards (one to the Ink on 3 store and one to the Penguin Palace store). The hop will end on November 7 @ 11:59 PM PDT.

Just Breathe, Encouragement Card,Penguin Palace, Ink On 3,Collaboration Hop,Ink Blending,Coloring with Atelier Inks,Rainbow, Koi, Fadeout Ink, Card Making, Stamping, Die Cutting, handmade card, ilovedoingallthingscrafty, Stamps, how to,

Here is how this card came together.
Just Breathe, Encouragement Card,Penguin Palace, Ink On 3,Collaboration Hop,Ink Blending,Coloring with Atelier Inks,Rainbow, Koi, Fadeout Ink, Card Making, Stamping, Die Cutting, handmade card, ilovedoingallthingscrafty, Stamps, how to,

Hope this Just Breathe Encouragement Card inspired you today and reminds you that it is ok to take a break, stop, relax, do nothing and just Breathe. Especially with all that is going on in the world right now, it's OK! People are more understanding than you realize because after all we all need and deserve a break from time to timeπŸ˜‰

If you want to watch a short video clip of how I colored in the Koi, click the play button below.
Thank you for stopping by and until next time... Happy Crafting!
Ilda 🌈🐟