Saturday, February 27, 2021

Rainbow Atelier Ink Watercolor

I just LOVE to watercolor with InkOn3 Atelier Inks! They are bright and vibrant and move so well in water! 


I used 8 colors of Atelier Ink on my rainbow background - all except Shark Tooth White, Twiggy Brown, and Paint it Black. I stamped a geometric background, but you could certainly use a ruler and a marker and draw your own background. I stamped first with Juicy Clear Embossing Ink and then with Blackout Hybrid Detail Ink and heat embossed with Crystal Clear Ultra Fine Embossing Powder


I smooshed my Atelier Ink Pads onto my work surface and used a wet brush to add color to each area of my background. I tried my best not to put the same color next to each other and to evenly space out each color. Once my background was painted and dry I took clean water and flicked it onto my background and picked it up with an Ink Off Cloth. I repeated this three times to intensify the lift effect. 


I didn't want to cover up a lot of my pretty background, so I added a few die cut sentiments and covered the large "hello" with Liquid Pixie Dust so that it would stand out. And that's it! I hope you give this technique a try! 

Thursday, February 25, 2021

Atelier Inks Water coloring and Embossing with Open Stamps

 Hello everyone it's Cheryl with the Inkon 3 Creative Team! I'm by no means good at water coloring, but I love how water coloring has an organic quality that most other coloring mediums don't have. In addition to being awesome inks to use for stamping Atelier Inks are wonderful to use as water coloring.

Today I'm going to share with you this easy and fun card using embossing and water coloring!


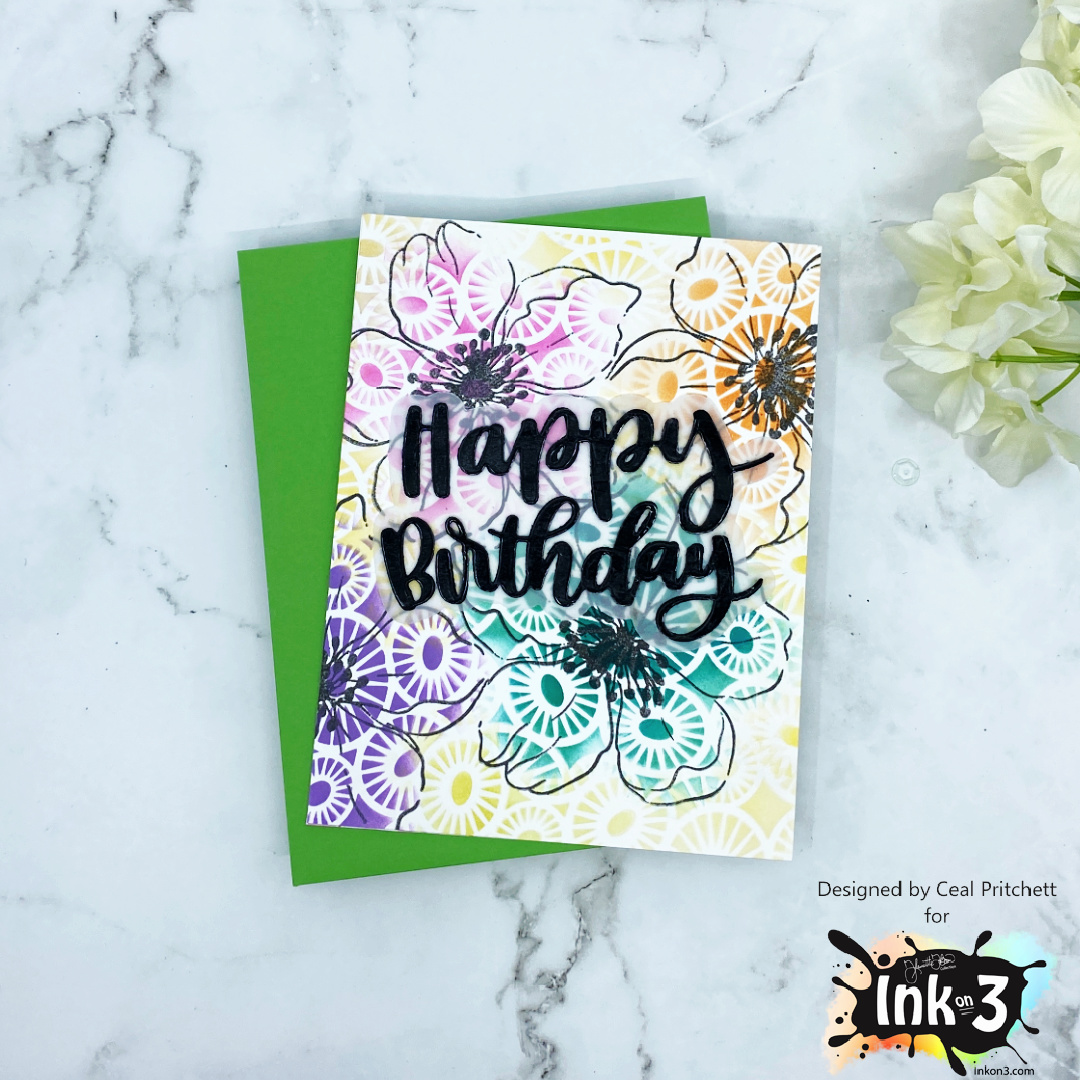
First I used Juicy Clear Embossing Ink & Watermark ink to ink up an open stamp, I stamped the image onto water color paper. Then I sprinkled some Arctic White Ultra-Fine Embossing Powder, next I tapped off the excess powder and then heat set.

You can pick your choices of colors, but be cautious to not pick colors that when mixed together would turn into brown. Unless you love brown, then go for it! I picked My Jam Purple, Peacock Blue, and Trinity Teal. In a painting palette I squeezed a few drops of inks from the Atelier Inks watercolor/re-inkers and dilute it a little bit with water. 

Using a large watercolor brush, lightly moisten the brush with water, and then brush the entire front of the card. Then dip a medium tip watercolor paint brush into your choice of color and drop or brush color at random over the card surface. Because the paper is wet you'll see the color spread! Continue with different colors and different areas of the paper. You can use the large brush and add more water if needed, or use your medium tip brush to pull the color a bit more. Let air dry, or if you're in a hurry, use a heat gun to dry.

Trim the water color paper to whatever your card base size is and adhere to the card base, and that's it!


Tuesday, February 23, 2021

Video Tutorial for creating a Sunrise Rose Garden

Hello and thanks for stopping by! Today I'm happy to share a project with you using the Roses in Bloom stamp set and Atelier Inks with a beautiful sunrise look.


The Roses in Bloom stamp set is filled with wonderful sentiments as well as a few sweet images. My favorite saying from this set is "Thoughts & Prayers are with you", which is perfect to take a moment and let someone know I'm thinking about them in the crazy times we are living in.

 The background panel was so much fun to create! First I added Bee Sting Yellow Atelier ink to one side of a piece of cardstock and then flipped it around to add Sweet Petunia Pink ink. Where the two inks meet, something magic happens. It turns a beautiful shade of orange! I use a slimline sized rectangle die to crop the panel and mount it to a card base after adding a heat embossed sentiment.

The Roses in Bloom stamp set is just gorgeous, isn't it? I chose to make my roses purple, which is a natural color progression in the yellow-orange-pink combo in the background. More gold embossing on the stamped images and then added the watercolor look with Atelier ink refills.
 
 Be sure to check out the video tutorial for a full process on coloring this card.


Here is an easy step by step how-to video for creating this card.


SUPPLY LIST:

Roses in Bloom stamp set: https://inkon3.com/products/roses-in-bloom-4x6-clear-stamp-set?aff=35

Juicy Clear Embossing & Watermark Ink: https://inkon3.com/collections/ink/products/juicy-embossing-watermark-ink?aff=35

Atelier Bee Sting Yellow- Artist Grade Fusion Ink: https://inkon3.com/collections/ink/products/bee-sting-yellow-atelier-artist-grade-fusion-ink?aff=35

Atelier Sweet Petunia Pink- Artist Grade Fusion Ink: https://inkon3.com/collections/atelier-ink-pads/products/atelier-sweet-petunia-pink-artist-grade-fusion-ink-pad?aff=35

Gold Rush Ultra Fine Embossing Powder:

https://inkon3.com/collections/ultra-fine-embossing-powder/products/gold-rush-ultra-fine-embossing-powder?aff=35

Liquid Pixie Dust: https://inkon3.com/products/liquid-pixie-dust?_pos=1&_sid=7b11563fd&_ss=r&aff=35 

Large Waterbrush Pen: https://inkon3.com/collections/paint-brushes/products/large-water-brush-pen?aff=35

Marilyn Red Ink Refill: https://inkon3.com/products/atelier-watercolor-re-inker-marilyn-red-artist-grade-fusion-ink?aff=35

Marigold Ink Refill: https://inkon3.com/collections/re-inkers/products/atelier-watercolor-re-inker-maigold-orange-artist-grade-fusion-ink?aff=35

Bee Sting Yellow Ink Refill: https://inkon3.com/products/atelier-watercolor-re-inker-bee-sting-yellow-artist-grade-fusion-ink?aff=35

Goddess Green Ink Refill: https://inkon3.com/collections/re-inkers/products/atelier-watercolor-re-inker-maigold-orange-artist-grade-fusion-ink?aff=35

Twiggy Brown Ink Refill: https://inkon3.com/collections/re-inkers/products/atelier-watercolor-re-inker-twiggy-brown-artist-grade-fusion-ink?aff=35

Sweet Petunia Pink Ink Refill: https://inkon3.com/collections/atelier-watercolor-re-inkers/products/atelier-watercolor-re-inker-sweet-petunia-pink-artist-grade-fusion-ink?aff=35

Trinity Teal Ink Refill: https://inkon3.com/collections/atelier-watercolor-re-inkers/products/copy-of-atelier-watercolor-re-inker-sweet-petunia-pink-artist-grade-fusion-ink?aff=35

Shark Tooth White Ink Refill: https://inkon3.com/collections/atelier-watercolor-re-inkers/products/atelier-watercolor-re-inker-shark-tooth-white-artist-grade-fusion-ink?aff=35

..  ……

Slimline Modern Embossed Panels dies: https://shrsl.com/2pwgu

Soapy Bubbles Iridescent no-Hole Sequins: https://shrsl.com/28tlg

Marvy Double Sided Jewel Picker: https://shrsl.com/2b566

Trinity Stamps Tidy Tray: https://shrsl.com/2c4f6

Trinity Stamps Blending Buddy Brush:   http://shrsl.com/23yyi

Blending Bar – Platform Base: https://shrsl.com/2f4qz

Blending Buddy and Blending Bar System w/accessories: https://shrsl.com/2f4r5

Die Snips Tool: https://shrsl.com/2qird

Hero Arts Precision glue tube: https://shrsl.com/2k42g

Darice Double Sided Foam Sticky Strips: https://shrsl.com/2951f

MISTI Stamping Tool REDESIGNED: https://shrsl.com/2g8kw

MISTI Creative Corners: https://shrsl.com/2g8kz

MISTI Mouse Pad Cushion: https://shrsl.com/2g8l1

Teflon Burnishing Tool: https://shrsl.com/2g8md

Teflon Ergonomic Tool: https://shrsl.com/2g8me

Neenah Solar White 110 lb cardstock:  https://www.ellenhutson.com/neenah-cardstock-neenah-heavyweight-classic-crest-solar-white-110-lb-25-pk/#_a_238

Neenah Classic Crest Solar White 80 lb cardstock: https://www.ellenhutson.com/neenah-classic-crest-solar-white-25-pk-cardstock/#_a_238

Dual Speed Heat Tool: https://www.ellenhutson.com/dual-speed-heat-tool-wow/#_a_238

EK Success Powder Tool for embossing:  https://www.ellenhutson.com/powder-tool-adhesive-deactivator/#_a_238

Spellbinders Platinum 6 die cut and emboss machine:  https://www.ellenhutson.com/platinum-6-die-cutting-and-embossing-machine-spellbinders-tools/#_a_238

Scor-buddyMini Scoring Board:  https://www.ellenhutson.com/scor-buddy-mini-scoring-board-9x7-5/#_a_238

Tonic 8.5” Guillotine Paper Trimmer by Tim Holtz:  https://www.ellenhutson.com/tonic-comfort-8-5-inch-guillotine-paper-trimmer-by-tim-holtz/#_a_238

EK Success 5” Scissors: https://www.ellenhutson.com/ek-tools-precision-5-inch-scissors-with-sheath/#_a_238

Purple Tape ½”:  https://www.ellenhutson.com/icraft-purple-tape-1-2-in-x-15-yards/#_a_238

Tonic Nuvo Deluxe Adhesive: https://www.ellenhutson.com/tonic-nuvo-deluxe-adhesive/#_a_238

Post It Adhesive Roll: https://www.ellenhutson.com/3m-post-it-adhesive-roll-white-1x400-in/#_a_238

Pixie Spray: https://www.ellenhutson.com/icraft-pixie-spray/#_a_238

Scotch Foam Tape Roll:  https://www.ellenhutson.com/scotch-foam-mounting-tape/#_a_238


Does this project bring you lots of new ideas for creating? We would love to hear from you! Thank you for visiting us today and I look forward to sharing again with you soon!

Jenny Hall


Saturday, February 20, 2021

Lilac Easter Blessings Card


Hello friends, Ilda here from I Love Doing All Things Crafty. I hope you are enjoying your Saturday.

I have a super simple and easy Easter Card to share with you today. This design is easy enough to make one or many if you are thinking of sending some Easter cards to friends this year.

CARD RECIPE
  • Place and position the LILAC DREAMS image into your stamping tool.
  • Ink up the different areas of the image using one color at a time. I began with ATELIER GODDESS GREEN where the leaves are. I then used ATELIER MY PURPLE JAM in the center of the Lilacs and then finished stamping the top with ATELIER SWEET PETUNIA.
  • TIP: Wipe ink off the stamp to avoid color contamination on your ink pads.
  • Line up the Easter stamp from BUNNY HUGS and the blessings from BLESSINGS Stamp Set in your positioner.
  • Use BLACKOUT INK to stamp sentiment.
  • Trim the panel and glue it to a coordinating cardstock panel.
  • Glue to A2 top folding card base.
  • Embellish with gem stickers.
So simple and yet so pretty. Well, at least I think so 😆

Hope you were inspired by my Lilac Easter Blessings Card. Thank you for stopping by and until next time... Happy Crafting!

Hugs,

Connect with me also on my Blog, Facebook Page, Instagram, and YouTube

SUPPLIES
LILAC DREAMS
LILAC DREAMS
Shop at:
IO3
BUNNY HUGS
BUNNY HUGS
Shop at:
IO3
BLESSINGS
BLESSINGS
Shop at:
IO3
ATELIER GODDESS GREEN
Shop at:
IO3
ATELIER MY PURPLE JAM
Shop at:
IO3
ATELIER SWEET PETUNIA
Shop at:
IO3
BLACKOUT INK
BLACKOUT INK
Shop at:
IO3
MINI MISTI
MINI MISTI
Shop at:
SSS | SB | HBS
NEENAH SOLAR WHITE 110
Shop at:
SSS | AMZ | HBS
BEE CREATIVE GLUE
BEE CREATIVE GLUE
Shop at:
SSS | SB | HBS
Tim Holtz 8.5 Inch Trimmer
Shop at:
TS UK
Playful Pastels Gem Stickers
Shop at:
HBS

Thursday, February 18, 2021

Easy Inked Backgrounds - Raccoon Hugs

Hi everyone! It’s Jeannie (InsideoutJeans) on the blog today with Ink on 3’s stamp set named Raccoon Hugs stamp set. This is a set that has been in my collection but I haven't pulled it out and I'm unsure why. The adorable raccoon holding the heart balloon is just so sweet.

I wanted to create some easy backgrounds to go with this image so I just inked up them using the Atelier inks along with some masking tape. Nothing super special, no special items needed. 


Here is my process video so you can see how these three cards came together. 


Thanks for stopping by today and I hope you get inspired to create. Come back again soon for more inspiration and ideas! Happy Crafting! 


Wednesday, February 17, 2021

Coloring Made Easy


Hey everybody!
It's Ceal here. Today I am sharing a technique with you that makes coloring super quick and easy and adds interest to the card. 


To create the card I started with a top folding card base and a white panel cut to the same size as the base.  I randomly stamped the large flower from the BeYOUtiful stamp set over the panel. Next I used the Pondie stencil and Atelier Ink  in Trinity Teal, Sweet petunia Pink, Marigold Orange, My Jam Purple and Bee Sting Yellow. I placed the stencil over each flower and ink blended the color. I used the Bee Sting Yellow to fill in the voids. 

Saturday, February 13, 2021

Clean and Simple Atelier Ink Watercolor

Hi, it's Lynnea! I *almost* made a one layer card using InkOn3 Atelier Inks as watercolors ... and then I couldn't help myself and added a layer! *face palm* Maybe one of these days! 


This card is so simple and you can switch up the sentiment to make any kind of card! I stamped the pitcher, stem, flower, and sentiment from the Posies Stamp Set using both Juicy Watermark and Embossing Ink and Blackout Hybrid Detail Ink. I had to stamp the pieces separately and I wasn't sure I could work quickly enough to use just the Blackout Hybrid Detail Ink, so I stamped first with the Juicy Watermark and Embossing Ink. Once all of the images were stamped I heat embossed them with Crystal Clear Embossing Ink


I used Sweet Petunia Pink and Marylin Red Atelier Inks to watercolor the flower, Goddess Green for the stem, and Trinity Teal for the pitcher. I needed ground my "scene" so I watered down some Twiggy Brown Atelier Ink and added a line of ink under the pitcher. Once the ink was dry I went over everything with Liquid Pixie Dust. I trimmed down the panel just a bit and popped it up onto a white card base. And that's it! See you soon! 

Sunday, February 7, 2021

Video Tutorial featuring Ink on 3's Mirror Image stamp set

Hello and thanks for stopping by! Today I'm happy to share a project with you using the Little Birdie stamp set and Atelier Inks with a beautiful stencil from Ink on 3 to create the mirror image technique.


The Little Birdie stamp set is filled with wonderful sentiments as well as a few sweet images. My favorite saying from this set is "Sending Thoughts and Prayers", which is perfect to take a moment and let someone know I'm thinking about them in the crazy times we are living in.

 The bird image panel was so much fun to create! I started out with the Mirror Image stamp from the Ink on 3 shop. It's a solid rectangle stamp and allows an image to be "picked up" on a piece of paper once it has been stamped onto the rectangle image. Just like that, I had a bird image that was pointing the direction I had in my mind. I then colored the bird with Atelier Ink Refills that act just like liquid watercolors.

I was inspired by the serene look to the Leafy Forest Stencil from Ink on 3 and paired it with idea of featuring it in a frame design. To create the frame, simply place two rectangle dies inside one another. Use the negative space as a mask over the stencil and you will be coloring only the inside of the framed area.
 
 Be sure to check out the video tutorial for a full process on coloring this card.


Here is an easy step by step how-to video for creating this card.


SUPPLY LIST:

Mirror Image Stamp: https://inkon3.com/products/mirror-image-stamp-set-4x6-clear-inkon3-com?aff=35

Little Birdie stamp set: https://inkon3.com/products/little-birdie-4x6-clear-stamp-set-1?_pos=1&_sid=2a9aa4fcb&_ss=r&aff=35

Leafy Forest Stencil: https://inkon3.com/collections/stencils/products/leafy-forest-6x6-stencil?aff=35

Atelier Goddess Green- Artist Grade Fusion Ink: https://inkon3.com/collections/ink/products/goddess-green-atelier-artist-grade-fusion-ink?aff=35

Blackout Hybrid Detail Ink: https://inkon3.com/collections/ink/products/blackout-hybrid-detail-ink?aff=35

Marilyn Red Ink Refill: https://inkon3.com/products/atelier-watercolor-re-inker-marilyn-red-artist-grade-fusion-ink?aff=35

Marigold Ink Refill: https://inkon3.com/collections/re-inkers/products/atelier-watercolor-re-inker-maigold-orange-artist-grade-fusion-ink?aff=35

Bee Sting Yellow Ink Refill: https://inkon3.com/products/atelier-watercolor-re-inker-bee-sting-yellow-artist-grade-fusion-ink?aff=35

Goddess Green Ink Refill: https://inkon3.com/collections/re-inkers/products/atelier-watercolor-re-inker-maigold-orange-artist-grade-fusion-ink?aff=35

Twiggy Brown Ink Refill: https://inkon3.com/collections/re-inkers/products/atelier-watercolor-re-inker-twiggy-brown-artist-grade-fusion-ink?aff=35

Sweet Petunia Pink Ink Refill: https://inkon3.com/collections/atelier-watercolor-re-inkers/products/atelier-watercolor-re-inker-sweet-petunia-pink-artist-grade-fusion-ink?aff=35

Trinity Teal Ink Refill: https://inkon3.com/collections/atelier-watercolor-re-inkers/products/copy-of-atelier-watercolor-re-inker-sweet-petunia-pink-artist-grade-fusion-ink?aff=35

Shark Tooth White Ink Refill: https://inkon3.com/collections/atelier-watercolor-re-inkers/products/atelier-watercolor-re-inker-shark-tooth-white-artist-grade-fusion-ink?aff=35

Liquid Pixie Dust: https://inkon3.com/products/liquid-pixie-dust?_pos=1&_sid=7b11563fd&_ss=r&aff=35 

Large Waterbrush Pen: https://inkon3.com/collections/paint-brushes/products/large-water-brush-pen?aff=35

Modern Embossed Rectangle Stack dies: https://shrsl.com/2rwok

Trinity Stamps Blending Buddy Brush:   http://shrsl.com/23yyi

Blending Bar – Platform Base: https://shrsl.com/2f4qz

Blending Buddy and Blending Bar System w/accessories: https://shrsl.com/2f4r5

Marvy Double Sided Jewel Picker: https://shrsl.com/2b566

Trinity Stamps Tidy Tray: https://shrsl.com/2c4f6

MISTI Stamping Tool REDESIGNED: https://shrsl.com/2g8kw

MISTI Creative Corners: https://shrsl.com/2g8kz

MISTI Mouse Pad Cushion: https://shrsl.com/2g8l1

Teflon Burnishing Tool: https://shrsl.com/2g8md

Teflon Ergonomic Tool: https://shrsl.com/2g8me

Spellbinders Platinum 6 die cut and emboss machine:  https://www.ellenhutson.com/platinum-6-die-cutting-and-embossing-machine-spellbinders-tools/#_a_238

Scor-buddyMini Scoring Board:  https://www.ellenhutson.com/scor-buddy-mini-scoring-board-9x7-5/#_a_238

Tonic 8.5” Guillotine Paper Trimmer by Tim Holtz:  https://www.ellenhutson.com/tonic-comfort-8-5-inch-guillotine-paper-trimmer-by-tim-holtz/#_a_238

EK Success 5” Scissors: https://www.ellenhutson.com/ek-tools-precision-5-inch-scissors-with-sheath/#_a_238

Purple Tape ½”:  https://www.ellenhutson.com/icraft-purple-tape-1-2-in-x-15-yards/#_a_238

Tonic Nuvo Deluxe Adhesive: https://www.ellenhutson.com/tonic-nuvo-deluxe-adhesive/#_a_238

Post It Adhesive Roll: https://www.ellenhutson.com/3m-post-it-adhesive-roll-white-1x400-in/#_a_238

Pixie Spray: https://www.ellenhutson.com/icraft-pixie-spray/#_a_238

Scotch Foam Tape Roll:  https://www.ellenhutson.com/scotch-foam-mounting-tape/#_a_238


Does this project bring you lots of new ideas for creating? We would love to hear from you! Thank you for visiting us today and I look forward to sharing again with you soon!

Jenny Hall