Showing posts with label BeYOUtiful. Show all posts

Friday, March 25, 2022

Sending BeYOUtiful Hugs


Hello friends!
It's Ceal, here. 
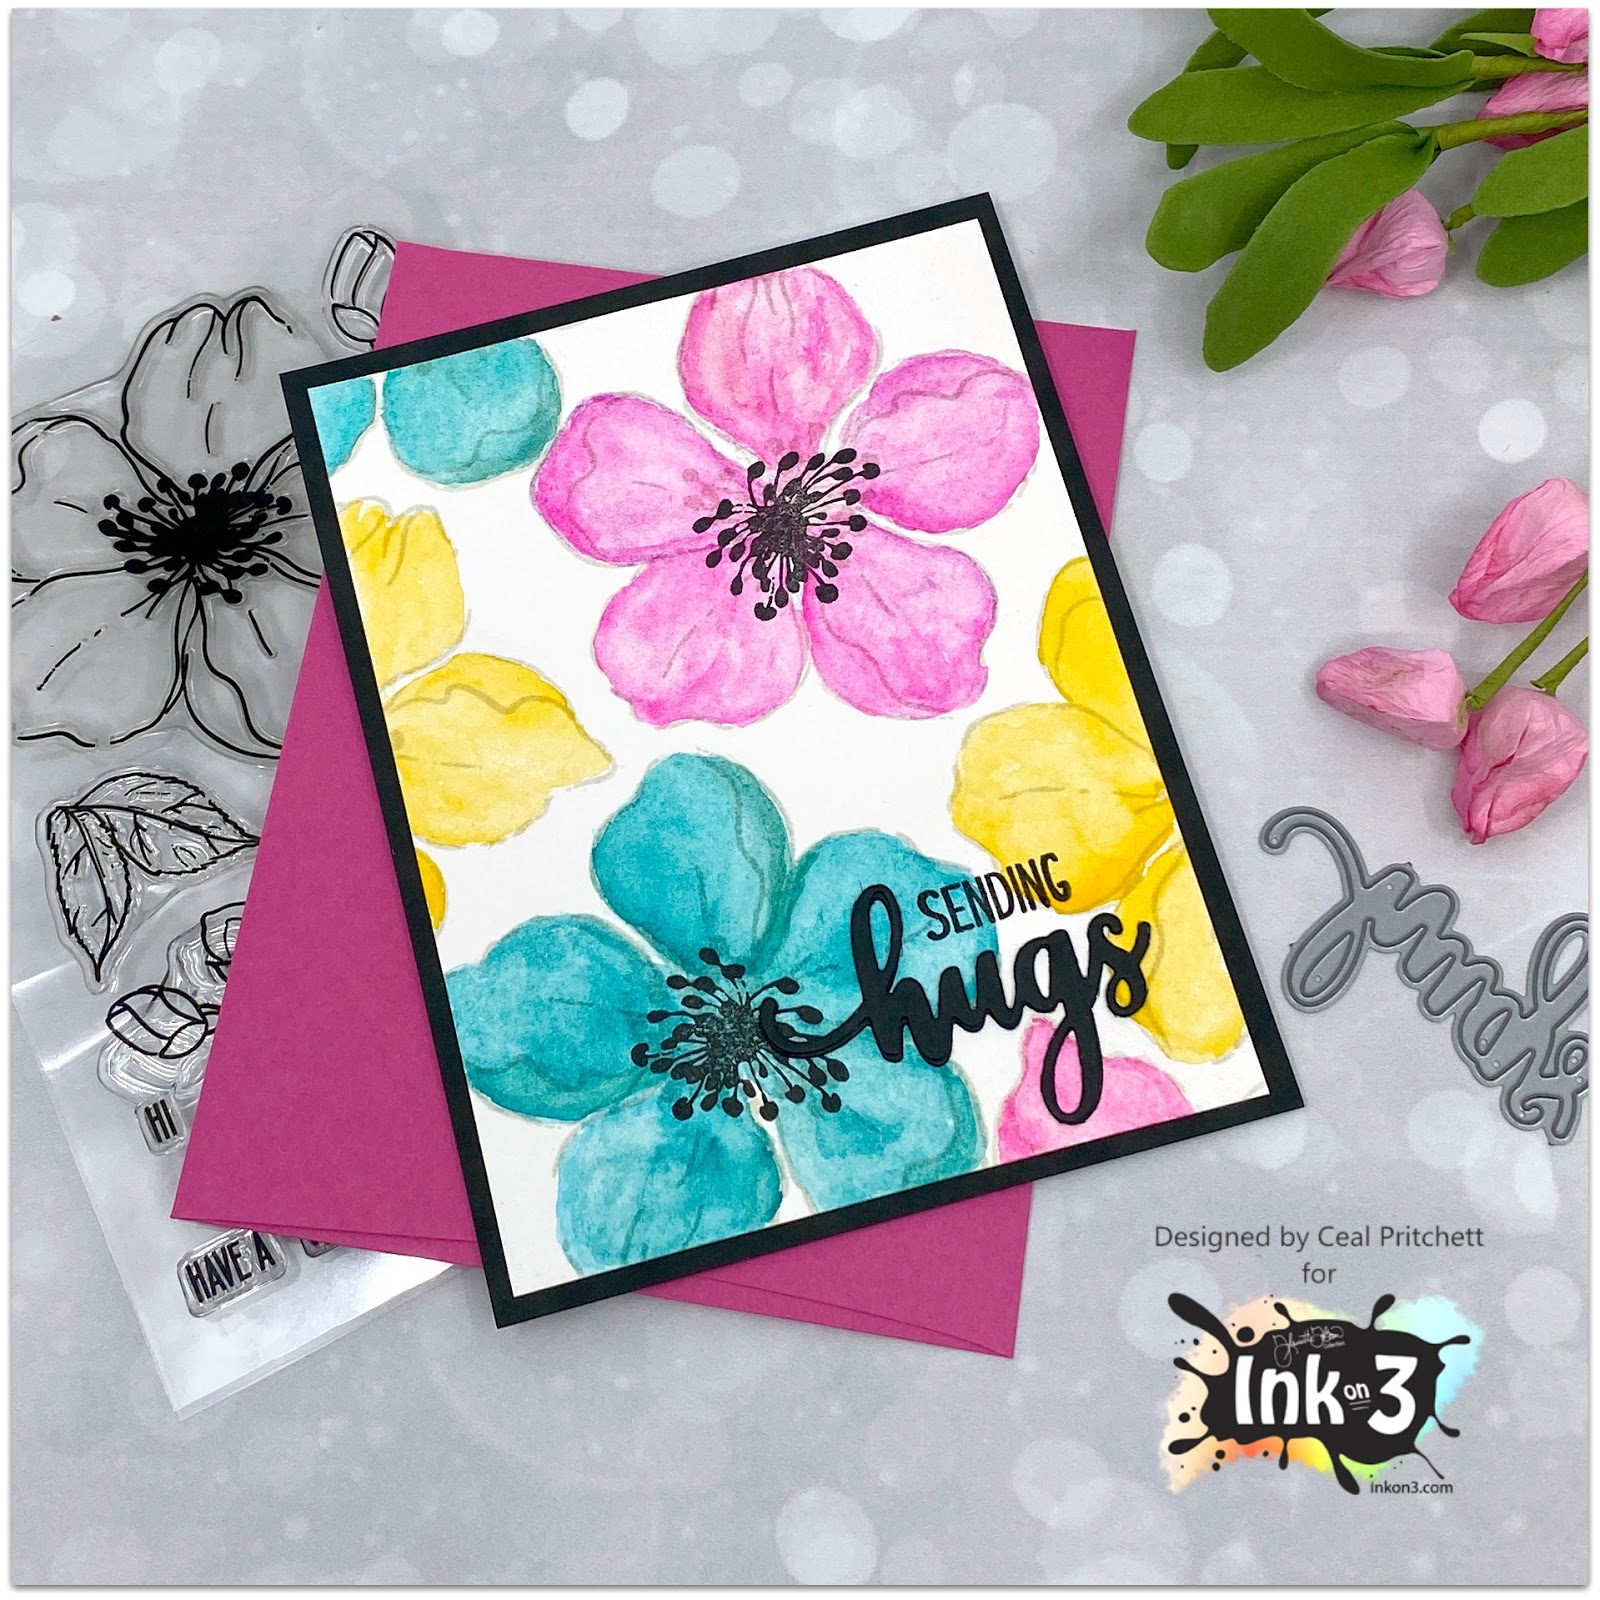
Today I a sharing a card I made using the BeYOUtiful set.  I love creating backgrounds with stamps and the large flower in this set makes it super easy. 

To create this card I started with a with a white top folding card base, a black panel and a panel of watercolor paper.  I randomly stamped the large flower with our Juicy Embossing ink and embossed them with clear powder.
 Next I used our Atelier re-inkers which are awesome to watercolor with to loosely watercolor them.  The colors I used are Sweet Petunia Pink, Marigold Orange, Bee Sting Yellow, My Jam Purple and Trinity Teal. 
I love how vibrant they are!


Wednesday, February 17, 2021

Coloring Made Easy


Hey everybody!
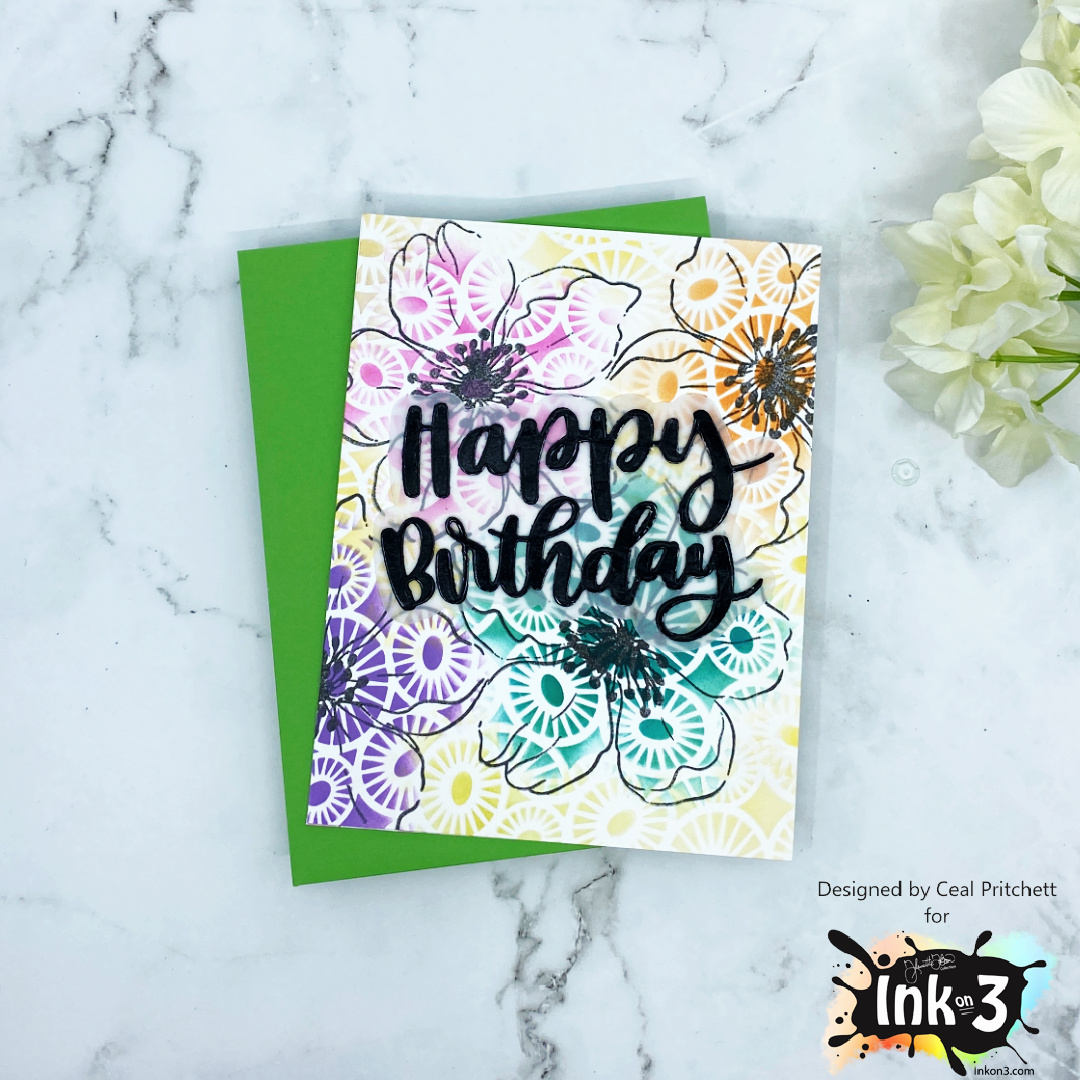
It's Ceal here. Today I am sharing a technique with you that makes coloring super quick and easy and adds interest to the card. 


To create the card I started with a top folding card base and a white panel cut to the same size as the base.  I randomly stamped the large flower from the BeYOUtiful stamp set over the panel. Next I used the Pondie stencil and Atelier Ink  in Trinity Teal, Sweet petunia Pink, Marigold Orange, My Jam Purple and Bee Sting Yellow. I placed the stencil over each flower and ink blended the color. I used the Bee Sting Yellow to fill in the voids. 

Tuesday, January 26, 2021

Thinking Of You, BeYOUtiful!

  Hi and Happy 2021! 

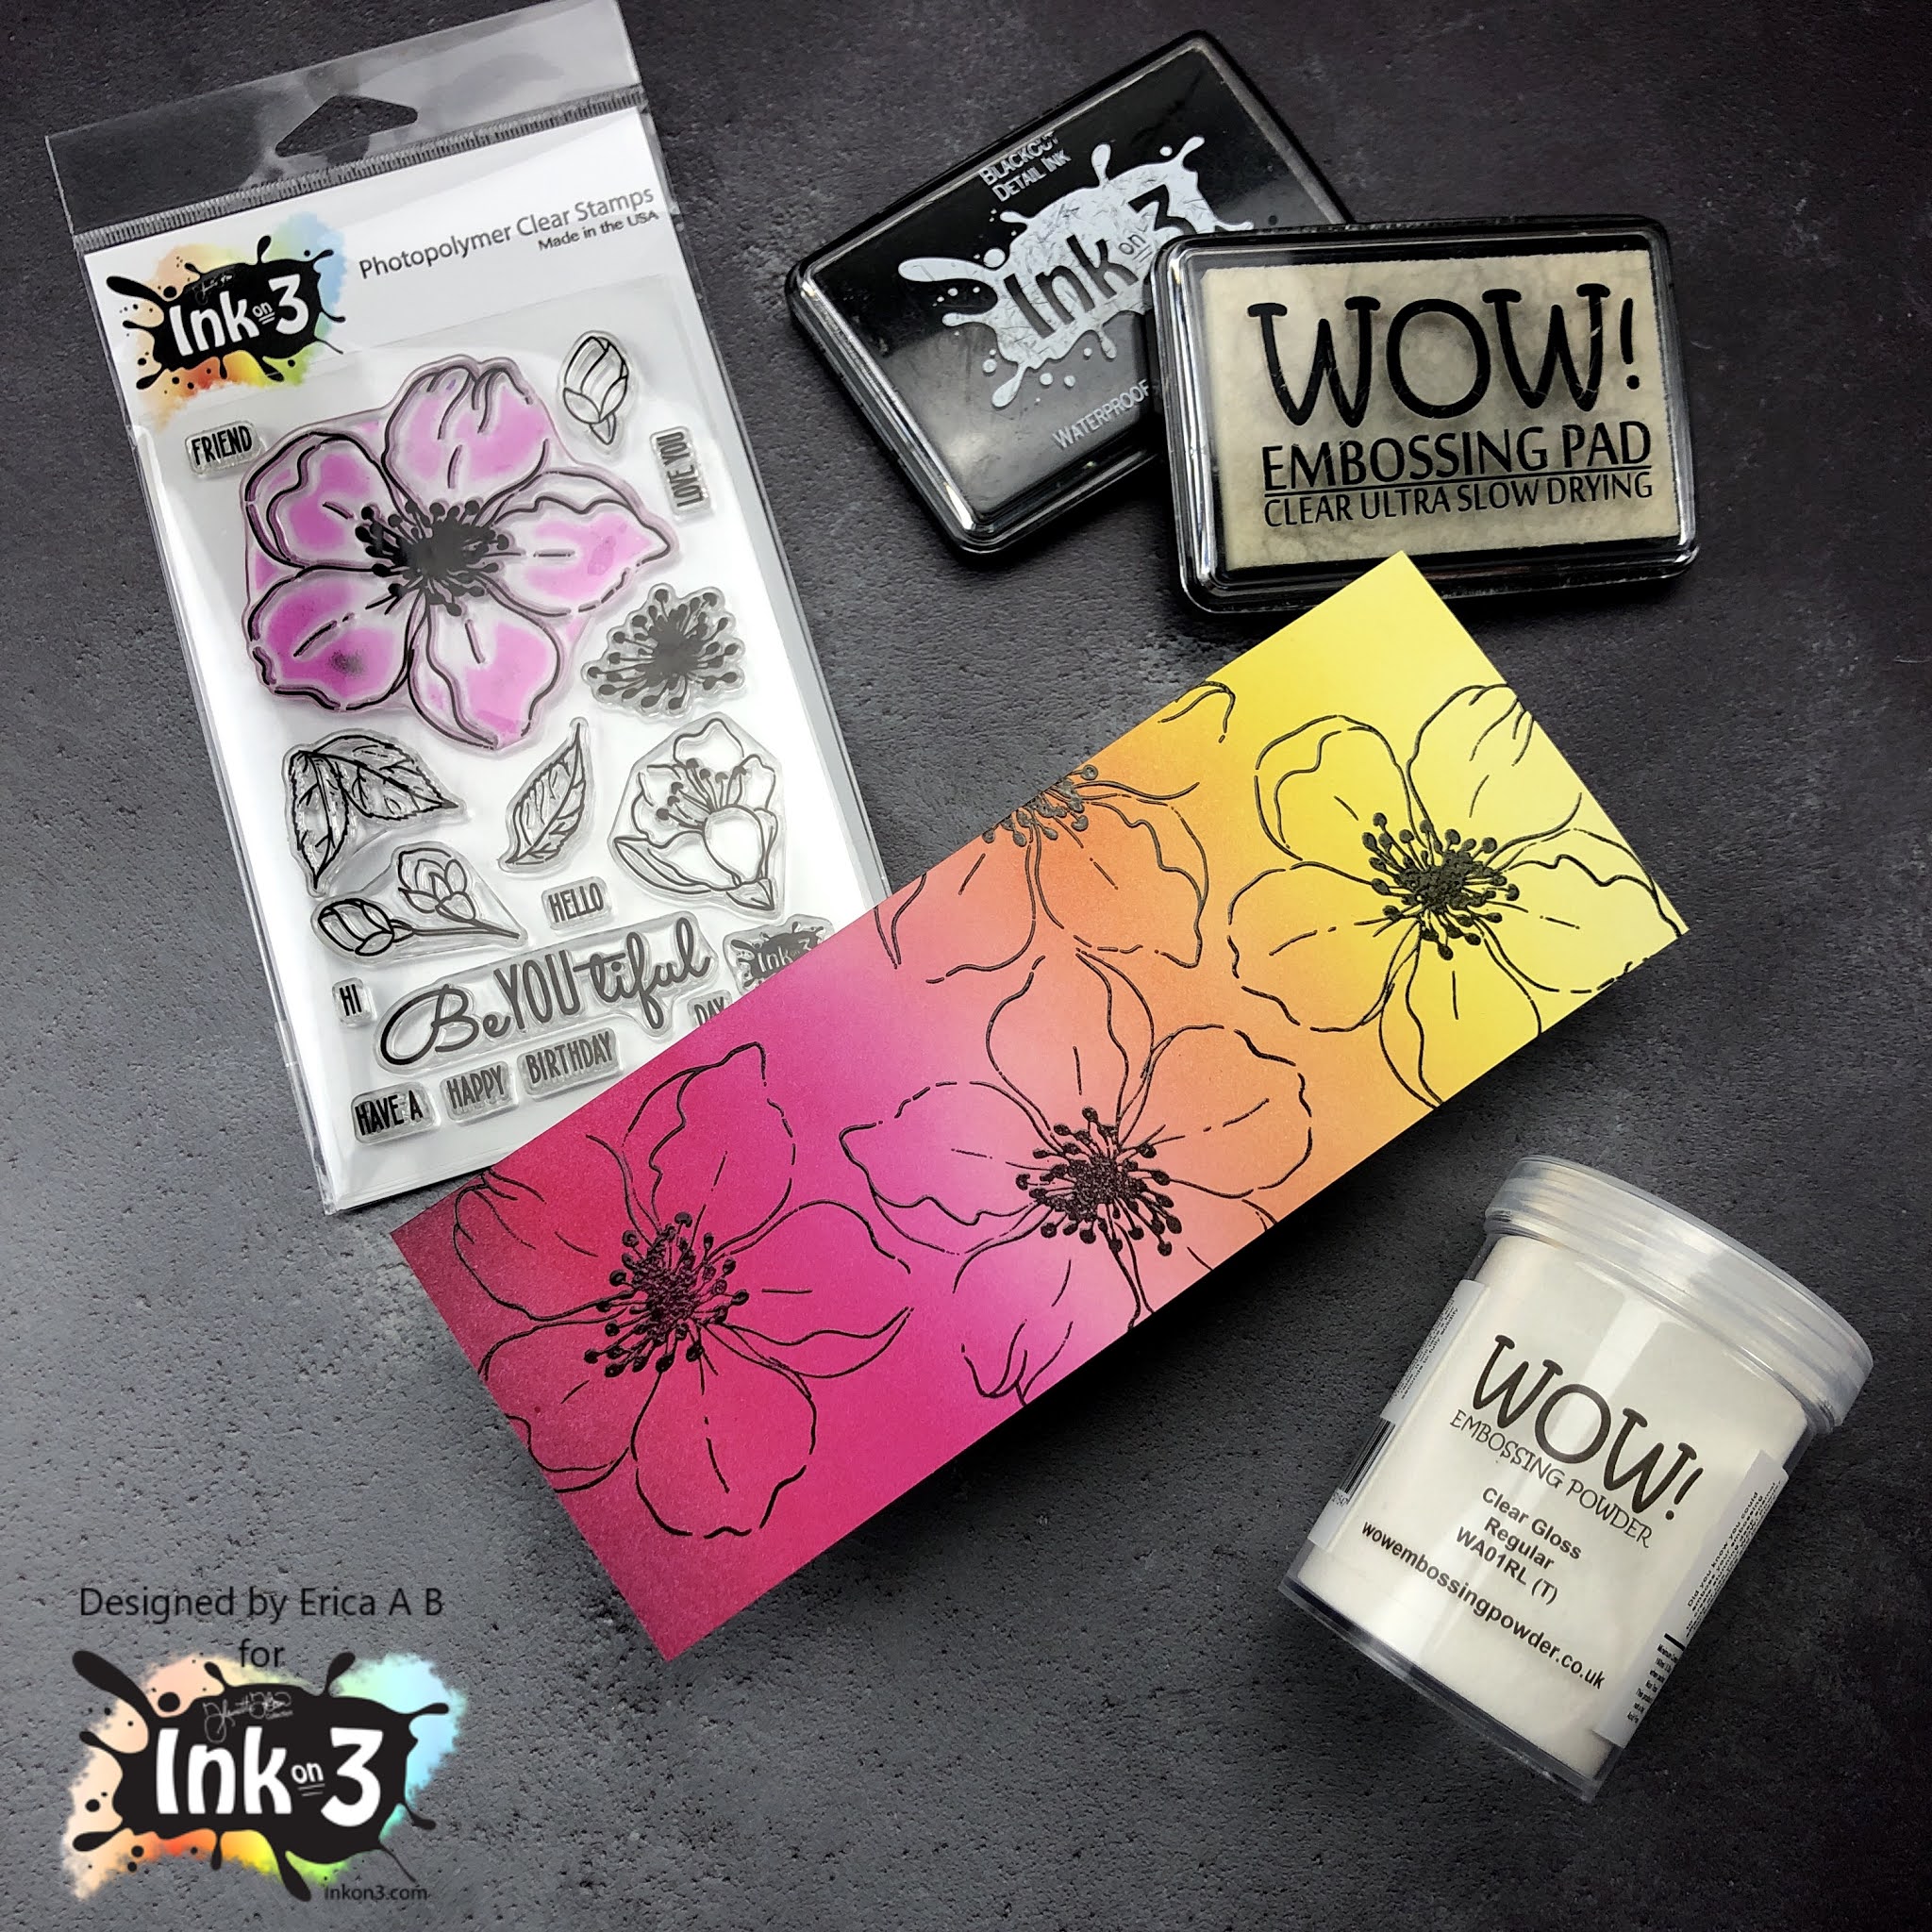
It’s Erica back on the Ink On 3 blog, for the first time in 2021. It’s been a bit of a rough start to the year to be honest, so I decided to make a ‘thinking of you’ card, as I figured I am not the only one who’s feeling like 2021 is saying ‘hold my beer’.

First off I did some ink blending with the goooooorgeou Atelier inks in Bee Sting Yellow, Marigold Orange, Sweet Petunia Pink and Marilyn Red using Life Changing Blender Brushes on Bristol Smooth paper. This combo has become quite a fave of mine for a variety of reasons, the main one being that it’s absolutely beautiful. I love it! 


These panels are actually one big piece that I cut up after ink blending over the whole thing. I love ink blending, and it’s always good to have some background panels done for when you need to make a card quickly! 


On the slightly smaller panel, I stamped up the big flower from the BeYOUtiful set with Blackout Detail ink and then Embossing ink. On top of these I sprinkled Clear Gloss embossing powder and set that with the heat gun. I did use a MISTI for the stamping to make sure the flower images were really solid. 

This panel I then layered up with the other one, but in different colour order. The reason I did this was to create some contrast and interest. 


To finish off this card I ended up using a diecut from Hero Arts that says Thinking Of You. I cut it out of white card stock three times, and then a fourth time in black card stock, and I layered these up to give the card some dimension. On top of this I heat embossed it with clear gloss embossing powder to give it a puffy sticker look. 


This word die I then glued down on the card with liquid glue and with that, the card was done. I contemplated adding some black gem stones or sequins, but if you can believe it, I decided against it. *GASP* I know.. 


That’s it from me for today! I hope you were inspired by this post, and will try this design for yourself. 


Lot of love and happy crafting from Erica


Thursday, November 26, 2020

Two-for-One Ink Technique with Erica

 Hi guys! 

Erica here on the Ink On 3 blog today with a couple of cards, using the same basic supplies but with VERY different looks! Like an utter nutter though, I didn’t get a photo of the backgrounds before I cut them up... Ay, mama! 


Oh well, hopefully I can explain it well enough so you get what I’ve done. If not, I can always make a video and show you! 

Right, let’s get to it: Before I did anything else, I took the Leafy Forest stencil and sprayed it with a very generous layer of Pixie Spray and let that cure for a few minutes. While that was doing its thing, I got some card stock out for ink blending and also water colouring. Oh and ALL THE ATELIER INKS! 

Oh yes, I used pretty much all of them: Bee Sting Yellow, Marigold Orange, Sweet Petunia Pink, Marilyn Red, My Jam Purple, Peacock Blue, Trinity Teal and Goddess Green. The only two I didn’t use for the ink blending were Paint It Black and Twiggy Brown. Using a different Life Changing Blender Brush for each colour, I blended the colours on the diagonal, and vividly, for the first panel. 

Then to get a two-for-one and not wasting all that ink, I got a water spritzer out and misted the stencil. It’s important to give the water a bit of time to activate the ink though. Then, in quick and firm moves, place a panel of water colour card stock on top of the stencil, trying not to move it too much. Press down, again, without moving the paper too much and turn it over quickly. Set aside to dry, or use a heat tool to speed this step up. 

This technique gives a lovely soft, water coloured look with very little hassle. I absolutely love doing this, and do it practically every time I ink blend as it makes me feel like I get the most out of my supplies. 

So, back to the first panel. This one I used a scalloped rectangular die on to trim it down, as well as a celebrate word die in the middle, before adding it to a white card base. The celebrate word die I cut out of black card stock three times and layered up with liquid glue. To make the top layer, with the ink blended pattern, pop a little bit more, I heat embossed it with Clear Gloss embossing powder before adding it to the card. That’s it! 

With the second panel, I did a similar thing: I used a rectangular stitched die to trim it down. This one I added to a black panel, before adding that to a card base. The black really made the stencil print pattern stand out. 

I wanted to add more to this, so I grabbed my Mini MISTI and the flower from the BeYOUtiful stamp. This I stamped up with Paint It Black Atelier ink, all over the panel. I really love how this turned out! To finish this card off, I simply cut a ‘hello’ diecut out of black card stock three times and layered these up. This I added to the card and with that, the second card was done too. 


I hope you like these cards and will give this stencil printing technique a go! If you prefer, you can skip the ink blending and just dab your ink pads on the stencil, mist it and then place your paper on top. 


Lots of love and happy crafting from Erica 

Saturday, October 3, 2020

No-Line Colouring with Erica

 Hi! 

Can you believe it’s already December?? At one point it felt like we were just threading water in March, which became Mapril, which then morphed into Mapriay (March + April + May) and now here we are in the final month of 2020. I’m torn over this year being over. It kind of feels like we deserve a do-over. Or am I the only one?? 

Today’s card is a simple ‘hugs’ card as I am totally starved for hugs from my family and friends. It’s been so long since it’s been normal to be able to just hug someone, so I’m sending some paper hugs instead of the real thing, until it’s safe again. 

I’ve used two stamp sets for this card, and with the help of a MISTI, I’ve stamped the flowers from the BeYOUtiful and Little Birdie sets along the edges of it. I used Fadeout Ink as I wanted to do some no-line water colouring with the Atelier re-inkers. I have a palette with reinkers mixed with Liquid Pixie Dust, to make shimmery water colours, and I grabbed this to colour the panel with. 

I did film a lot of the card making, but unfortunately due to the fact I can’t plug my phone in to charge any longer, there is something wrong with the charging port, the battery ran out mid-colouring. Of course I didn’t realise either, so I could have stopped, charged it up and then carried on. Oh no. No such luck for me. So the video is only covering the first half of the colouring, but it’s better than nothing, right? 

When the colouring was done, and it was all dry, I stamped up ‘hugs’ from the Racoon Hugs set with Blackout Detail ink. I used an old-fashioned glue stick on the card base and after adding the panel, I put the whole thing under my diecutting machine as a weight to make sure it dried flat. 

Well, that’s it from me, I hope you like the card and found some inspiration here with me today. Lots of love and happy crafting from Erica 

Thursday, August 13, 2020

InkOn3 x ThermOWeb Collab | Custom Colored Glitz Glitter Gel with Atelier Reinkers

GET EXCITED! It's Day 3 of InkOn3 and ThermOWeb's week long collaboration. 


Make sure you visit us daily for new inspiration! We will have one project for our blog and one project over on the ThermOWeb blog for double the inspiration. Today, Rebecca will be sharing a project over there so be sure to check it out reading about this project. 

As a reminder, at the end of the week, we'll be giving away a $30 gift certificate for Ink on 3 and ThermOWeb will be giving away a $30 gift certificate for their store as well! Be sure to stop by and leave a comment for a chance to win!  Ink on 3 will be announcing our winner on the blog on August 21, 2020. 

Here is Lynnea's project for today! 

------- 

I just adore both of these companies and I'm so excited to mix together their products to create a card. I used some Atelier Ink Reinkers from InkOn3 and Glitz Glitter Gel from ThermOWeb and made a custom color of Glitz for my stenciled background!


There is a whole wide array of colors of Glitz Glitter Gel in the ThermOWeb site, but some of my favorites are the White and Iridescent Glitz Glitter Gel because I can make them into any color I like! You can use liquid watercolors, ink from an ink pad, ... but I decided to go with the highly pigmented Atelier Ink Reinkers! I used Marilyn Red, Marigold Orange, and a bit of Bee Sting Yellow Reinkers and mixed them with some White Glitz Glitter Gel. I wanted to create a coral color - but it ended up more orangey than pink. That's okay! Be sure to watch the video above - I still created a completely custom color! I'll show you a comparison between my custom color and the existing "orange" colors of Glitz Glitter Gel.


I sprayed the back of the Wavy Stencil from InkOn3 with Pixie Spray and used a Stencil Pal from ThermOWeb and spread my custom mixed Glitz Glitter Gel over the Wavy Stencil. I'm in love with this pretty orangey glittery goodness!


My images for this card are the GORGEOUS florals from the BeYOUtiful Stamp Set from InkOn3. I stamped them with my favorite black ink - Blackout Hybrid Detail Ink - and colored them with Copic Markers. I thought the yellow flower would really compliment the orange background! I trimmed them out and added them to the card with iCraft 3D Foam Squares. The background glitters so much that I thought the flowers needed some glitter, too! I keep some Liquid Pixie Dust in a Small Watercolor Brush so all I have to do is shake it up and brush it over the images and BOOM! They're sparkly, and glitter, and amazing!


I hope you've enjoyed this fun collaboration tutorial and that you'll use your Atelier Ink Reinkers to color your own custom color of Glitz Glitter Gel!

-----------

Be sure to stop by the ThermOWeb blog today and check out the project from Rebecca! She also has a video for you.


https://youtu.be/50--jVpLT6k


If you missed this week of inspiration, just check out the older posts on the blog! 

Friday, July 24, 2020

Tone-on-Tone coloring - BeYOUtiful Floral Monthly Planner Layout

It's Cheryl with the Inkon 3 Creative Team here to show you how I made this BeYOUtiful monthly pages.


Did you know that the Atelier Inks are Copic Safe? This inspired me to do some tone-on-tone coloring. I think it looks super cool and it keeps the color palette simple which makes coloring super easy! 


I used a scalloped rectangle die and die cut some white card stock. On the white card stock, I stamped out the flowers from the BeYOUtiful Clear stamp set using the Peacock Blue Atelier Ink, then I stamped out the leaves from the same stamp set using the Goddess Green Atelier Ink. Next, I colored in the flower with blue copic markers and the leaves and stems with green copic markers. Then stamp the sentiment "Hello BeYOUtiful" on the lower left hand corner of the rectangle using Twiggy Brown Atelier Ink.


For my A6 planner, I cut a rectangle 6"x 4.25" out of white card stock, and punched holes on the side. Then I used the Leafy Forest Stencil, blender brushes and the Peacock Blue and Goddess Green Atelier Ink to create a beautiful background, you don't have to bring the background all the way to the center since you will cover it with the card stock with the flowers. Adhere the scalloped rectangle with the flowers onto the card stock with the Leafy Forest background.


On the monthly calendar side I stenciled in some more leafy backgrounds using Peacock Blue and Goddess Green Atelier Ink. Then I added some gold sparkly washi tape on the top of the page.


What do you think of the tone-on-tone coloring? It's not quite no-line coloring, but you get a nice softness to the image right?


Products Used:

Copics Used: 
Blues: BG05, BG02, B000
Greens: YG27, YG23, YG13

Thursday, July 16, 2020

BeYouTiful

Hi everyone! It’s Jeannie (InsideoutJeans) on the blog today with Ink on 3’s stamp set named BeYouTiful stamp set. I couldn't get enough and had to create another card using it. 


I know I love no line coloring, which is what I did previously in this post, but I wanted to color up this floral quickly using some alcohol markers. I stamped it out the largest floral from the BeYouTiful stamp set using Blackout Ink and colored it up using my favorite purple Copic Combo: V12, V15, V17. 

While using this set, I realized that there was a solid image for the stamen of the flower and it's an exact copy of the one in the floral image! This would be perfect for helping with no line coloring as well as adding a pop to the flower, which is what I did with today's card. I used Juicy ink and heat embossed the stamen using Chrome embossing powder in the middle. I kinda love it since I used the Blackout Ink for the image, it looked a bit harsh compared to the flower. 


I took a piece of white cardstock and inked it up using Peacock Blue and My Jam Purple Atelier inks. I wanted to try a technique I saw with stencils. I pulled out the Wavy stencil and a baby wipe. Using my normal sandwich for my die machine, I ran the card panel, stencil and baby wipe through my machine. It ended up being pretty cool! The stencil embossed itself to the card panel, while the baby wipe picked up the colors in the positive areas. 

To finish off the card, I wanted to tie in the Chrome embossed stamen. I stamped the sentiments using Juicy ink and then heat embossed with the same silver Chrome embossing powder. 


Thanks for stopping by today and I hope you get inspired to create. Come back again soon for more inspiration and ideas! Happy Crafting! 


Tuesday, July 14, 2020

No Coloring with Vibrant Stenciled Backgrounds

Have you heard my top secret-est secret of all time? I don't enjoy coloring! Gasp! I know I know! But it stresses me out! Good news for me - leaving an image completely uncolored seems to be all the rage right now! So you know I hopped on that train using the gorgeous large floral from the BeYOUtiful Stamp Set from InkOn3!


I quickly made a set of 4 cards using the Leafy Forest Stencil, the BeYOUtiful Stamp Set, and a rainbow of Atelier Inks! And of course some Liquid Pixie Dust!


I always try to bring interest to my cards in one way or another. Since I'm not doing any fancy coloring on this card I decided to use my vibrant Atelier Inks to make pretty backgrounds!


I made four backgrounds with the rainbow of Atelier Inks and I kept the inks darkest at the bottom and lighter towards the top for each background. I temporarily held the Leafy Forest Stencil in place on a piece of white cardstock and blended my inks with a blender brush. I mixed together colors next to each other in the rainbow to get pretty blends - Peacock Blue with My Jam Purple and Marilyn Red, Marigold Orange, and Bee Sting Yellow. Then I made two backgrounds with just a single color of Atelier Ink - Paint it Black for one and Goddess Green for the other.


Now let's add something on top of the pretty backgrounds! I used Blackout Hybrid Detail Ink to stamp the large flower and a few leaves from the BeYOUtiful Stamp Set and then trimmed them out with scissors. I added them with foam tape because every card needs a little pop, right?! I used Blackout Hybrid Detail Ink and stamped a couple of different buildable sentiments onto the cards.


It's so hard see in the photos ( so definitely watch the video! ), but I jazzed up the flowers and leaves with some Liquid Pixie Dust! I keep mine in a Small Fine Detail Waterbrush so I can easily brush some glitter on my images! I hope you enjoyed this pop of white! See you soon!

Tuesday, June 30, 2020

Video Tutorial: Create STUNNING Floral Bouquets Using this ONE Rule.


Hi everyone, welcome back to the Ink On 3 blog!  We often talk about coloring, inking techniques, coloring mediums, etc.  Color is just one part of the art equation.  Another element of art that is just as important is composition--or how elements are arranged on your canvas.  In the video tutorial below, I will show you a very basic introduction to floral composition that can be applied to other card themes such as animal scenes.


Hey thank you so much for checking out my video on how I made this cards!  Do you all have stamp sets from Ink On 3 that you would like me to use in a future project?  Let me know in the comments below!  If you like what you've seen from me, make sure you subscribe to my YouTube channel and give me a follow over on Instagram!  Talk to you all very soon!


Materials:


Jaycee Gaspar


Friday, June 19, 2020

Watercolor Blooms


Hello Everyone!
It's Ceal, here to share a card with you today using the BeYOUtiful  set from our latest release. I love the big bloom in this set it is super fun! 
To create this card I started with a top folding white card base, a black panel and a panel of watercolor paper. I randomly stamped the blooms using Fadeout noline coloring ink to cover the watercolor panel. I used the Atelier inks to watercolor the blooms. There are so many colors you can make by mixing the inks.
 To finish the card I added the sentiment from the Bunny Hugs set and the hugs die from the coordinating die set. 
After I was done stamping I used the Ink Off pad and cloth to clean and condition my stamps. 


Tuesday, June 16, 2020

BeYOUtiful Friend

Hi everyone! It’s Jeannie (InsideoutJeans) on the blog today with Ink on 3’s stamp set named BeYOUtiful stamp set. This is one of the newest stamp sets that is part of the BeYOUtiful Waters bundle. If you know me, I love any kind of florals and this is no exception. 

I stamped out the main floral image (which is really large!) using Ink on 3's Fadeout Ink. Since this ink is used for no-line coloring, I was able to add the leaves and additional florals without needing to mask. I wanted to create a corner of florals using the BeYOUtiful stamp set. 


I went ahead and colored everything in using alcohol markers (colors listed below). Originally, the florals were going to be in the bottom right hand corner of the card but I decide to flip it around so the card panel read horizontally and the florals ended up in the bottom left corner. 

I pulled out my Goddess Green Atelier Ink and ink blended in the top right hand corner. I didn't want to be too heavy handed and wanted a soft ink blend. I decided to use the new Wavy stencil to add a bit of interest to the background. I just went over the area I already blended with additional ink along with the stencil and it added a subtle interest to the background. I wanted to add a bit of balance so I added a little bit of the Goddess Green Atelier Ink to the bottom left hand corner as well. 


For the sentiment, I was able to pick and choose my own sentiment and stamped it using Ink on 3's Blackout Ink. To finish off the card, I used some embellishments to surround the sentiment and added a bit to the remaining white space. 


Thanks for stopping by today and I hope you get inspired to create. Come back again soon for more inspiration and ideas! Happy Crafting! 


→ SUPPLIES USED ← 
Items marked with an asterisk (*) were provided by a store or the manufacturer for review and use. All other items were personally purchased. Affiliate links may be used at no cost to you. 

STAMP SET(S):
*Ink on 3 - BeYOUtiful: https://bit.ly/2Ug0bKy
STENCILS: *Ink on 3 - Wavy: https://bit.ly/2Ug131A
INK:
*Ink on 3 - Fadeout Ink:  http://bit.ly/2RulfMP
*Ink on 3 - Blackout Hybrid Ink: http://bit.ly/2YAStuf *Ink on 3 - Goddess Green Atelier Ink Pad : http://bit.ly/3aXAZzk
COLORING: Copic Sketch - R20: http://shrsl.com/1f3o5  Copic Sketch - R22: http://shrsl.com/1iznz  Copic Sketch - R24: http://shrsl.com/1ah3c   Copic Sketch - R27: http://shrsl.com/17ydv   Copic Sketch - YG01: https://shrsl.com/2bikp 
Copic Sketch - YG13: http://shrsl.com/1ah3f 
Copic Sketch - YG17: http://shrsl.com/1erwt  Copic Sketch - YG67: http://shrsl.com/1ah3h Copic Sketch - E25: http://shrsl.com/172a2  Copic Sketch - E27: http://shrsl.com/1erwo  Copic Sketch - E29: http://shrsl.com/172a5