Showing posts with label Atelier Ink Re-Inkers. Show all posts

Friday, March 25, 2022

Sending BeYOUtiful Hugs


Hello friends!
It's Ceal, here. 
Today I a sharing a card I made using the BeYOUtiful set.  I love creating backgrounds with stamps and the large flower in this set makes it super easy. 

To create this card I started with a with a white top folding card base, a black panel and a panel of watercolor paper.  I randomly stamped the large flower with our Juicy Embossing ink and embossed them with clear powder.
 Next I used our Atelier re-inkers which are awesome to watercolor with to loosely watercolor them.  The colors I used are Sweet Petunia Pink, Marigold Orange, Bee Sting Yellow, My Jam Purple and Trinity Teal. 
I love how vibrant they are!


Tuesday, July 20, 2021

Dripping Roses Tutorial with Video! for Ink on

Hello and thanks for stopping by! Today I'm happy to share a project with you using the Triple Roses stamp set and Atelier Inks with a fun technique, including a video.


Using a fun technique to create a handmade card is half the pleasure for me. Traditional watercoloring with Atelier Ink Refills are one of my favorites but it's cool to have something different at times. In the recent release, Ink on 3 has a beautiful new stamp set called Triple Roses. There are giant blossoms that are really versatile to color. Perfect for a fun technique!

I call this dripping roses because it's like the name, the color drips from the edges which are reminiscent of the painted roses from Alice in Wonderland. It can be created by first stamping with Ink on 3's Fadeout Ink pad on watercolor paper. Once stamped and dry, use a paint brush or a water brush from Ink on 3 to add color from Atelier Ink Refills. I keep a paint palette full of them all the time. The Fadeout ink picks up the color and the stamped lines change! Then hit this with a heat tool until dry and add some drips of ink at the edges. Be sure to check out the video tutorial for a full process on coloring this card.


Here is an easy step by step how-to video for creating this card.


SUPPLY LIST:

Does this project bring you lots of new ideas for creating? We would love to hear from you! Thank you for visiting us today and I look forward to sharing again with you soon!

Jenny Hall


Thursday, May 13, 2021

Here For You

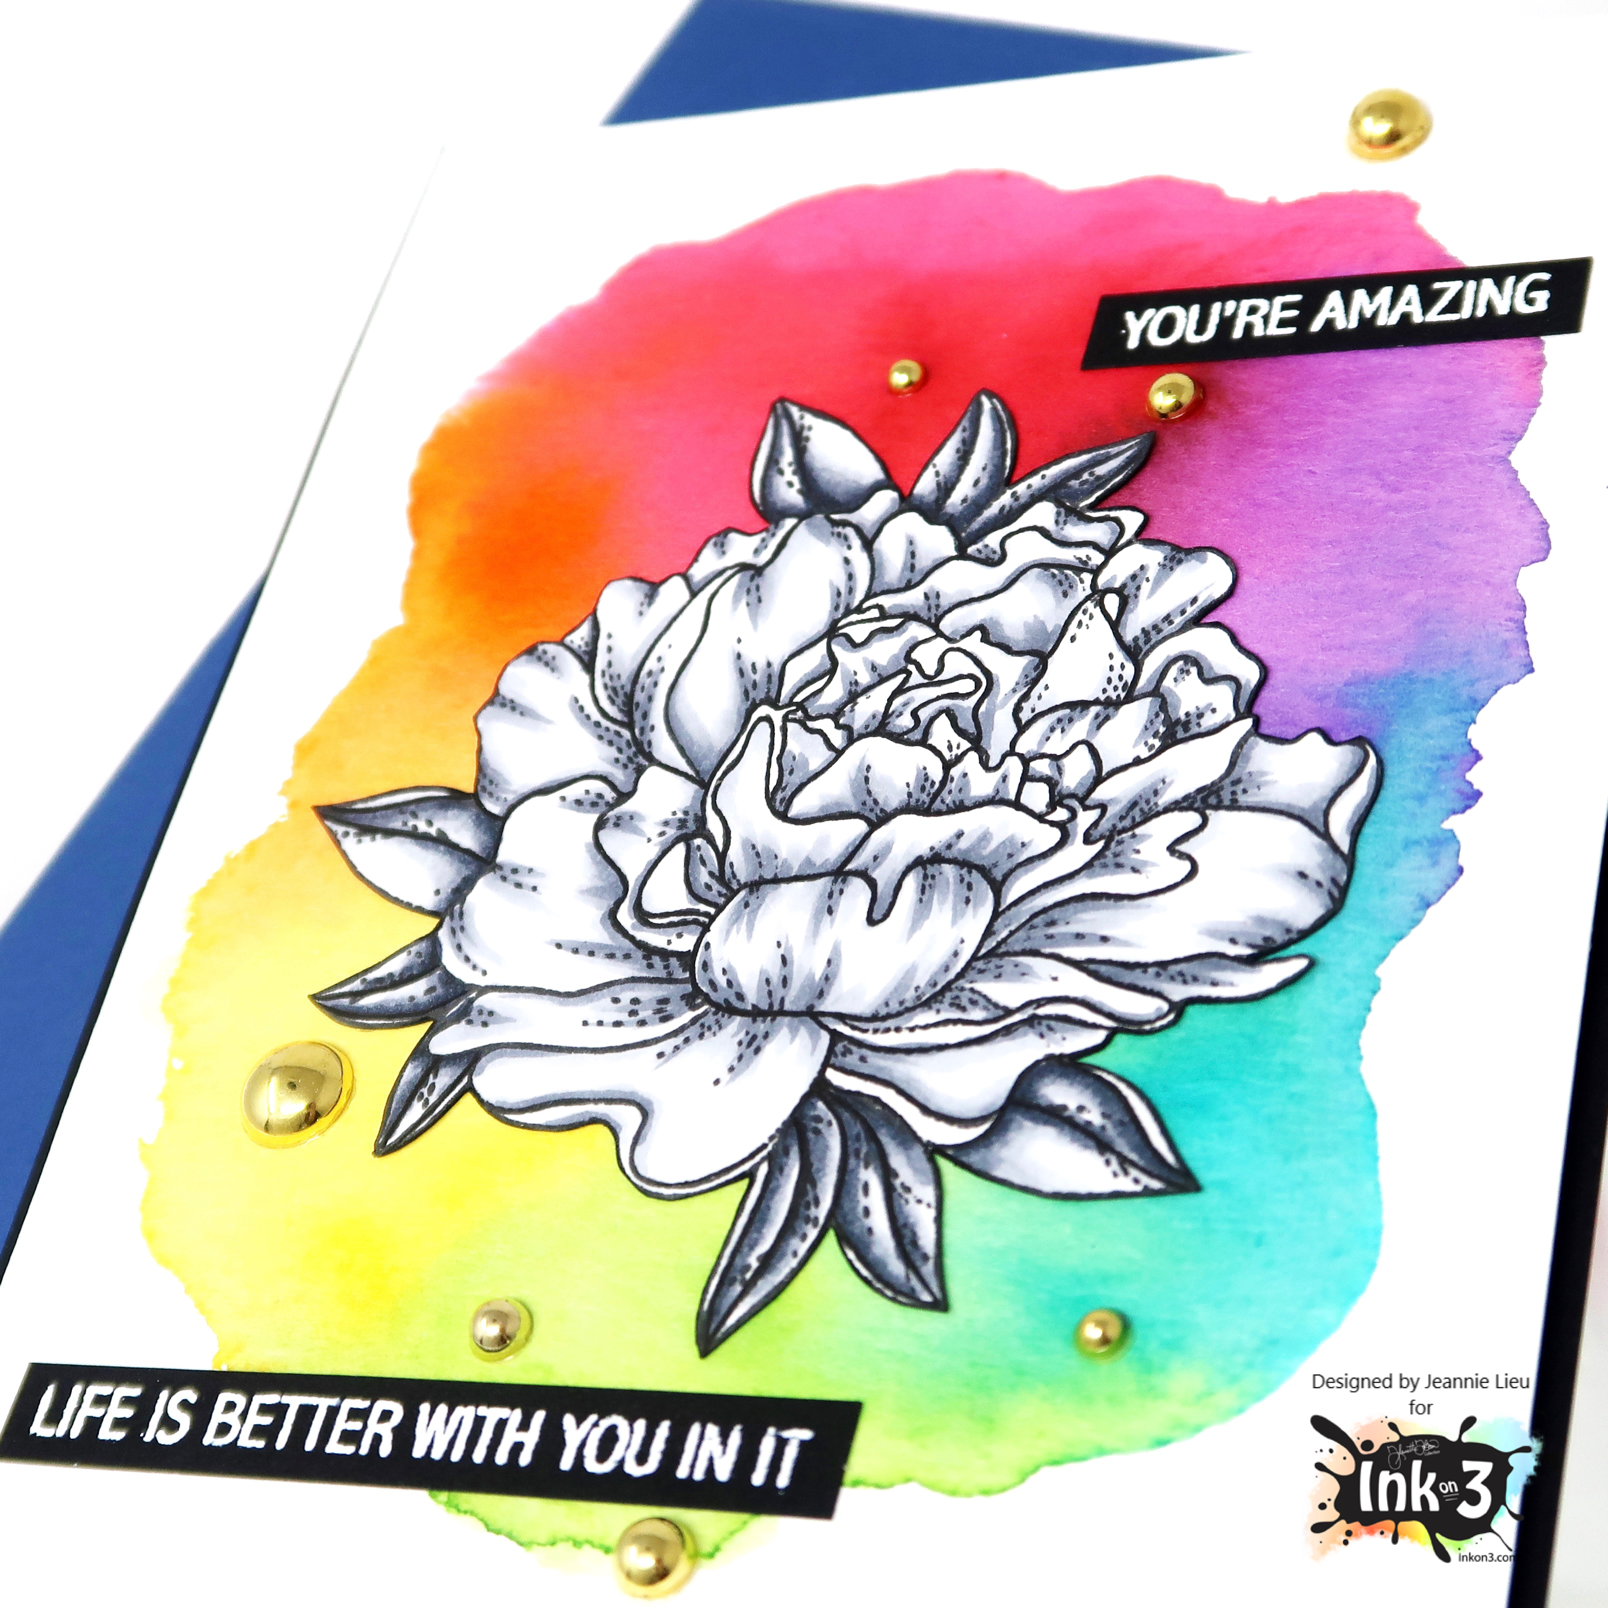
Hi everyone! It’s Jeannie (InsideoutJeans) on the blog today with Ink on 3’s stamp set named Here for You stamp set. This is one of three floral stamp sets that recently released from Ink on 3 and I think it's the most intimidating one because of all the layers and details.  


For today's card, I decided to color in the floral from the Here for You stamp set in some cool gray markers (C7, C5, C3, C1).

To create the background, I used Ink on 3's Atelier Inks in Marilyn Red, Marigold Orange, Bee Sting Yellow, Goddess Green, Peacock Blue and My Jam Purple to create a simple watercolor background. I wet my Canson XL watercolor paper in the areas I wanted to add watercolors and then dropped the colors in rainbow order into the rectangular area.


For the sentiments, I stamped two sentiments from the Here for You stamp set using Juicy Ink and added Artic White embossing powder and heat set it. Once my panel was ready, I popped it up on foam tape on top of a piece of black cardstock.


To finish off the card, I added some Trinity Stamps Gold baubles to the panel and I think it really pulled the card together.


Thanks for stopping by today and I hope you get inspired to create. Come back again soon for more inspiration and ideas! Happy Crafting! 


Friday, March 26, 2021

Spring has Sprung with Gerbera Daisies!

Hello Friends! It's Cheryl with the Inkon3 Creative Team here to show you a fun Spring inspired card featuring the new Gerbera Daisies Stamp set!

First I stamped several daisies from the Gerbera Daisy Stamp Set using Blackout Hybrid Detail Ink, then I fussy cut the daisies and then colored with copic markers.

Next, I masked off the sides of the card using low-tack tape, and created a bright yellow background using Bee-Sting Yellow Atelier Ink, leaving the tape on, I used some Marigold Orange water color, and diluted it with water. I dipped a paintbrush into the water color and splattered the orange onto the yellow background. Let the water color dry.

Then I removed the tape and then created a border with a simple striped washi-tape.  Next, I adhered the daisies as shown in the picture above. 

For the sentiment, I die cut a rectangle and then I stamped "Hello BeYOUtiful" from the BeYOUtiful clear stamp set using juicy clear embossing ink. Next, I sprinkled some Arctic White Ultra Fine Embossing Powder onto the sentiment and tapped off any excess powder. Then I heat-set the embossing powder. 

Adhere the sentiment onto the card and frame with the striped washi tape!


Products Used:


Tuesday, March 9, 2021

Atelier Inks Two Ways with a VIDEO!

Hello and thanks for stopping by! Today I'm happy to share a project with you using the Phat Alphanumeric stamp set and Atelier Inks in two different ways.


Don't you just love a clever stamp set? The Phat Alphanumeric stamp set from Ink on 3 is clever in the way that is has many different looks. In my eye, the stamps look like bubbles! This gave me the idea to create a birthday card for my oldest son that would be customized to spell out exactly what I had in mind.

 The background panel was so much fun to create! First I stamped the letters in Juicy Embossing Ink and sprinkled on Arctic White Embossing Powder. This would be the part to really draw the attention to the theme of the card. After adding a blue watercolor wash with Atelier Ink Refills, I made sure the area with the embossed letter would be easy for a child to read.

My son is really fond of whales. I happened to have a retired whale stamp set in my supplies that would work out great. It's a color layering stamp set, so I grabbed my Atelier ink pads in two shades of blue to get that amazing look I get only from Atelier Inks. These ink pads work well for watercoloring but also stamp out beautifully! Here is the whale using Ink on 3's Trinity Teal, Peacock Blue and Paint it Black Atelier ink pads. Nice and crisp image, don't you think?
 
 Be sure to check out the video tutorial for a full process on coloring this card.


Here is an easy step by step how-to video for creating this card.


SUPPLY LIST:

Phat Alphanumeric stamp set: https://inkon3.com/products/phat-alphanumeric-4x6-clear-stamp-set?aff=35

Phat Alphanumeric coordinating dies: https://inkon3.com/products/phat-alphanumeric-die-cuts-stand-alone-dies?aff=35

Peacock Blue Ink Refill: https://inkon3.com/products/atelier-watercolor-re-inker-peacock-blue-artist-grade-fusion-ink?aff=35

Trinity Teal Ink Refill: https://inkon3.com/collections/atelier-watercolor-re-inkers/products/copy-of-atelier-watercolor-re-inker-sweet-petunia-pink-artist-grade-fusion-ink?aff=35

Paint it Black Ink Refill: https://inkon3.com/products/atelier-watercolor-re-inker-paint-it-black-artist-grade-fusion-ink?aff=35

Liquid Pixie Dust: https://inkon3.com/products/liquid-pixie-dust?_pos=1&_sid=7b11563fd&_ss=r&aff=35 

Large Waterbrush Pen: https://inkon3.com/collections/paint-brushes/products/large-water-brush-pen?aff=35

Juicy Clear Embossing & Watermark Ink: https://inkon3.com/collections/ink/products/juicy-embossing-watermark-ink?aff=35

Arctic White Ultra Fine Embossing Powder: https://inkon3.com/collections/ultra-fine-embossing-powder/products/arctic-white-ultra-fine-embossing-powder?aff=35

Ink Off Stamp Cleaner Pad: https://inkon3.com/products/ink-off?_pos=2&_sid=e797b1832&_ss=r&aff=35

Slimline Stitched Card Panels & Windows dies: https://shrsl.com/2oehd

Strathmore Watercolor Paper Pad 9x12:  https://www.ellenhutson.com/strathmore-watercolor-paper-9x12/#_a_238 

Color Layering Whale stamp set is retired, from Hero Arts

Atelier Trinity Teal- Artist Grade Fusion Ink: https://inkon3.com/collections/atelier-ink-pads/products/atelier-trinity-teal-artist-grade-fusion-ink-pad?aff=35

Atelier Peacock Blue- Artist Grade Fusion Ink: https://inkon3.com/collections/ink/products/atelier-peacock-blue-artist-grade-fusion-ink?aff=35

Atelier Paint it Black- Artist Grade Fusion Ink: https://inkon3.com/collections/ink/products/atelier-paint-it-black-artist-grade-fusion-ink?aff=35

Dual Speed Heat Tool: https://www.ellenhutson.com/dual-speed-heat-tool-wow/#_a_238

EK Success Powder Tool for embossing:  https://www.ellenhutson.com/powder-tool-adhesive-deactivator/#_a_238

Spellbinders Platinum 6 die cut and emboss machine:  https://www.ellenhutson.com/platinum-6-die-cutting-and-embossing-machine-spellbinders-tools/#_a_238

Scor-buddyMini Scoring Board:  https://www.ellenhutson.com/scor-buddy-mini-scoring-board-9x7-5/#_a_238

Tonic 8.5” Guillotine Paper Trimmer by Tim Holtz:  https://www.ellenhutson.com/tonic-comfort-8-5-inch-guillotine-paper-trimmer-by-tim-holtz/#_a_238

EK Success 5” Scissors: https://www.ellenhutson.com/ek-tools-precision-5-inch-scissors-with-sheath/#_a_238

Purple Tape ½”:  https://www.ellenhutson.com/icraft-purple-tape-1-2-in-x-15-yards/#_a_238

Tonic Nuvo Deluxe Adhesive: https://www.ellenhutson.com/tonic-nuvo-deluxe-adhesive/#_a_238

Post It Adhesive Roll: https://www.ellenhutson.com/3m-post-it-adhesive-roll-white-1x400-in/#_a_238

Pixie Spray: https://www.ellenhutson.com/icraft-pixie-spray/#_a_238

Scotch Foam Tape Roll:  https://www.ellenhutson.com/scotch-foam-mounting-tape/#_a_238


Does this project bring you lots of new ideas for creating? We would love to hear from you! Thank you for visiting us today and I look forward to sharing again with you soon!

Jenny Hall


Saturday, October 3, 2020

No-Line Colouring with Erica

 Hi! 

Can you believe it’s already December?? At one point it felt like we were just threading water in March, which became Mapril, which then morphed into Mapriay (March + April + May) and now here we are in the final month of 2020. I’m torn over this year being over. It kind of feels like we deserve a do-over. Or am I the only one?? 

Today’s card is a simple ‘hugs’ card as I am totally starved for hugs from my family and friends. It’s been so long since it’s been normal to be able to just hug someone, so I’m sending some paper hugs instead of the real thing, until it’s safe again. 

I’ve used two stamp sets for this card, and with the help of a MISTI, I’ve stamped the flowers from the BeYOUtiful and Little Birdie sets along the edges of it. I used Fadeout Ink as I wanted to do some no-line water colouring with the Atelier re-inkers. I have a palette with reinkers mixed with Liquid Pixie Dust, to make shimmery water colours, and I grabbed this to colour the panel with. 

I did film a lot of the card making, but unfortunately due to the fact I can’t plug my phone in to charge any longer, there is something wrong with the charging port, the battery ran out mid-colouring. Of course I didn’t realise either, so I could have stopped, charged it up and then carried on. Oh no. No such luck for me. So the video is only covering the first half of the colouring, but it’s better than nothing, right? 

When the colouring was done, and it was all dry, I stamped up ‘hugs’ from the Racoon Hugs set with Blackout Detail ink. I used an old-fashioned glue stick on the card base and after adding the panel, I put the whole thing under my diecutting machine as a weight to make sure it dried flat. 

Well, that’s it from me, I hope you like the card and found some inspiration here with me today. Lots of love and happy crafting from Erica 

Friday, June 26, 2020

Masculine Koi Pond Card

Hi Crafty Friends! It's Cheryl with the Creative Team here to show you how I made some cards for the important men in my life, the cards read "Happy Father's Day", but change up the sentiments and these cards can be used for any occasion!

I made the card in portrait and landscape orientation! Which one do you prefer?

First I created a 5.5"x 4.25" card base using white card stock. Then I used a rectangle die to cut out a panel that's slightly smaller than the card base. Next, I used distress oxide ink in Tumbled Glass and a blending tool to add a light blue background to the lower right hand corner of the card. Place the Wavy stencil over the light blue background and with a blending tool and Peacock Blue Atelier Ink, blend in the atelier ink concentrating on the lower right hand corner and lightly bring in the color towards the center of the card to create an ombre look.


From the Koi Pond stamp set, stamp out the Koi images of your choice using Blackout Hybrid Detail Ink, color with your choice of coloring medium and then fussy cut. For the Lily Pads, I first stamped the largest lily pad stamp using the Goddess Green Atelier Ink, then I used the Peacock Blue on the next layer, and Marigold Orange on the last layer. The Atelier Inks worked so well when layered! Fussy cut the lily pads.


Then I die cut some flags for the sentiments, for a perfectly coordinated sentiment flag, I die cut white card stock and applied Peacock Blue Atelier ink with a blending tool. I stamped the sentiments with embossing ink, used Arctic White Ultra Fine Embossing Powder and heat set.


Adhere the panel with the stenciled waves onto the card base. Then position the fussy cut images, and sentiment flags onto the card front as shown in the picture above. Trim off any excess of the sentiment flags that extends beyond the Koi. Adhere the fussy cut images and sentiment flags onto the card and there you have it!

Copic Colors Used: 
Reds: R29, R27, R24, R22
Oranges: YR27, YR68, YR14, YR12 

Products used:

Thursday, May 28, 2020

Hey Gorgeous - Spring Planner Pages

Hi Friends, it's Cheryl with the Inkon3 Creative Team here to show you a simple way to dress up your planner pages with the "Hey Gorgeous" Clear stamp set. Nothing says Spring like a big fashionable hat and lovely flowers right? And this is all in one awesome stamp set!

I stamped and colored the pretty gal in the Hey Gorgeous stamp set on cardstock. Then I fussy cut the image. Then I picked different sizes of flowers from the same stamp set and stamped out a pretty flower border. I picked the Marilyn Red, Marigold Orange, and Bee Sting Yellow colors because those colors would overlap beautifully, which means no need to mask!


Then I stamped some leaves using the Goddess Green Atelier Inks, and added a few small circles for a little more special accents. I really love how many stamps comes with this stamp set! I used the Blackout Hybrid Detail ink to stamp the sentiment "Hey Gorgeous" on the lower left hand corner of the left planner page, and adhered the image approximately in the center of the left page.


Products Used:

Tuesday, May 26, 2020

Rainbow Stripes Watercolor with Atelier Re-Inker

Rainbows just make me so happy! Especially when they're bright and vibrant and mixed with beautiful white flowers! I used Atelier Ink Re-Inkers from InkOn3 along with the Posies Stamp Set for today's card - and I have to say - I really like it!


I love using re-inkers to add rich, vibrant color and the Atelier Inks are gorgeously pigmented! I wanted to have some simple chunky stripes, so I decided to just free hand them! 


I added a few drops of Marilyn Red, Marigold Orange, Bee Sting Yellow, Goddess Green, Peacock Blue, and My Jam Purple Re-Inkers to my work surface and used a bit of water and a 1/2" flat watercolor brush to add stripes to a piece of watercolor cardstock. I tried to keep the stripes pretty even, but in the end I think the fact that they all look a little wonky is great! It gives the background character! Haha! I keep a bit of Liquid Pixie Dust in a Small Fine Tip Watercolor Brush and I brushed some over each stripe. If I had thought ahead properly I would have mixed a drop of Liquid Pixie Dust into each puddle of Atelier Re-Inker before I painted - but I didn't. Oh well! 


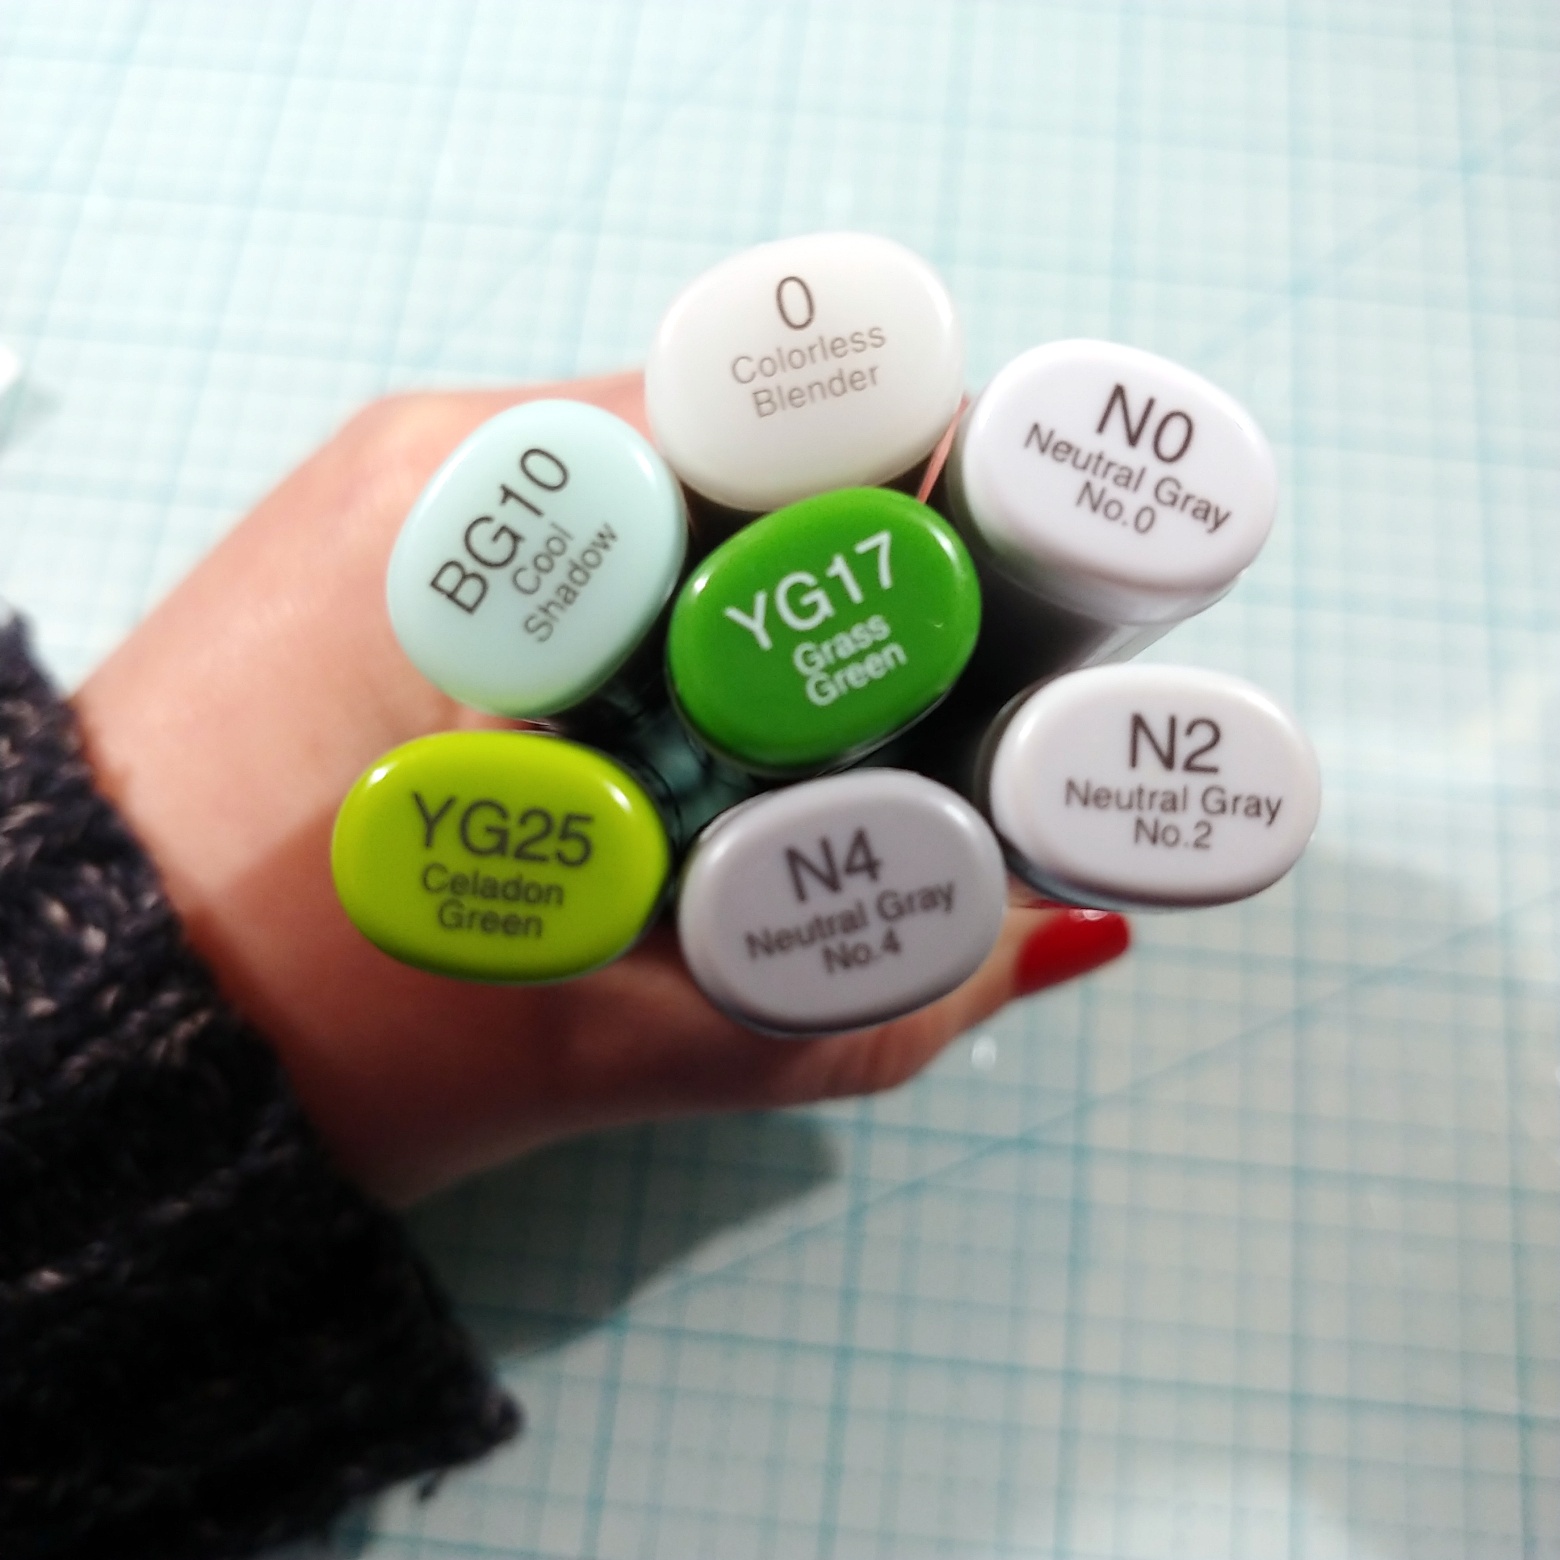
I stamped my image from the Posies Stamp Set with Blackout Hybrid Detail Ink by combining the vase, stem, and flower onto heavy weight white cardstock. I colored the image quickly with Copic Markers and trimmed it out. I snapped a photo of the Copics that I used or you can see the coloring in action in the video above! Of course I needed a bit more shimmer, so I covered the image with Liquid Pixie Dust


I finished the card by stamping a sentiment from the Posies Stamp Set with Blackout Hybrid Detail Ink and adding the image with foam tape. I hope you like it! There's just something so striking about a vibrant rainbow background with a simple white flower. See you soon!