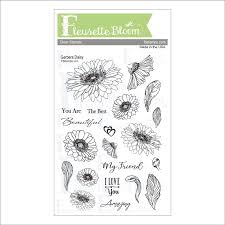
Showing posts with label Gerbera Daisy. Show all posts

Wednesday, April 28, 2021

Smile


Hello Everyone!
It's Ceal here today sharing a card using the Gerbera Daisy set along with the Atelier inks. 
To create this card I started with a top folding white card base and a panel of Tim Holtz white Heavystock.   
I randomly stamped the different sized daisies from the Gerbera Daisy set with embossing ink and embossed them with white powder to create a background. 
I put down come Bee Sting Yellow and Sweet Petunia Pink Atelier ink on a craft sheet, spritzed with water and then smooshed the background panel in them, dried it and smooshed again until I got the look I wanted. 
To finish the card I added a smile die cut. 


Saturday, April 10, 2021

Gerbera Daisy Stamped Background

I have fallen head over heels in LOVE with white pigment ink stamped backgrounds! I used the new Gerbera Daisy Stamp Set from InkOn3 to make this card that's sure to bring a bit of encouragement! 


I started by using Shark Tooth White Atelier Ink to stamp the flower images from the Gerbera Daisy Stamp Set all over a piece of black cardstock. The Shark Tooth White Atelier Ink is so bright and vibrant! You just can't beat it! I wanted more texture in the background so I watered down some of the same Shark Tooth White Atelier Ink and spattered it onto my background. 


I stamped more of the Gerbera Daisy flowers and greenery using Blackout Hybrid Detail Ink and colored them with Copic Markers then trimmed them out with my scissors. I added them with foam tape onto my stamped background. I stamped a sentiment from the Here for You Stamp Set with Juicy Watermark Emboss Ink and heat embossed it with Arctic White Ultra Fine Embossing Powder. 


I sure hope you'll try stamping in white to build a background! See you soon!

Friday, March 26, 2021

Spring has Sprung with Gerbera Daisies!

Hello Friends! It's Cheryl with the Inkon3 Creative Team here to show you a fun Spring inspired card featuring the new Gerbera Daisies Stamp set!

First I stamped several daisies from the Gerbera Daisy Stamp Set using Blackout Hybrid Detail Ink, then I fussy cut the daisies and then colored with copic markers.

Next, I masked off the sides of the card using low-tack tape, and created a bright yellow background using Bee-Sting Yellow Atelier Ink, leaving the tape on, I used some Marigold Orange water color, and diluted it with water. I dipped a paintbrush into the water color and splattered the orange onto the yellow background. Let the water color dry.

Then I removed the tape and then created a border with a simple striped washi-tape.  Next, I adhered the daisies as shown in the picture above. 

For the sentiment, I die cut a rectangle and then I stamped "Hello BeYOUtiful" from the BeYOUtiful clear stamp set using juicy clear embossing ink. Next, I sprinkled some Arctic White Ultra Fine Embossing Powder onto the sentiment and tapped off any excess powder. Then I heat-set the embossing powder. 

Adhere the sentiment onto the card and frame with the striped washi tape!


Products Used:


Saturday, March 20, 2021

Ink Smooshed Backgrounds with White Flowers

Hi it's Lynnea! I love to ink smoosh, don't you!? It gets a bit messy, but the results are so colorful and fun! Today I'm sharing ink smooshing with Atelier Inks and using the NEW Gerbera Daisy Stamp Set from InkOn3! 


Let's just dive right in to those gorgeous backgrounds! I ink smooshed two ways. I started by putting some Bee Sting Yellow, Sweet Petunia Pink, and Trinity Teal Atelier Inks onto my glass work surface. I spritzed them with water and picked up all three colors at once with a piece of plastic and smooshed it onto a piece of watercolor cardstock. I continued to pick up ink until my panel was full. I liked this background, but mixing all three colors together at once created some muddy areas, so I tried a second method to reduce the mud. Haha! 


I used the same three colors of Atelier Ink for my second background, but this time I used them one at a time. I added a bit of Bee Sting Yellow, dried the panel, then Sweet Petunia Pink, dried the panel, and Trinity Teal, and dried the panel. Allowing the colors to dry in between and adding them one at a time reduced the amount of mixing. There's definitely still some mixing of color, but I don't have muddy colors this time. I watered down some Paint it Black Atelier Ink and added ink spatters all over each background. 


I didn't want my images on top to take away from my pretty Atelier Ink backgrounds, so I decided to leave them white. I stamped some flowers and leaves from the Gerbera Daisy Stamp Set and trimmed them with my scissors. I mounted them with foam on my backgrounds. I stamped sentiments from the Here for You Stamp Set with Juicy Watermark Emboss Ink and heat set them with Arctic White Ultra Fine Embossing Powder. I trimmed them into strips and added them to the center of my floral cluster. 


I added a bit of glam to the sentiment strips with Liquid Pixie Dust to complete this card set. I hope you'll try this ink smooshing technique! 

Thursday, November 17, 2016

More Gerbera Daisies! Using FBstamps Clear Stamps


Happy Thursday, Crafty Friends... It's fall and can you believe Thanksgiving is just in one week?!

Thanksgiving is the time of year to be thankful for all they have. For me, I am very thankful for family and friends! I appreciate each and everyone one of them. And though I try to show them I care everyday, sometimes life just get's in the way. I guess that's what I get for "adulting"... mommy & wifey duties, house chores, design team obligations... they all pile up! 

I'm making an active effort to let my loved ones know I appreciate & love them. 

Today is my first Guest DT post for FB stamps and I made this fall themed I love you card.

Supplies Used

Gerbera Daisy (FB Stamps)
Chipboard
Whimsy Embossing Folder (Lifestyle Crafts)
Mega Runner (Xyron)
VersaFine Onyx Black (Tsukineko/ Imagine Crafts)
Clean Color Real Brush Markers (Zig/ Kuretake)
Wink of Stella (Zig/ Kuretake)
Mixed Media Paper (Strathmore)
Whipped Spackle (Faber-Castell)
3D Dots (EK Success)
PITT Artist Pen XS (Faber-Castell)
Chalklets(EK Success)
White Gel Pen (Sakura)
Glitter Enamel Dots
Hemp Twine 
Button
Scissors


I started by stamping my images in black ink onto mixed media paper. then, I colored the flowers with my Zig Markers in Yellow, Mustard, Beige,Dark Oatmeal, &  Brown and went over the centers with a clear glitter pen. I also colored the leaves in Mild Green, Olive green, & Deep Green. 

I fussy cut the flowers all the images out but if you are not great at fussy cutting or just want to save time FB Stamps have the cut files for all their stamps and the coordinating digi dies are FREE!!

I stamped doubles of the bigger blooms and cut off the outer row of petals. then layered it onto the bigger bloom with foam dots.


I wanted my flowers to be an arrangement and not just floating on the card... so, I used Eileen Hull's Tea Cup Die for the cup and the tag. I cut them from Chipboard then adhered my patterned paper onto them with my Creative Station Lite.

I shaded the edges with  abit of chalk in colors that were at least 2 shades darker than the paper.

 The little "I love You" stamp comes included with the Gerbera Daisies set.

In the picture above it looked cute it felt it was missing something...


So, I added some texture to the background with a bit of modeling paste and a stencil.
And cut out a band for my teacup and embossed it and added enamel glitter dots.

I traced around the cup and tags with an extra fine black pen and then added highlights with a white gel pen. I also went over the embossed area with the same black pan as well. 

Then finally, I finished it off with a button topped multi-looped twine bow.

Here is a close up of all the dimension in this card...


I am enjoying this stamp set very much and I'm looking forward to making more with it!!

I hope you all enjoyed today's card!!

Until next time...

HAPPY CRAFTING!!
~Mitsy

You can see more of Mitsyana on her blog 
http://www.upontippytoes.com/2016/11/love-and-appreciation.html