Saturday, December 11, 2021

Shimmery Christmas Card

A little stamp layering with InkOn3 stamps and Atelier Inks and shimmer watercolors make a quick and easy Christmas card! 


I stamped the outlines of the birds from the Love Birds Stamp Set with Blackout Hybrid Detail Ink repeatedly on my background until my cardstock was full of little birdies. I used the layering images for the birds and stamped them with Marilyn Red Atelier Ink to mimic the look of cardinals. There are layering stamps to fill in the tails and wings as well, but I decided to use some shimmer watercolor for a bit of sparkle. I added some gold watercolor spatters to finish off the background. 


I stamped a greeting from the Holiday Wreath Stamp Set three times with Juicy Watermark Embossing Ink and heat embossed with Gold Rush Fine Detail Embossing Powder. I trimmed each of the sentiments into small strips and popped them up near the top center of my card. 


Thanks so much for joining me! I hope you enjoyed this shimmery Christmas card! 

Thursday, December 9, 2021

Merry Christmas, Deer!


Hello friends! 
It's Ceal, here.  Today I am sharing a card using one of my favorite stamps from Ink On 3. 

To create this card I started with a white top folding card base and a piece of white cardstock for the image. I stamped the image deer from Oh Deer with Blackout ink, colored it using alcohol markers and then cut it out with the Coordinating Die.
Next I stamped the lights and the ornaments, also colored with alcohol markers and cut with the dies. 
To finish the card I added some glossy accents to the ornaments and lights and then added the Merry Christmas die cut from Picket Fence Studios 


Tuesday, November 30, 2021

Love Birds Planner Pages

Hello Crafty Friends! I'm going to go back to my roots and start creating planner layouts from scratch again! I like starting off with some dot grid pages because it provides some points of references, but from a distance, you can hardly notice that the pages has a grid at all! The planner layout below is for a B6 ring planner, but you can adjust the boxes to whatever planner you like to use!


The daily boxes are 1.5" wide, which is standard for most planners, the top rectangle is 1.5" high and the width to match the three daily boxes. 


First, I masked off around the large top rectangle. Then I used a blender brush and applied the Bee-Sting Yellow Atelier Ink to create a background. You can saturate the color on the sides to create an ombre look.  Leaving the mask on, stamp the birds, and feathers from the Love Birds Clear Stamp Set. I also used a vine from the Holiday Wreath Clear Stamp Set. With a red pen, draw little hearts in random open spaces.


Remove the mask, and then use date stamps or stickers for each day of the week. Stamp a calendar on the lower left hand corner of the left planner page. Then add some washi tape to the bottom for a little more deco!

Isn't this such a fun and pretty layout!?


Inkon3 Products used:


Saturday, November 27, 2021

Easy Masking with Dies

I love easy techniques and I have an easy masked background to share with you! I used Atelier Inks and some Reverse Confetti stamps and dies for this wintery card. 


I stamped a bunch of snowflakes all over my card with Blackout Hybrid Detail Ink and then used the coordinating die set to cut masks for each image from masking paper. 


I placed the masks over the stamped images and then pulled out some Atelier Inks to blend over my background. I started with My Jam Purple at the bottom, Trinity Teal in the middle, and Sweet Petunia Pink at the top. I added some spatters of shimmer watercolor and removed the masks. I love the look! The masks leave a sort of 'halo' around the stamped images that's so fun! 


I planned to make this a one layer card, but I forgot to stamp a sentiment when I was stamping the snowflakes, so I stamped one onto white cardstock, trimmed it out, and popped it up onto my card. 


Thanks so much for joining me! I'll see you soon! 

Saturday, November 13, 2021

NEW RELEASE! | Faux Watercolor with Atelier Ink Cubes

There's a new release from InkOn3 and I used one of the new stamp sets and some Atelier Ink Cubes to create an Autumn themed faux watercolored card. 


The new Thankful For You Stamp Set has solid and outline leaves that you can use together or separately. I lined up the solid images on my card using my Misti and inked them up with Marilyn Red, Marigold Orange, and Bee Sting Yellow Atelier Ink Cubes. I spritzed them with a bit of water and stamped them onto my card giving me a faux watercolor look. 


I stamped the outlines with Blackout Hybrid Detail Ink but I offset them to add to the whimsy of the background. I added some flicks of gold watercolor to fill in any empty spaces. 


I used Blackout Hybrid Detail Ink to stamp a sentiment from the Thankful For You Stamp Set, cut it into strips, and lined the bottom with red cardstock and popped up the strips with foam tape to finish the card. Thanks for joining me! 

Friday, November 5, 2021

Thankful for You


Hello Everyone! 
It's Ceal, here. Today I am sharing a card using the Hey Gorgeous set and the Thankful for You set that just released. 

To create this card I started with a top folding white card base and a white panel. I stamped the image using Blackout ink and colored it using alcohol markers. I stamped the  image again on some patterned paper and fussy cut out the hat and then added some of the leaves from the Thankful for You set to the hat. 
To finish the card I added a sentiment. 


Until next time Happy Stamping!

Wednesday, November 3, 2021

Just Breathe Encouragement Card - Rainbows with Atelier Inks

Just Breathe, Encouragement Card,Penguin Palace, Ink On 3,Collaboration Hop,Ink Blending,Coloring with Atelier Inks,Rainbow, Koi, Fadeout Ink, Card Making, Stamping, Die Cutting, handmade card, ilovedoingallthingscrafty, Stamps, how to,

Hello, again my friends, Ilda here 👋

I am back with a card I created as part of a collaboration Hop between Inkon3 and Penguin Palace Stamps which is happening over on👉 Instagram

We teamed up to celebrate the Penguin Palace's 3rd Anniversary! Still plenty of time to join.  You can hop along with us on Instagram for your chance to win one of two $25 gift cards (one to the Ink on 3 store and one to the Penguin Palace store). The hop will end on November 7 @ 11:59 PM PDT.

Just Breathe, Encouragement Card,Penguin Palace, Ink On 3,Collaboration Hop,Ink Blending,Coloring with Atelier Inks,Rainbow, Koi, Fadeout Ink, Card Making, Stamping, Die Cutting, handmade card, ilovedoingallthingscrafty, Stamps, how to,

Here is how this card came together.
Just Breathe, Encouragement Card,Penguin Palace, Ink On 3,Collaboration Hop,Ink Blending,Coloring with Atelier Inks,Rainbow, Koi, Fadeout Ink, Card Making, Stamping, Die Cutting, handmade card, ilovedoingallthingscrafty, Stamps, how to,

Hope this Just Breathe Encouragement Card inspired you today and reminds you that it is ok to take a break, stop, relax, do nothing and just Breathe. Especially with all that is going on in the world right now, it's OK! People are more understanding than you realize because after all we all need and deserve a break from time to time😉

If you want to watch a short video clip of how I colored in the Koi, click the play button below.
Thank you for stopping by and until next time... Happy Crafting!
Ilda 🌈🐟

Sunday, October 31, 2021

GOURD-GEOUS Gratitude Journal Page

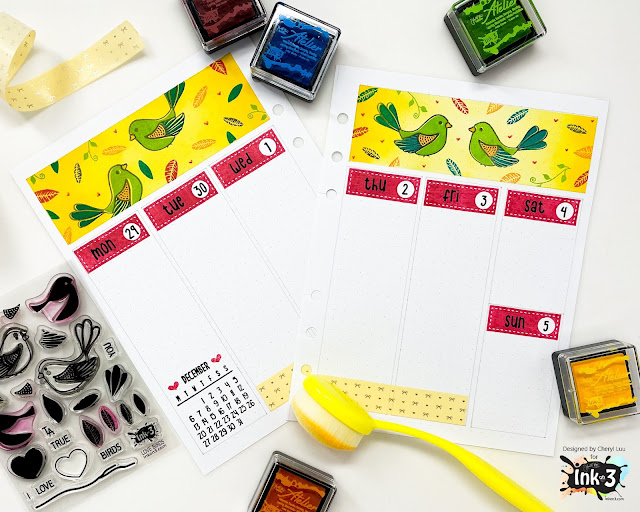
Hello Crafty Friends! It's Cheryl with the Inkon 3 Creative Team here to show you a quick and easy way to dress up a gratitude journal! 

Since I will be using these pages for my November gratitude, I used the Pumpkin Patch Clear Stamp set. Isn't it perfect for Fall Vibes?  


First, I stamped the pumpkins onto sticker paper using the Fadeout No Line Coloring Ink, then I colored using the copic colors listed below. Next, I fussy cut the image.

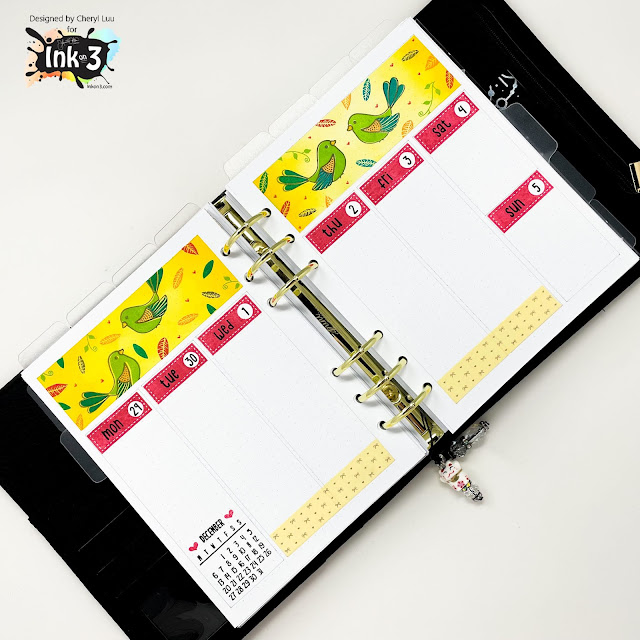
To add a little bit more depth and dimension to the pages, I added some ink to two corners of my journal page. I used a blender brush and applied some Atelier Ink in Bee Sting Yellow on two opposite corners of the page. Then with another blender brush, I applied some Atelier Ink in Marigold Orange on the same corner, concentrating the color in the inner corners. Blend the colors more by layering the Bee-Sting Yellow ink to create a smooth transition to the colors, creating an ombre effect.

Lastly, adhere the Pumpkins onto the planner page and then use the Blackout Hybrid Detail Ink to stamp the sentiment "Grateful For your Kindness" on the lower right-hand corner.


Products Used:

Copic Colors Used:
Oranges: YR68, YR16, YR14, YR12, YR21
Greens: G46, YG63, G24, G21, YG61
Yellows: Y19, Y15, Y13, Y11


Saturday, October 30, 2021

Layered Ornaments Card Set with Atelier Inks

It may the end of October, but the Holidays will be here before you know it! I used a layering stencil set from Pretty Pink Posh along with my InkOn3 Atelier Inks and some ThermOWeb Glitz Glitter Gel and created a quick set of Holiday cards! 


This card set was really quick to pull together and I love that you can customize your backgrounds to make whatever colors you want!


I used the Pretty Pink Posh Layered Ornaments Stencil Set along with my Atelier Inks and created four backgrounds. I used Marilyn Red, Goddess Green, Sweet Petunia Pink, and Trinity Teal Atelier Inks to create my baubles. 


I moved on to the second layer of the stencil set and first blended Bee Sting Yellow Atelier Ink and then a bit of Twiggy Brown Atelier Ink over the yellow to create a golden yellow ornament topper. Perfect! 


You could stop here and you would have some really cute inked cards, but the Layered Ornaments Stencil Set comes with a detail layer! I debated adding ink over the top for a quicker set of cards, but I really wanted some glitter! I broke out my Silver Glitz Glitter Gel and added glitter accents to each of the baubles. I'm really happy with how the silver looks with the bold ink colors! 


I wanted simple but elegant sentiments for each of my cards, so I stamped the Pretty Pink Posh Holiday Scripts Stamp Set with Blackout Hybrid Detail Ink and used the coordinating dies to cut out the sentiments. I pieced together sentiments and added them to each of the cards with foam tape. 


I hope you enjoyed this quick and easy card set! The bold Atelier Inks were perfect for these ornaments! See you soon!

Monday, October 25, 2021

Memory Dex Calendar with Fall Vibes!

Hi Crafty Friends! It's Cheryl with the Inkon3 creative team here to show you a fun way to bring on the Fall Vibes! Can you believe that November is just around the corner?  I love making memory dex calendars and I thought the little Fox & Bunny Hugs clear stamp set is perfect for the fall!


First, I die cut a memory dex card onto fall colored/themed cardstock. Then I die cut a scalloped rectangle using white cardstock. On the white cardstock, I stamped the November Calendar using Blackout Hybrid detail ink. Then stamp the little leaves from the Fox & Bunny Hugs stamp set using  the Atelier Inks Green Goddess Cube. Adhere the scalloped rectangle onto the memory dex die cut.

Next, stamp the Fox & Bunny onto white cardstock using the Fadeout No Line Coloring Detail Ink Cube, coloring with your choice of color medium, or with the copic colors listed below. Fussy cut the colored image and adhere onto the memory dex card!

Copics Used:
Oranges: E99, YR27, E97, E95, YR00
Light Browns: E55, E53, E51, E50
Greys: W9, W7, W5, W3, W1, W0

Products Used: 


Saturday, October 16, 2021

Heat Embossed Poinsettia Card

I have a no coloring required card to share with you using the InkOn3 Poinsettia Stamp Set and coordinating dies! 


I stamped the flowers and leaves from the Poinsettia Stamp Set onto red and green cardstock using Juicy Watermark Embossing Ink and embossed them with Arctic White Fine Detail Embossing Powder. I stamped and heat embossed a bunch so that I would have enough to cover a full background and have some extras left over. I wanted to add a little bit of dimension so I blended a bit of Twiggy Brown Atelier Ink to the centers of the flowers and Trinity Teal on to the bottom of the leaves. I added some gold watercolor ink spatters onto the flowers and leaves and used the Poinsettia Coordinating Die Set to cut out the images. 


I arranged the poinsettias and the leaves all over my card base and adhered them with liquid adhesive. Check out my video for some quick tips for adhering multiple small images at once! 


I die cut a large sentiment from black cardstock and covered it with Liquid Pixie Dust for some super magical sparkle and added it to the card with foam tape. That's it! Have a great day! 

Saturday, September 25, 2021

Atelier Ink Set of Teacher Cards

My son started kindergarten a few weeks ago and I decided to spoil his teacher with a set of cards stamped with InkOn3 Atelier Inks


Teachers work so hard and I wanted to show my son's teacher how much I appreciate her! I thought a long time about what style of card to make, but when I saw these apples I knew they were perfect!


I made one card to give to her and then a set of five cards to give as a gift. I used the Taylored Expressions I Pick You Cling & Clear Combo for all of the cards. This was the perfect set because it gave me an excuse to bust out my Atelier Inks and do some solid stamping! 


I started by stamping the background - the apple outlines - with Blackout Hybrid Detail Ink and then used the coordinating stamp set to fill in the centers of the apples. I love that there are so many different styles of apple "fillings"! I used Marilyn Red, Marigold Orange, Bee Sting Yellow, and Goddess Green Atelier Inks to create my apples. 


Once all of my apples were stamped I used the I Pick You Stencil to add more detail to the backgrounds. This stencil perfectly masks off the apples in the background and creates some fun horizontal stripes. I used Peacock Blue, Paint It Black, and Twiggy Brown Atelier Inks to add ink blending to the backgrounds. 


Even thought all the backgrounds are different I decided to keep things consistent by using the same sentiment on each card. I die cut using the My Favorite Things Sweet Hello Die Set and popped the sentiments up onto my card. I stamped a coordinating sentiment from the I Pick You Stamp Set with Blackout Hybrid Detail Ink to complete the look. 


I hope this project inspires you! Thanks so much for watching! 

Friday, September 24, 2021

Pink Pumpkins


Hello Everyone!
It's Ceal, here. Today I am sharing a card using the Pumpkin Patch stamp set by Ink on 3. Pumpkin can be pink right?

To create this card I started with a top folding kraft card base an a piece of white cardstock for the image. I stamped the image with Blackout ink, colored it using alcohol markers and then cut it out with the coordinating die


Thanks for stopping by, for all the details you can head over to my blog, Simply Beautiful.
 

Saturday, September 11, 2021

Masked Ink Blending

Hi, it's Lynnea! Even simple masking gives your stencils new life! I masked off the edges of the InkOn3 Wonky Lines Stencil for a more focused background. 


Stencils are my favorite crafty tools and I love giving them new life. I'm a simple crafter, so I try to bring simplicity a bit of flare in my craft room! I used Purple Tape and masked off 3/4" on each side of an A2 piece of cardstock. I sprayed the back of the Wonky Lines Stencil with Pixie Spray so that the detailed lines wouldn't shift while I blended with Atelier Inks. Can you believe I only used two colors of ink on the background?! I started with a few blobs of Bee Sting Yellow and then finished off with Peacock Blue. I made sure that the inks overlapped to create varying shades of yellow, green, and blue. 


I removed the stencil, but left the masking tape in place and spattered on some black watercolor for extra texture. Then I removed the tape and set the background aside to dry. I stamped out all three dragons and some flames from the Magical Dragons Stamp Set with Blackout Hybrid Detail Ink and colored them with Copic Markers. I used the coordinating Magical Dragons Die Set to cut them out. 


I popped up the dragons and a sentiment onto my background with foam tape and then covered the dragons with Liquid Pixie Dust for some magical shimmer! Thanks so much for joining me! 

Friday, September 3, 2021

Colored Pencils on Kraft


Hey Y'all! 
It's Ceal, here. Today I am sharing another card made using the gorgeous Lotus stamp set.
To create this card I started with a top folding white card base and a panel of Kraft cardstock cut down with a stitched die. I stamped the Lotus using BlackOut detail ink and then colored it using Polychromos pencils.  To finish the card I added a sentiment from that same set. 


Thanks for stopping by! 
Until next time, stay crafty! 
 

Tuesday, August 31, 2021

Pretty Lotus Decorative Phone Case

Hi Crafty friends! It's Cheryl with the Inkon3 Creative team here to show a fun way to use your stamps to decorate your phone case! You'll need a clear phone case and a cut file for your phone case (I got mine from Etsy for about $2).


I precut a bunch of the inserts for the phone to have handy since each cut file can cut three inserts per 8.5x11 sheet of paper. Then stencil in a background using the Curls 6x6 Stencil, and Atelier inks in Peacock Blue and Trinity Teal.


Then stamp out the lotus from the Lotus clear stamp set using Blackout Detail Ink. Color with your choice of color medium, then fussy cut.  Adhere the Lotus onto the stenciled insert and trim off any paper that overhangs the phone insert.

Lastly, slip the insert into your clear phone case and enjoy! :)

Products Used:


Saturday, August 28, 2021

Floral Atelier Ink Watercolor

This card was so easy to make and it's one of my favorites I've made in a long time! I watercolored these gorgeous florals with InkOn3 Atelier Inks and they're just gorgeous! 


Atelier Inks are great for stamping and ink blending ... but I really LOVE the way they work as watercolors! They are so vibrant! I stamped the Concord & 9th Heartfelt Blossoms Stamp Set with Blackout Hybrid Detail Ink and heat embossed with Crystal Clear Fine Detail Embossing Powder. The embossing helps to keep the watercolor in the lines - which is something I definitely need! I used Goddess Green, Bee Sting Yellow, Sweet Petunia Pink, and Trinity Teal Atelier Inks to watercolor my background and then used the coordinating die to cut it out. 


I created a peek through background by stamping the Altenew Pinstripe Stamp with Blackout Hybrid Detail Ink and popped up my watercolored image on top with foam tape. I wanted a sentiment that would perfectly match my background, so I blended Trinity Teal Atelier Ink onto white cardstock and then die cut the sentiment. The color of the sentiment perfectly matches my watercolored frame! 


I finished off this pretty Atelier Ink watercolored card with some pastel pearls. Thanks for joining me!