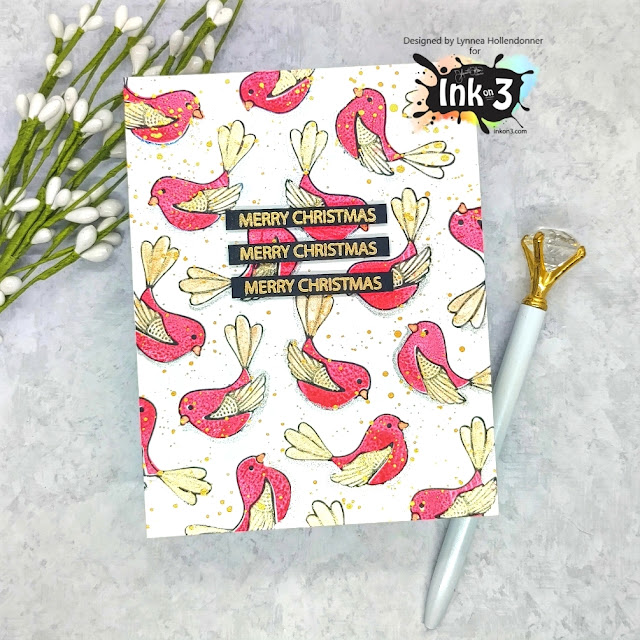
I stamped the outlines of the birds from the Love Birds Stamp Set with Blackout Hybrid Detail Ink repeatedly on my background until my cardstock was full of little birdies. I used the layering images for the birds and stamped them with Marilyn Red Atelier Ink to mimic the look of cardinals. There are layering stamps to fill in the tails and wings as well, but I decided to use some shimmer watercolor for a bit of sparkle. I added some gold watercolor spatters to finish off the background.
Showing posts with label Christmas Card. Show all posts
Saturday, December 11, 2021
Shimmery Christmas Card
A little stamp layering with InkOn3 stamps and Atelier Inks and shimmer watercolors make a quick and easy Christmas card!
I stamped a greeting from the Holiday Wreath Stamp Set three times with Juicy Watermark Embossing Ink and heat embossed with Gold Rush Fine Detail Embossing Powder. I trimmed each of the sentiments into small strips and popped them up near the top center of my card.
Labels:
Atelier Ink,
Atelier Ink Cube,
Christmas Card,
Gold Rush Ultra Fine Embossing Powder,
Holiday Wreath StampSet,
love birds Clear stamps,
Lynnea Hollendonner,
process video,
Video,
Video Tutorial
Saturday, November 27, 2021
Easy Masking with Dies
I love easy techniques and I have an easy masked background to share with you! I used Atelier Inks and some Reverse Confetti stamps and dies for this wintery card.
I stamped a bunch of snowflakes all over my card with Blackout Hybrid Detail Ink and then used the coordinating die set to cut masks for each image from masking paper.
I placed the masks over the stamped images and then pulled out some Atelier Inks to blend over my background. I started with My Jam Purple at the bottom, Trinity Teal in the middle, and Sweet Petunia Pink at the top. I added some spatters of shimmer watercolor and removed the masks. I love the look! The masks leave a sort of 'halo' around the stamped images that's so fun!
I planned to make this a one layer card, but I forgot to stamp a sentiment when I was stamping the snowflakes, so I stamped one onto white cardstock, trimmed it out, and popped it up onto my card.
Thanks so much for joining me! I'll see you soon!
Labels:
Atelier Ink,
card,
card making,
christmas,
Christmas Card,
ink blending,
Lynnea Hollendonner,
Masking,
My Jam Purple Atelier,
process video,
Sweet Petunia Pink,
Trinity Teal,
Video,
Video Tutorial,
YouTube video
Saturday, October 30, 2021
Layered Ornaments Card Set with Atelier Inks
It may the end of October, but the Holidays will be here before you know it! I used a layering stencil set from Pretty Pink Posh along with my InkOn3 Atelier Inks and some ThermOWeb Glitz Glitter Gel and created a quick set of Holiday cards!
I used the Pretty Pink Posh Layered Ornaments Stencil Set along with my Atelier Inks and created four backgrounds. I used Marilyn Red, Goddess Green, Sweet Petunia Pink, and Trinity Teal Atelier Inks to create my baubles.
I moved on to the second layer of the stencil set and first blended Bee Sting Yellow Atelier Ink and then a bit of Twiggy Brown Atelier Ink over the yellow to create a golden yellow ornament topper. Perfect!
You could stop here and you would have some really cute inked cards, but the Layered Ornaments Stencil Set comes with a detail layer! I debated adding ink over the top for a quicker set of cards, but I really wanted some glitter! I broke out my Silver Glitz Glitter Gel and added glitter accents to each of the baubles. I'm really happy with how the silver looks with the bold ink colors!
I wanted simple but elegant sentiments for each of my cards, so I stamped the Pretty Pink Posh Holiday Scripts Stamp Set with Blackout Hybrid Detail Ink and used the coordinating dies to cut out the sentiments. I pieced together sentiments and added them to each of the cards with foam tape.
I hope you enjoyed this quick and easy card set! The bold Atelier Inks were perfect for these ornaments! See you soon!
This card set was really quick to pull together and I love that you can customize your backgrounds to make whatever colors you want!
Labels:
Atelier Ink,
card,
Card Set,
christmas,
Christmas Card,
ink blending,
Layering Stencil,
Lynnea Hollendonner,
process video,
Video,
Video Tutorial,
YouTube video
Saturday, October 16, 2021
Heat Embossed Poinsettia Card
I have a no coloring required card to share with you using the InkOn3 Poinsettia Stamp Set and coordinating dies!
I arranged the poinsettias and the leaves all over my card base and adhered them with liquid adhesive. Check out my video for some quick tips for adhering multiple small images at once!
I die cut a large sentiment from black cardstock and covered it with Liquid Pixie Dust for some super magical sparkle and added it to the card with foam tape. That's it! Have a great day!
I stamped the flowers and leaves from the Poinsettia Stamp Set onto red and green cardstock using Juicy Watermark Embossing Ink and embossed them with Arctic White Fine Detail Embossing Powder. I stamped and heat embossed a bunch so that I would have enough to cover a full background and have some extras left over. I wanted to add a little bit of dimension so I blended a bit of Twiggy Brown Atelier Ink to the centers of the flowers and Trinity Teal on to the bottom of the leaves. I added some gold watercolor ink spatters onto the flowers and leaves and used the Poinsettia Coordinating Die Set to cut out the images.
Labels:
Atelier Ink,
card,
christmas,
Christmas Card,
Die cutting,
Heat Embossing,
Liquid Pixie Dust,
Lynnea Hollendonner,
process video,
Video,
Video Tutorial,
YouTube video
Friday, July 9, 2021
Christmas in July Poinsettia Card
It's no secret that I LOVE all things winter and Christmas! I get so happy when July comes around because it gives me an excuse to share Christmas cards again!
I stamped out flowers, leaves, and twigs from the Poinsettia Stamp Set with Blackout Hybrid Detail Ink and colored them with Copic Markers and cut them out with the coordinating Poinsettia Die Set. I arranged them onto my background with foam tape for dimension. I wanted a simple sentiment that wouldn't take away from the background and bright images, so I stamped a sentiment from the Merry & Bright Stamp Set with Juicy Watermark Emboss Ink and heat set it with Arctic White Ultra Fine Embossing Powder.
No Christmas card is complete without adding even more shimmer so I covered my colored images with Liquid Pixie Dust! Now they sparkle and shine and make my heart so happy! Thanks so much for joining me!
I wanted to have bold images against a wintery background, so I placed a snowflake stencil over a piece of black cardstock and used Shark Tooth White Atelier Ink to create the background for my card. For a bit more interest I spattered on some Liquid Pixie Dust. I love how easy it can be to create a magical background!
Labels:
Atelier Ink,
christmas,
Christmas Card,
Christmas in July,
Heat Embossing,
Lynnea Hollendonner,
Merry and Bright,
Poinsettia,
process video,
Shark Tooth White,
stencil,
Video,
Video Tutorial,
YouTube video
Saturday, November 28, 2020
Ink Smooshed Rainbow Christmas Card
Can't stop won't stop with the rainbow Christmas cards! I used some Atelier Inks from InkOn3 to create a smooshy rainbow background for this punny card!
I would like to start an official petition to bring back ink smooshing! Haha! It's one of my favorite techniques. It's effortless and easy to blend colors for an organic looking background. I pressed some Bee Sting Atelier Ink onto my work surface. I use a glass mat, but a piece of plastic packaging would work, too! I sprayed the ink once or twice with water and then used an old stamp pocket ( again, a piece of plastic would work just fine! ) and picked up some of the ink and pressed it onto a piece of watercolor cardstock. I repeated the process with Trinity Teal Atelier Ink and Sweet Petunia Atelier Ink, The colors mixed together giving me a rainbow background!
I added a spritz of water to a drop of Shark Tooth White Atelier Re-Inker and used a paint brush to spatter some paint onto my background. I used Blackout Hybrid Detail Ink to stamp the adorable images and color them with Copic Markers. I trimmed out the images and added them to the smooshy background with foam tape.
Labels:
Atelier Ink,
christmas,
Christmas Card,
Faux Watercolor,
Holiday,
Ink Smooshing,
Lynnea Hollendonner,
process video,
Video,
watercolor
Friday, November 27, 2020
Warm Winter Wishes Holiday Card ft. Little Birdie
Hey Friends and Happy Friday, Ilda here!
I am so excited to share this Warm Winter Wishes Holiday Card with you today. I absolutely love how it all came together. The design, the colors, the sparkle, and the texture..., it just may be one of my all-time favorite cards! The stamps I used come from Ink On 3's LITTLE BIRDIE Set. The images in this set are so pretty and perfect for so many occasions but I wanted to show you how it could be used for the Holidays.
CARD DETAILS
To begin, I stamped the Birdie using BLACKOUT INK and then colored it in using Prismacolor Pencils and fussy cut the image out. I actually had colored him for the first day of Kathy Raccosins latest coloring Coloring Challenge so that saved me some time when it came to putting this card together.
The next thing I did was plan out the design using the branch stamp. Once I had it somewhat figured out, I then placed the panel in the MISTI and stamped the branch using BLACKOUT INK. I then rotated the panel 90 degrees and placed it back in the MISTI stamped the branch again to create the same design on the opposite side in reverse. I repeated the same steps for each of the leaves and then I freehand stamped the berries and extra leaves to create subtle differences.
The images were then colored in using Copic Markers and then to add a touch of sparkle I added a layer of LIQUID PIXIE DUST. I then trimmed down the panel that would then later be glued onto a red piece of cardstock.
Next, I stamped out the Sending stamp on the right side of the card panel and also stamped out the warm winter wishes onto black cardstock using ATELIER SHARK TOOTH WHITE INK, to which I then trimmed down and glued in place with a bit of foam.
To create the snow-like appearance on the branches and berries, I used Liquid Applique and puffed it up with the heat tool. Once it cooled off I added some glue on top of it and sprinkled some glitter on it for an added touch of sparkle.
The last thing I did was to glue the Birdie in place using foam tape.
I hope you have inspired by this Warm Winter Wishes Holiday Card of mine and I pray you and yours are staying warm and safe this Holiday season.
Thank you for stopping by and until next time... Happy Crafting!
Connect with me also on my Blog, Facebook Page, Instagram, and YouTube
SUPPLIES
![]() LITTLE BIRDIE Shop at: IO3 | ![]() BLACKOUT INK Shop at: IO3 | ![]() ATELIER SHARK TOOTH Shop at: IO3 | ![]() LIQUID PIXIE DUST Shop at: IO3 | ![]() SMALL TIP WATER BRUSH PEN Shop at: IO3 |
![]() INK OFF STAMP CLEANER Shop at: IO3 | NEENAH SOLAR WHITE 110 Shop at: SSS | AMZ | HBS | ![]() ORIGINAL MISTI Shop at: SSS | AMZ | SB | HBS | ![]() PRISMACOLOR PENCILS Shop at: SSS | AMZ | ![]() COPIC SKETCH Shop at: AMZ |
![]() LIQUID APPLIQUE Shop at: SSS | AMZ | ![]() STUDIO KATIA GLUE Shop at: SSS | SK | ![]() SPARKLE GLITTER Shop at: SSS | SK | ![]() FOAM TAPE - WHITE Shop at: SSS | SK | ![]() GLOSSY ACCENTS Shop at: SSS | AMZ | SB | HBS |
Saturday, November 14, 2020
Little Birdie Cardinal Card
There's a new stamp set in the InkOn3 shop and it covers all of your bases! There are flowers, twigs, lots of sentiments, and of course a little birdie!
I saw the Little Birdie Stamp Set and immediately wanted to create a Christmas cardinal card! I wanted a simple background, so I grabbed the Leafy Forest Stencil and Goddess Green Atelier Ink. As I blended the ink over the stencil I realized that my background was looking too "spring." The Goddess Green Atelier Ink is a gorgeous green color, but a little too bright for my Christmas background. I added a little bit of Twiggy Brown Atelier Ink over the Goddess Green Atelier Ink and the result was a pretty olive green colored background. Perfect!
Labels:
Atelier Ink,
Blackout Hybrid Detail Ink,
Christmas Card,
ink blending,
Leafy Forest Stencil,
Liquid Pixie Dust,
Little Birdie Stamp Set,
Lynnea Hollendonner,
Video,
Video Tutorial,
YouTube video
Tuesday, November 6, 2018
Liquid Pixie Dust on Poinsettia Blessings Card
Hello my crafty friends, Ilda here with you today!
Well, the snow has started falling here and it looks like it will stay with us for a while... before you know it Christmas will be here!
Today I'm sharing another Christmas creation for Ink On 3. This card features a couple of the newer released sets, Poinsettia, Merry and Bright and an older set Fairy Christmas.
To the ink blended background, I stamped out the evergreen branches. I then added the other pieces that I had stamped out with Blackout Ink and colored in with Zig Clean Clear markers. To the poinsettias, I added extra petals by masking each flower and stamping individual petals in between the spaces and then fussy cut each flower. I finished off the card by adding some glossy accents to the centers and some sparkly sequins.
Hope this Poinsettia Floral Christmas Card inspired you today. For a complete list of all the products used today, stop by my blog I Love Doing All things crafty.
Thank you for stopping by 😊
Until next time... Happy Crafting 👋
Subscribe to:
Posts (Atom)


