Saturday, November 27, 2021
Easy Masking with Dies
Sunday, July 25, 2021
Making Cards and Mistakes with Erica
Hi guys!
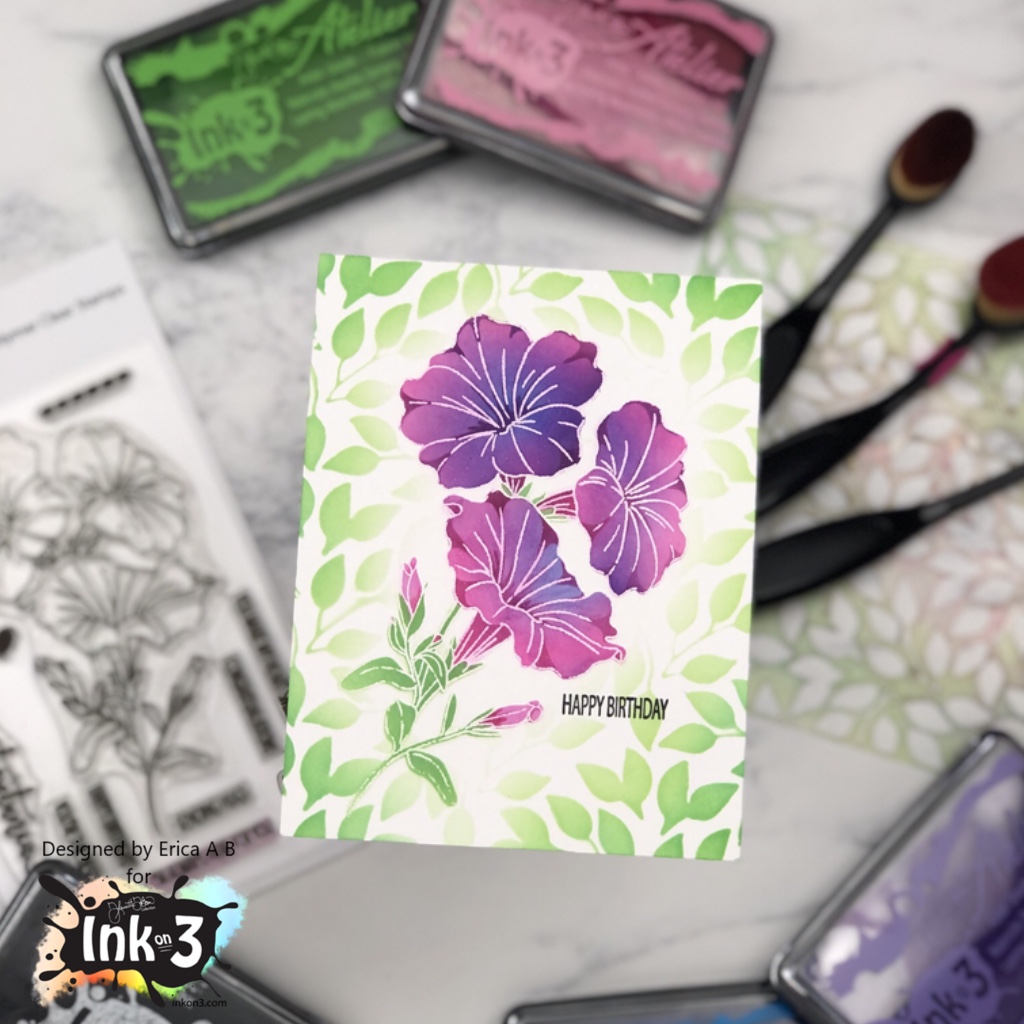
It’s Erica back on the Ink On 3 blog with another card using the My Sweet Petunia stamp and layering stencil set. On this one I made a big mistake, and thought I’d share it with you so you can avoid it yourself.
If you saw my last blog post, I used this set for those cards too, but on those I ink blended first and then heat embossed the outline stamp on top. For this card, I did not do that.. and it ended up a bit meh… not going to lie. Take it from me, if you want a white heat embossed outline, do that last.
So I started out by heat embossing the gorgeous My Sweet Petunia stamp on white card stock. I’m not sure why I did it this way, I should know better by now, really. Anyway, I grabbed Sweet Petunia Pink, My Jam Purple and Peacock Blue Atelier Inks, some Life Changing Blender Brushes and the My Sweet Petunia layering stencils.
Right off the bat, I realised what a mistake I had done as the inks are so pigmented and vibrant, they instantly discoloured the white embossed lines. I SHOULD know better by now! And yeah, I said it again, because I really don’t know what I was thinking here.
Anyway, onward and upwards. I ink blended the My Jam Purple and Peacock Blue to create a deep, vivid look for the flowers and then went softly with Goddess Green for the stem and leaves layer. I tried cleaning up a little, but it’s very easy to smudge and leave marks on the project when doing this, so I did what I felt I could do safely without making too much of a mess.
Around the flower I also ink blended more Goddess Green using the Leafy Forest Stencil, just to add some softness to the card, which is a true one-layer card if you can believe it! A quick Happy Birthday was stamped up with Blackout Ink and that was it.
Super simple, and it can work for so many occasions. Just change up the colour scheme and sentiment, and you are good to go! Oh, and ink blend FIRST, and heat emboss when all the ink is dry. Maybe best to leave it overnight to make sure. Take it from me, don’t do it my way, because that did not work out very clean. Having said that, that’s only with white embossing powder, I guess? Maybe gold will be fine? Ok, I’m off to best that theory! See you next time!
Lots of love and happy crafting from Erica
Friday, December 11, 2020
Little Birdie - No Line Coloring
Hi everyone! It’s Jeannie (InsideoutJeans) on the blog today with Ink on 3’s stamp set named Little Birdie stamp set. Last month, I used this stamp set in a non-wintery way; it ended up being more like a springtime card.
I stamped out the images using Fadeout Ink and did some no line coloring. I wanted a wintery scene for this card so I went with a red flower along with blue flowers.For the background, I mixed some My Jam Purple and Peacock Blue reinkers to create this darker blue color. I did an ombre watercolor wash on a piece of Canson XL watercolor paper with some Shark Tooth White splatter, which almost made the scene wintery.
Wednesday, December 9, 2020
Basic Starter Watercoloring with Guest Designer Melinda
Happy hump day beautiful people! Today I’m going to share a card technique that I love because the painting is pretty quick and simple. This one will be great for those of you learning to watercolor.
* Cut card base 4x9 inches and top piece at 3 3/4x 8 3/4 inches
* Take the Pondie stencil and some texture paste and smear across the center of your top piece. Set aside to dry while you make the rest of the card.
* Cut 6 1/2 x 8 inch piece of watercolor paper and lay down the large floral and the leaves in the lower left corner of your paper. Stamp the flower with My Jam Purple and the leaves in Trinity Teal. The bud I stamped the top in purple and the lower part with the teal. Flip your paper and repeat the stamping. If you have a stamp positioner leave your stamps in position. If you don’t, no worries you’ll just skip a step.
* Smear some Peacock Blue, My Jam Purple, Trinity Teal and Goddess Green Atelier inks on your craft mat or a plate like I used. Wet the whole flower with your water brush, pick up bits of blue and purple, dab them randomly and just let the ink flow and do it’s thing. Paint the leaves with teal and green.
* After you color everything let it dry. Repeat the stamping process to bring back the detail. Skip this if you don’t have a positioner.
* Move your stamps to the lower right corner and repeat the above steps.
* Stamp the centers of the large flower in black and use a black pen for your bud. Add some white gel pen highlights.
* Fussy cut everything out and set aside the extra flower and bud. I used all my leaves.
* I used a slim line frame to frame my center and arranged the flowers and leaves until I was happy with the look. I popped one of the large flowers at each corner and glued everything else to the top panel. I needed a birthday card so I used this sentiment, that like the frame was kicking around on my desk.
I hope you’ll give this technique a try. It’s great for playing around with and getting a feel for watercolors. Have a great rest of the week and be well!
Thursday, July 16, 2020
BeYouTiful
Monday, July 6, 2020
Stencil Watercoloring - Guest Designer Judy
Monday, June 15, 2020
Making Your Own Patterned Paper with Erica
It's Erica back on the Ink On 3 blog today. Sadly due to some unforeseen circumstances, cough cough (covid-19) I have not had the latest release yet. I was holding out and holding out as we sporadically get mail here in Spain still, but no luck.
Instead I've grabbed my beloved Magical Unicorn stamp set again BUT don't roll your eyes and groan "oh man, she ALWAYS use that one". I mean, I do, I love it. However, for these I have used some of the smaller images and made my own patterned paper with the help of the Atelier inks!
I do love a nice patterned paper but have a terrible habit of hoarding it instead of using it. It's madness, really. So, I decided to make my own so I can make as many as I want, whenever I want!
I lined up my Atelier inks in the order I wanted to use them: Bee Sting Yellow, Marigold Orange, Marilyn Red, My Jam Purple, Peacock Blue and Goddess Green. The photo below is from when I was swatching the inks.
On my first panel, I used two of the star stamps and just placed them close together on an acrylic block. Then I stamped from one corner to the opposite one, at an angle, one colour to the next. On the second panel I did them straight across.
I probably added a little bit too much yellow at the top of this one, which lead to not a lot of green at the opposite corner. But oh well, you live and learn.
For the second panel, I used only the clustered stars stamp and stamped horizontally. For more even colour, it would probably be smarter to do the middle line first and then work your way out. If you aren't bothered about that, just stamp away.
I love how these turned out. So fun!
To finish these off, I stamped up 'hugs' in Blackout Detail Ink, with the help of my MISTI. The 'hugs' is from the Bunny Hugs stamp set. When that was dry, I added these to white card bases. It was so tempting to add a little something else, but I wasn't sure exactly what so in the end I decided to keep them as they were. I know, shocker!
Thanks for stopping by today. I hope you have found some inspiration here today and will look at your stamps with new eyes and step outside the box with me.
Lots of love and happy crafting from Erica
Wednesday, June 10, 2020
Heat Embossing Surprise with Guest Designer Laura
- Fox: Copper Brow, Warm Grey 1, Blush
- Bunny: Warm Grey 3, Blush