Showing posts with label Magical Unicorn. Show all posts

Saturday, June 18, 2022

I Believe In You!


Hey friends!
It's Ceal, here to share a card with you today.
This Magical Unicorn set has always been one of my favorites. 
Too make this card I started with a white top folding card base, a watercolor paper panel and another panel of white cardstock for the image.  
I created the background for the unicorn by using the Curls stencil with some Atelier inks in Bee Sting YellowMarigold Orange, and My Jam Purple.
I stamped the Unicorn and colored it using Copic markers in rainbow order, cut it out with the coordinating die and popped it up on the colorful panel. 


Monday, November 23, 2020

Hugs, Kisses and Unicorn Wishes


Hey everybody! 
It's Ceal here to share a card with you today. I have been busy making Christmas cards and then I had someone order a birthday card with an unicorn so I immediately knew what set I was going to use.  
I started with a white top folding card base and a white panel cut to the same size. I stamped the unicorn from the set Magical Unicorn and colored it using Copic markers. I added some shimmer with Liquid Pixie Dust and added shine to her horn with glossy accents. 

Since I have been working on Christmas cards, I was thinking I may try coloring her in Christas colors. If I do, I will come back and show you. 


Monday, June 15, 2020

Making Your Own Patterned Paper with Erica

Hi guys!

It's Erica back on the Ink On 3 blog today. Sadly due to some unforeseen circumstances, cough cough (covid-19) I have not had the latest release yet. I was holding out and holding out as we sporadically get mail here in Spain still, but no luck.

Instead I've grabbed my beloved Magical Unicorn stamp set again BUT don't roll your eyes and groan "oh man, she ALWAYS use that one". I mean, I do, I love it. However, for these I have used some of the smaller images and made my own patterned paper with the help of the Atelier inks!


I do love a nice patterned paper but have a terrible habit of hoarding it instead of using it. It's madness, really. So, I decided to make my own so I can make as many as I want, whenever I want!

I lined up my Atelier inks in the order I wanted to use them: Bee Sting Yellow, Marigold Orange, Marilyn Red, My Jam Purple, Peacock Blue and Goddess Green. The photo below is from when I was swatching the inks.


On my first panel, I used two of the star stamps and just placed them close together on an acrylic block. Then I stamped from one corner to the opposite one, at an angle, one colour to the next. On the second panel I did them straight across.


I probably added a little bit too much yellow at the top of this one, which lead to not a lot of green at the opposite corner. But oh well, you live and learn.


For the second panel, I used only the clustered stars stamp and stamped horizontally. For more even colour, it would probably be smarter to do the middle line first and then work your way out. If you aren't bothered about that, just stamp away.


I love how these turned out. So fun!

To finish these off, I stamped up 'hugs' in Blackout Detail Ink, with the help of my MISTI. The 'hugs' is from the Bunny Hugs stamp set. When that was dry, I added these to white card bases. It was so tempting to add a little something else, but I wasn't sure exactly what so in the end I decided to keep them as they were. I know, shocker!


Thanks for stopping by today. I hope you have found some inspiration here today and will look at your stamps with new eyes and step outside the box with me.

Lots of love and happy crafting from Erica

Sunday, February 16, 2020

Very colourful no-coloring cards with Erica!

Hi guys!

Apologies for the confusing headline, I was trying to be a bit clever and funny. Not the best idea on a day when you are tired, possibly on a delayed sugar-high and too full. Technically these cards are coloured, BUT only the backgrounds. The images themselves are not but oh well, I hope you will forgive me when you see how easy these cards are.

I started out by watercolouring some background panels with the Atelier Ink re-inkers. A bit too late I had a super brilliant idea (I’m totally tooting my own horn here but I can’t believe I didn’t think of it sooner!) I have dripped ink into a plastic palette and I use these for water colouring but it’s getting to the point where I’m running a bit low. Instead of adding more re-inker to the colours, I added Liquid Pixie Dust to the remains of the colours! This makes the colours shimmery without contaminating the colours on the paper, which is where I got the idea from. On my first two panels, the Liquid Pixie Dust smeared the colours a bit and I had to be very careful how I added it. With the Liquid Pixie Dust already mixed into the colours, you don’t have to worry! How brilliant is that??


The colours I used are Bee Sting Yellow, Goddess Green, Peacock Blue, My Jam Purple. Marilyn Red  and Marigold Orange. With the backgrounds done, it was time to start thinking about the rest of the card making.


One of my favourite stamp sets from InkOn3 is the Magical Unicorn and I decided to use this one yet again. I also grabbed the Oh Deer set and heat embossed these on vellum with Gold Rush and Chrome embossing powders. First I used a anti-static tool on my pieces of vellum, and the images are stamped with the Juicy pad.


After they were heat embossed, I used the coordinating Magical Unicorn and Oh Deer diecuts to cut them out. I also stamped up some sentiments and heat embossed these too.


At first I did them all in Gold Rush, but then when it came time to put the cards together I decided to redo the sentiment for the Chrome Unicorn also in Chrome. This time I did it on turquoise card stock, instead of white.


The vellum images are adhered with a vellum adheisive. It works relatively well, but oh man, it is a pain in the bee-hind to work with. The sentiment strips are adhered with liquid glue and with that, the cards are done!

I made a video for this post too, you can find that over on my YouTube channel.

Thanks for stopping by today!

Lots of love and happy crafting from Erica

Monday, December 23, 2019

Atelier Ink Magical Unicorn card with Erica


Hi guys!

Erica here on the InkOn3 blog with another Magical Unicorn card. I can't help it, I love that stamp! To check out my no-line colouring card, click HERE. There is also a YouTube video for that card HERE.

For this card I have created a very colourful background by ink blending all the Atelier Inks, except Paint It Black and Twiggy Brown. I used a stencil and the Life Changing Blender Brushes from Picket Fence Studios. The stencil is called Basket Weave.


I started out by adhering the stencil to a panel of Bristol Vellum paper. It was still a little bit tacky from the Pixie Spray I had used during another crafting session, but I secured it with some purple tape at the top and bottom just to be on the safe side. Then I blended the colours in a rainbow look, from bottom to top it's Bee Sting Yellow, Marigold Orange, Marilyn Red, My Purple Jam, Peacock Blue and Goddness Green. I added the Goddess Green over the blue thinking it would go turquoise but it went a dark teal instead. Because I wanted some green on the panel as well, I added a little bit of Goddess Green to the bottom of the yellow.


I trimmed this panel down to 5"x4.25" and this was adhered to a white card base. The reason I trimmed it shorter than the height of the card base was to give it a while border at the top and the bottom.

The Magical Unicorn I heat embossed by stamping up the image with Juicy Ink and sprinkling Chrome Embossing powder on it. Once set, it was ready to be coloured. I did some loose water colouring using the Atelier ink re-inkers and lots of water. To add sparkle I used a little bit of Paint It Black re-inker and Liquid Pixie Dust to colour in the actual head of the unicorn.

On a piece of white card stock I stamped up the sentiment 'Hugs, Kisses and Unicorn Wishes' with Blackout detail ink. This was trimmed down to a slim strip and adhered to the card with liquid adhesive. As was the unicorn itself once it was cut out using the coordinating diecut.


I wanted to add some sequins to it as well but managed to rein myself in, as it already has a lot going on. Look at that, I am making progress with my sequin addiction!! LOL!

That's it from me for today blog-wise but if you want to watch the whole card making shenanigan routine I call crafting, hop on over to YouTube for a video.

Thanks for stopping by, I hope you found some inspiration here with me today.

Lots of love and happy crafting from Erica


Wednesday, September 18, 2019

Bright Magical Unicorn No-Line colouring with Erica


Hi everyone! *waves excitedly*

Erica here with my first blog post on the Inkon3 blog as part of the design team! I’m so, so excited about working for this fab company. I’ve been such a fan of Fleurette’s magical Fadeout No Line Coloring ink since I first got my hands on it and to be asked to join the Inkon3 DT was a dream come true.


Right, I’m going to dive right in with the details of my card for today’s post! I’ve used the Magical Unicorn stamp set, paired with Fadeout ink and Zig Clean Color markers to create a bright and sparkly unicorn.


To start with, I stamped up the image with the help of my Mini MISTI. I use the MISTI whenever I stamp anything, just in case I feel it needs another stamp or two. To make sure I could really see the outlines of this stamp, I stamped it three times with the Fadeout ink.

Then it was colouring time! As I wanted a bright and vivid look, I added hardly any water to the Zig’s. Especially on the mane-bit. I did have to use some on the ears and the face and body, but that’s one of the brilliant things of the Zigs. You can get so many different looks just by adding water or just blending them without any water at all.


As the mane is so bright and colourful, I decided to keep the flowers all white and only add Liquid Pixie Dust to them. This is some serious sparkly stuff! If you are looking for something that will add sparkled to your projects, don’t look any further!

I used the dropper to get a couple of drops out, I use a tile as a palette as it’s easy to clean off, and then used the medium water colour brush to fill in the flowers. Once throughly covered I set this aside to dry to overnight to avoid any colours or Pixie Dust to get where it’s not supposed to. I’m over-cautious after having had one too many projects ruined by smudging ink, colour or something else because it wasn’t fully dry.


Coming back to the card the next day, I settled on a sentiment and heat embossed that with Chrome Ultra Fine embossing powder. Before I did anything embossing wise, I used my anti-static tool all over the image, except over the Pixie Dust flowers. I figured if a few stray silver bits went on them it would only make them more sparkly.

With the help of my Mini MISTI again, I stamped up the sentiment ‘Hugs, Kisses and Unicorn Wishes’ with Embossing ink and then sprinkled the embossing powder over it. A quick swish with the heat gun and a card base later, the card was done!


I have a video of the colouring coming to my YouTube channel soon, so keep your eyes peeled if you want to see how I coloured the Magical Unicorn.

That’s it from me this time. Thanks for stopping by and I hope you have found some inspiration here today! See you soon again!

Lots of love and happy crafting from Erica


Click here Click here Click here Click here Click here Click here Click here Click here

Friday, August 9, 2019

Magical Unicorn Birthday Card


Hello, again my friends, Ilda here!

Today I am sharing this beautiful Unicorn card featuring the Magical Unicorn set.

CARD DETAILS

I colored in this partial stamp using Zig Clean Brushes, that I had first stamped out using Fadeout Ink for a no-line watercolored look onto Bristol Paper. Then on some areas, I added Liquid Pixie Dust for extra sparkle.

Next, I die cut some clouds and blended out some Broken China lightly to the bottom of them and also blended out Picked Raspberry onto the heart.

For the background, I used a strip of an alcohol rainbow panel that I had previously made and then popped all the elements on to the card front. The sentiments also come from the Magical Unicorn set and were stamped out using Blackout Ink.


Here is how I finished off the inside of this pretty card.


Hope you were inspired by my Magical Unicorn Birthday Card today.

Thank you for stopping by until next time... Happy Crafting!


SUPPLIES
Magical Unicorn
Magical Unicorn
Shop at:
SSS | HD
Fadeout No Line Ink
Fadeout No Line Ink
Shop at:
SSS | HD
Blackout Ink
Blackout Ink
Shop at:
SSS | HD
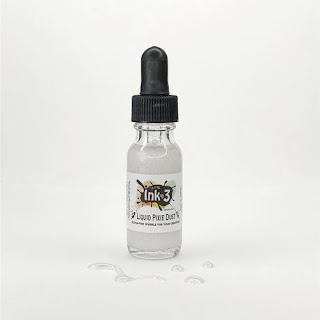
Liquid Pixie Dust
Liquid Pixie Dust
Shop at:
SSS | HD
Small Fine Tip Water Brush Pen
Shop at:
HD
Strathmore Bristol Pad
Shop at:
SSS | AMZ
Mini Misti Tool
Mini Misti Tool
Shop at:
SSS | AMZ | SB | SK
Zig CLEAN COLOR 60+ 80 SET
Shop at:
SSS | AMZ
Gemini Jr Die Cutting/Embossing Machine
Shop at:
SSS | AMZ | SB
BLENDER BRUSH Set
BLENDER BRUSH Set
Shop at:
SSS | AMZ | SB | PF
Oxide Ink Pad BROKEN CHINA
Shop at:
SSS | SB | HBS
PICKED RASPBERRY
PICKED RASPBERRY
Shop at:
SSS | SB | HBS
WHITE Gelly Roll Pens Set
Shop at:
SSS | AMZ | SB
EK Tools 5-Pack Journaling Pens, Black
Shop at:
AMZ
STUDIO KATIA GLUE
STUDIO KATIA GLUE
Shop at:
SSS | SK
Glossy Accents
Glossy Accents
Shop at:
SSS | AMZ | SB | HBS
Double-Sided Foam Tape
Shop at:
SSS | AMZ

Thursday, January 10, 2019

Magical Unicorn No Line Coloring Encouragement Card by Ilda

Hello Crafty Friends, Ilda here with you today! Hope you all are having a great start to the new year 😀

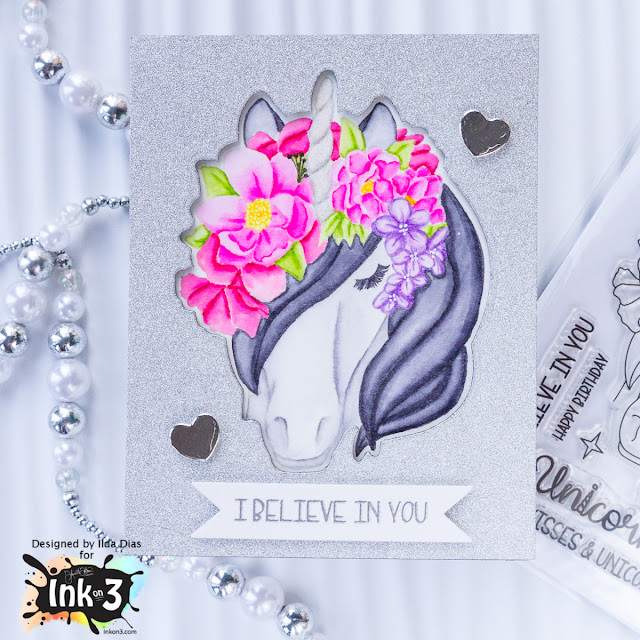
My card today features a no line coloring of the Magical Unicorn stamp and Coordinating Dies from Ink On 3. I just think this unicorn illustration is so pretty, and those florals are gorgeous!

Magical Unicorn No Line Coloring Encouragement Card for Ink On 3 by ilovedoingallthingscrafty.com

CARD DETAILS
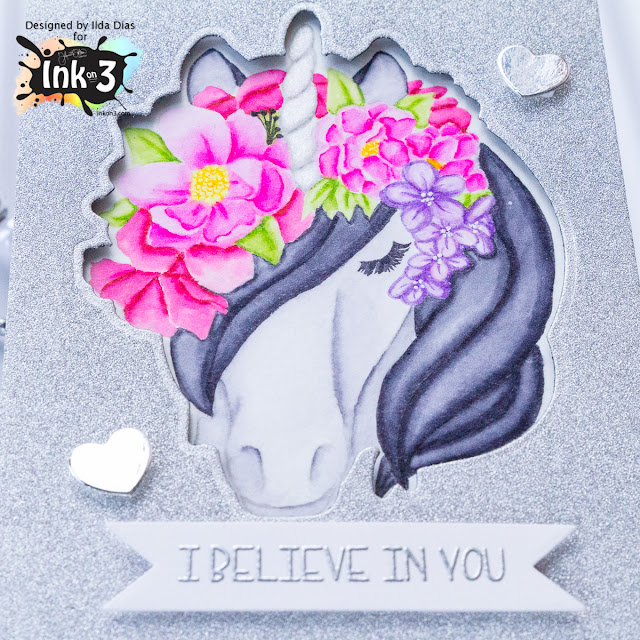
To begin, I stamped out the Magical Unicorn image onto watercolor paper using Fadeout Ink.  I then used Zig Clean Color Brushes to color it all in. Once the image was dry I added Liquid Pixie Dust to the Unicorn's horn. Sorry, but it is quite difficult to see that from my pictures... you'll just have to take my word for it how it shines beautifully in person.

Magical Unicorn No Line Coloring Encouragement Card for Ink On 3 by ilovedoingallthingscrafty.com

I then die cut a piece of Silver Glitter cardstock using the large Coordinating Die and lined it up over the image of the Unicorn popping it up with foam tape.

For the sentiment, I used Juicy Ink to stamp out the greeting and then heat embossed it with the Chrome Embossing powder.  I also finished the card with a couple of silver foil cardstock hearts that I die cut from the coordinating die set.

Magical Unicorn No Line Coloring Encouragement Card for Ink On 3 by ilovedoingallthingscrafty.com

SUPPLIES
To make supplies easy to find, I have linked them below. If something I used is no longer available I will link to a similar product.
Affiliate links may be used depending on the product. Your purchases help keep my blog running, so thanks in advance for the support!
Magical Unicorn
Magical Unicorn
Shop at:
 IO3
Magical Unicorn Dies
Shop at:
 IO3
Fadeout No Line Ink
Fadeout No Line Ink
Shop at:
IO3
Juicy  Ink
Juicy Ink
Shop at:
IO3
Chrome Ultra Fine Embossing Powder
Shop at:
 IO3
Liquid Pixie Dust
Liquid Pixie Dust
Shop at:
 IO3
Tim Holtz Detailer Water Brush
Shop at:
SSS | AMZ
Strathmore Bristol Pad
Shop at:
SSS | AMZ
Mini Misti Tool
Mini Misti Tool
Shop at:
SSS | AMZ | SB | SK
Zig CLEAN COLOR 60+ 80 SET
Shop at:
SSS | AMZ
Inkadinkado Embossing Magic
Shop at:
SSS | AMZ
Black and Decker  Heat Gun
Black and Decker Heat Gun
Shop at:
AMZ
Sizzix Big Shot
Sizzix Big Shot
Shop at:
SSS | AMZ | SB
Magnetic Platform
Magnetic Platform
Shop at:
SSS | AMZ
STANDARD CUTTING PADS
Shop at:
SSS | AMZ
BEST EVER DIES
BEST EVER DIES
Shop at:
SSS | SK
Recollections Black Heavyweight Cardstock 110bs
Shop at:
AMZ
Heidi Swapp CHRISTMAS Glitter Paper Pad
Shop at:
AMZ
Craft Smith Metallic Foil 12x12 Inch Paper Pad
Shop at:
AMZ
Double-Sided Foam Tape
Shop at:
SSS | AMZ


I hope this no line colored Magical Unicorn card inspired you today, the possibilities using this stamp set are endless.

Thank you for stopping by, until next time Ilda ðŸ‘‹