Showing posts with label Peacock Blue Atelier. Show all posts

Tuesday, August 31, 2021

Pretty Lotus Decorative Phone Case

Hi Crafty friends! It's Cheryl with the Inkon3 Creative team here to show a fun way to use your stamps to decorate your phone case! You'll need a clear phone case and a cut file for your phone case (I got mine from Etsy for about $2).


I precut a bunch of the inserts for the phone to have handy since each cut file can cut three inserts per 8.5x11 sheet of paper. Then stencil in a background using the Curls 6x6 Stencil, and Atelier inks in Peacock Blue and Trinity Teal.


Then stamp out the lotus from the Lotus clear stamp set using Blackout Detail Ink. Color with your choice of color medium, then fussy cut.  Adhere the Lotus onto the stenciled insert and trim off any paper that overhangs the phone insert.

Lastly, slip the insert into your clear phone case and enjoy! :)

Products Used:


Sunday, July 25, 2021

Making Cards and Mistakes with Erica

 Hi guys! 

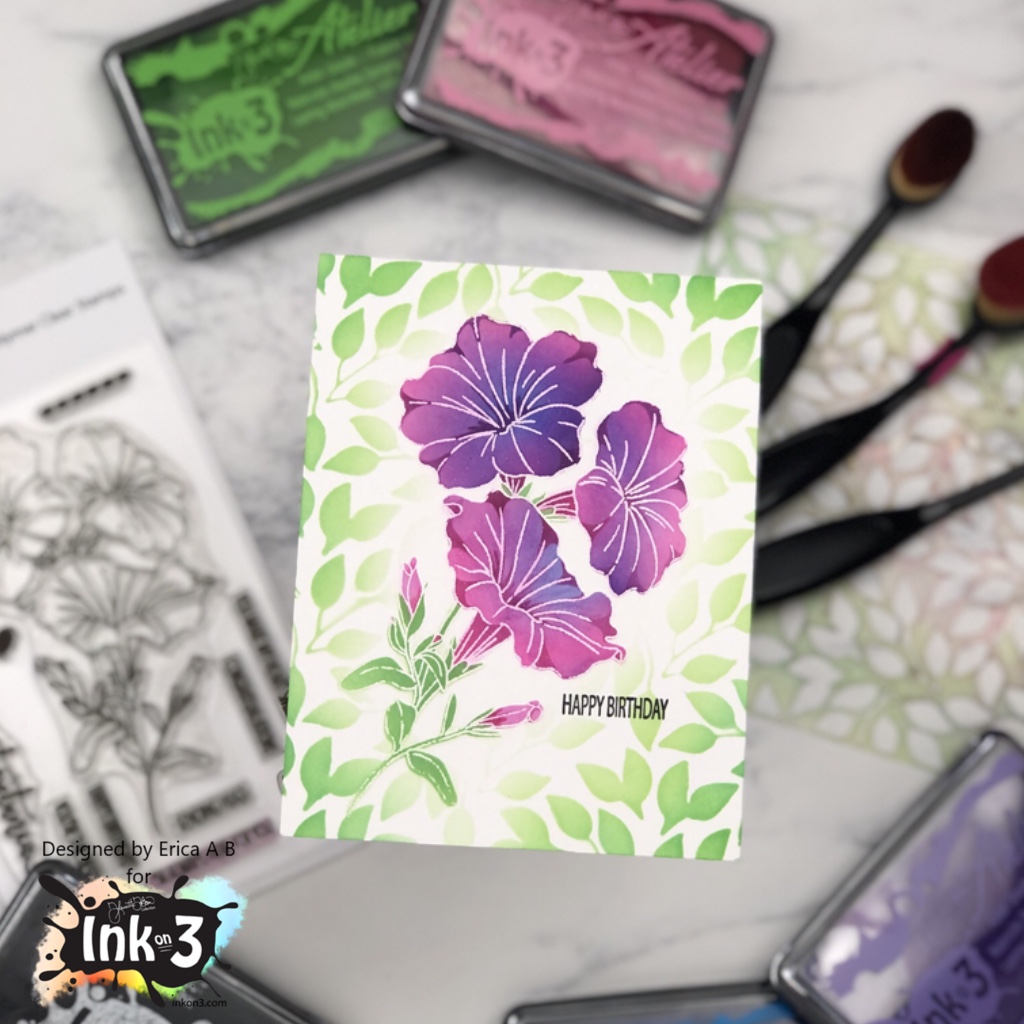
It’s Erica back on the Ink On 3 blog with another card using the My Sweet Petunia stamp and layering stencil set. On this one I made a big mistake, and thought I’d share it with you so you can avoid it yourself. 

If you saw my last blog post, I used this set for those cards too, but on those I ink blended first and then heat embossed the outline stamp on top. For this card, I did not do that.. and it ended up a bit meh… not going to lie. Take it from me, if you want a white heat embossed outline, do that last. 

So I started out by heat embossing the gorgeous My Sweet Petunia stamp on white card stock. I’m not sure why I did it this way, I should know better by now, really. Anyway, I grabbed Sweet Petunia Pink, My Jam Purple and Peacock Blue Atelier Inks, some Life Changing Blender Brushes and the My Sweet Petunia layering stencils. 

Right off the bat, I realised what a mistake I had done as the inks are so pigmented and vibrant, they instantly discoloured the white embossed lines. I SHOULD know better by now! And yeah, I said it again, because I really don’t know what I was thinking here. 

Anyway, onward and upwards. I ink blended the My Jam Purple and Peacock Blue to create a deep, vivid look for the flowers and then went softly with Goddess Green for the stem and leaves layer. I tried cleaning up a little, but it’s very easy to smudge and leave marks on the project when doing this, so I did what I felt I could do safely without making too much of a mess. 

Around the flower I also ink blended more Goddess Green using the Leafy Forest Stencil, just to add some softness to the card, which is a true one-layer card if you can believe it! A quick Happy Birthday was stamped up with Blackout Ink and that was it. 

Super simple, and it can work for so many occasions. Just change up the colour scheme and sentiment, and you are good to go! Oh, and ink blend FIRST, and heat emboss when all the ink is dry. Maybe best to leave it overnight to make sure. Take it from me, don’t do it my way, because that did not work out very clean. Having said that, that’s only with white embossing powder, I guess? Maybe gold will be fine? Ok, I’m off to best that theory! See you next time! 

Lots of love and happy crafting from Erica 

Friday, December 11, 2020

Little Birdie - No Line Coloring

Hi everyone! It’s Jeannie (InsideoutJeans) on the blog today with Ink on 3’s stamp set named Little Birdie stamp set. Last month, I used this stamp set in a non-wintery way; it ended up being more like a springtime card.

I stamped out the images using Fadeout Ink and did some no line coloring. I wanted a wintery scene for this card so I went with a red flower along with blue flowers. 


For the background, I mixed some My Jam Purple and Peacock Blue reinkers to create this darker blue color. I did an ombre watercolor wash on a piece of Canson XL watercolor paper with some Shark Tooth White splatter, which almost made the scene wintery. 


I just love how this card turned out! Thanks for stopping by today and I hope you get inspired to create. Come back again soon for more inspiration and ideas! Happy Crafting! 


Wednesday, December 9, 2020

Basic Starter Watercoloring with Guest Designer Melinda

Happy hump day beautiful people! Today I’m going to share a card technique that I love because the painting is pretty quick and simple. This one will be great for those of you learning to watercolor.


* Cut card base 4x9 inches and top piece at 3 3/4x 8 3/4 inches
* Take the Pondie stencil and some texture paste and smear across the center of your top piece. Set aside to dry while you make the rest of the card.
* Cut 6 1/2 x 8 inch piece of watercolor paper and lay down the large floral and the leaves in the lower left corner of your paper. Stamp the flower with My Jam Purple and the leaves in Trinity Teal. The bud I stamped the top in purple and the lower part with the teal. Flip your paper and repeat the stamping. If you have a stamp positioner leave your stamps in position. If you don’t, no worries you’ll just skip a step.
* Smear some Peacock Blue, My Jam Purple, Trinity Teal and Goddess Green Atelier inks on your craft mat or a plate like I used. Wet the whole flower with your water brush, pick up bits of blue and purple, dab them randomly and just let the ink flow and do it’s thing. Paint the leaves with teal and green.
* After you color everything let it dry. Repeat the stamping process to bring back the detail. Skip this if you don’t have a positioner.
* Move your stamps to the lower right corner and repeat the above steps.
* Stamp the centers of the large flower in black and use a black pen for your bud. Add some white gel pen  highlights.
* Fussy cut everything out and set aside the extra flower and bud. I used all my leaves.
* I used a slim line frame to frame my center and arranged the flowers and leaves until I was happy with the look. I popped one  of the large flowers at each corner and glued everything else to the top panel. I needed a birthday card so I used this sentiment, that like the frame was kicking around on my desk.

I hope you’ll give this technique a try. It’s great for playing around with and getting a feel for watercolors. Have a great rest of the week and be well!

Thursday, July 16, 2020

BeYouTiful

Hi everyone! It’s Jeannie (InsideoutJeans) on the blog today with Ink on 3’s stamp set named BeYouTiful stamp set. I couldn't get enough and had to create another card using it. 


I know I love no line coloring, which is what I did previously in this post, but I wanted to color up this floral quickly using some alcohol markers. I stamped it out the largest floral from the BeYouTiful stamp set using Blackout Ink and colored it up using my favorite purple Copic Combo: V12, V15, V17

While using this set, I realized that there was a solid image for the stamen of the flower and it's an exact copy of the one in the floral image! This would be perfect for helping with no line coloring as well as adding a pop to the flower, which is what I did with today's card. I used Juicy ink and heat embossed the stamen using Chrome embossing powder in the middle. I kinda love it since I used the Blackout Ink for the image, it looked a bit harsh compared to the flower. 


I took a piece of white cardstock and inked it up using Peacock Blue and My Jam Purple Atelier inks. I wanted to try a technique I saw with stencils. I pulled out the Wavy stencil and a baby wipe. Using my normal sandwich for my die machine, I ran the card panel, stencil and baby wipe through my machine. It ended up being pretty cool! The stencil embossed itself to the card panel, while the baby wipe picked up the colors in the positive areas. 

To finish off the card, I wanted to tie in the Chrome embossed stamen. I stamped the sentiments using Juicy ink and then heat embossed with the same silver Chrome embossing powder. 


Thanks for stopping by today and I hope you get inspired to create. Come back again soon for more inspiration and ideas! Happy Crafting! 


Monday, July 6, 2020

Stencil Watercoloring - Guest Designer Judy

Hello, it's Judy here, and I'm so happy and honored to be guest designing for Ink On 3 today. I have a fun technique for you. It's watercoloring on a stencil. Here is my card.


I began by stenciling the image from the Floral Stencil with Ink On 3 Fadeout No-Line Coloring Ink. Then I watercolored over the image.


I used Ink On 3 Atelier Inks in My Jam Purple, Peacock Blue, Goddess Green, Bee Sting Yellow, Twiggy Brown and Marilyn Red. These inks lend themselves beautifully to watercoloring. The blending and reaction with water is amazing.


Next I used the Leafy Forest Stencil on some watercolor paper to create an accent for my card. I used the Atelier Inks in My Jam Purple and Peacock Blue. Then I cut the Floral Stencil image on an angle  and inserted the Leafy Forest Stencil strip between the 2 halves. The greeting is from the Dogwood Flower Stamp Set.


This is a super fun technique I hope you will try it. You can use almost any stencil, depending on whether you want a focal image or an over all background.

Until next time, here's celebrating your Creative Muse!!!

Saturday, July 4, 2020

Hey Gorgeous!

Hey gorgeous!

It's Erica back on the Ink On 3 blog today with a one-layer card. Which is not my forte at all, but it's good to stretch your creative muscles and step outside of your comfort zone. Ok, not all the time, but sometimes for sure. 


The stamp I have used for this card is a new-to-me, Hey Gorgeous. I stamped it up on Copic friendly card stock with Blackout Detail ink and then coloured it in with various Copic markers. My intent was to give the girl a nice tan, but the poor thing ended up looking like she's been cooking on a tanning bed far too long! 


Her hair I did a bit like mine, it's sort of a brown to light brown to some highlights and then a big blue hat on top. I do happen to have a big blue hat too... Did I just put myself on a card? Eh, it happens, right? While I had the Hey Gorgeous stamp out, I also stamped it up on masking paper. After fussy cutting this out, I placed it on top of the coloured image.


I have used a stencil for the background, and this I sprayed liberally with Pixie Spray first. To create a colourful backdrop to the card I ink blended Bee Sting Yellow, Goddess Green and Peacock Blue all over it. By going lightly over some of the yellow with the green, it created a lime green which was lovely. I did the same with the green going into the blue, but heavier, and the result was a teal colour. I used a different Life Changing Blender Brush for each colour so the going back and forth was easy peasy. 


When the ink blending was done, I simply stamped up the 'Gorgeous' from the Hey Gorgeous stamp with Blackout Detail Ink and the card was finished!


Well... unless I go back and add some sequins that is. You never know, with this sequin-oholic. 

Thanks for stopping by today, I hope you like the card and found some inspiration here today! 

Lots of love and happy crafting from Erica 


Friday, June 26, 2020

Masculine Koi Pond Card

Hi Crafty Friends! It's Cheryl with the Creative Team here to show you how I made some cards for the important men in my life, the cards read "Happy Father's Day", but change up the sentiments and these cards can be used for any occasion!

I made the card in portrait and landscape orientation! Which one do you prefer?

First I created a 5.5"x 4.25" card base using white card stock. Then I used a rectangle die to cut out a panel that's slightly smaller than the card base. Next, I used distress oxide ink in Tumbled Glass and a blending tool to add a light blue background to the lower right hand corner of the card. Place the Wavy stencil over the light blue background and with a blending tool and Peacock Blue Atelier Ink, blend in the atelier ink concentrating on the lower right hand corner and lightly bring in the color towards the center of the card to create an ombre look.


From the Koi Pond stamp set, stamp out the Koi images of your choice using Blackout Hybrid Detail Ink, color with your choice of coloring medium and then fussy cut. For the Lily Pads, I first stamped the largest lily pad stamp using the Goddess Green Atelier Ink, then I used the Peacock Blue on the next layer, and Marigold Orange on the last layer. The Atelier Inks worked so well when layered! Fussy cut the lily pads.


Then I die cut some flags for the sentiments, for a perfectly coordinated sentiment flag, I die cut white card stock and applied Peacock Blue Atelier ink with a blending tool. I stamped the sentiments with embossing ink, used Arctic White Ultra Fine Embossing Powder and heat set.


Adhere the panel with the stenciled waves onto the card base. Then position the fussy cut images, and sentiment flags onto the card front as shown in the picture above. Trim off any excess of the sentiment flags that extends beyond the Koi. Adhere the fussy cut images and sentiment flags onto the card and there you have it!

Copic Colors Used: 
Reds: R29, R27, R24, R22
Oranges: YR27, YR68, YR14, YR12 

Products used:

Wednesday, June 24, 2020

Watercoloring Fun with Atelier Inks - Guest Designer Laura


Hi everyone! It's Laura Volpes here and today I am back with my fourth and last post as a guest designer for InkOn3! In this post I will be sharing a card and a video tutorial and I will be showing how to use Ink On 3 Atelier inks to watercolor.

Before that, though, I want to take a moment to thank InkOn3 for having me as a guest this month - I had a blast creating with their fun stamps and great inks!
My card today is a scene card - my favorite kind! I started by creating the elements for my scene out of some watercolor cardstock. I used the Heffy Doodle Imperial Stitched Rectangles, the Lawn Fawn Stitched Pond and the Heffy Doodle Grassy Lass Border dies.

I watercolored each piece separately using Atelier inks in Peacock Blue and Goddess Green and I added some splatters and some Liquid Pixie Dust for extra fun and shimmer!

I set the panels aside to dry and started working on my images.
Like I did last week, I used images from the Platy-rrific Pondies stamp set. I did some no line coloring this time around, so I stamped the images with InkOn3 Fadeout ink and I colored them with Illustrator markers. I then used the coordinating dies to die cut them out.
I assembled the scene on a top-folding A2 card base and I then stamped my sentiment with InkOn3 Blackout Ink.
I finished off the card by adding couple of white pen gen details and by coating the balloons with more Liquid Pixie Dust!

And, as promised, here is my video for you! I hope you like it!


A huge thank you again to InkOn3 for having me as a guest this month and to you all for stopping by!
Have a great day!

Monday, June 15, 2020

Making Your Own Patterned Paper with Erica

Hi guys!

It's Erica back on the Ink On 3 blog today. Sadly due to some unforeseen circumstances, cough cough (covid-19) I have not had the latest release yet. I was holding out and holding out as we sporadically get mail here in Spain still, but no luck.

Instead I've grabbed my beloved Magical Unicorn stamp set again BUT don't roll your eyes and groan "oh man, she ALWAYS use that one". I mean, I do, I love it. However, for these I have used some of the smaller images and made my own patterned paper with the help of the Atelier inks!


I do love a nice patterned paper but have a terrible habit of hoarding it instead of using it. It's madness, really. So, I decided to make my own so I can make as many as I want, whenever I want!

I lined up my Atelier inks in the order I wanted to use them: Bee Sting Yellow, Marigold Orange, Marilyn Red, My Jam Purple, Peacock Blue and Goddess Green. The photo below is from when I was swatching the inks.


On my first panel, I used two of the star stamps and just placed them close together on an acrylic block. Then I stamped from one corner to the opposite one, at an angle, one colour to the next. On the second panel I did them straight across.


I probably added a little bit too much yellow at the top of this one, which lead to not a lot of green at the opposite corner. But oh well, you live and learn.


For the second panel, I used only the clustered stars stamp and stamped horizontally. For more even colour, it would probably be smarter to do the middle line first and then work your way out. If you aren't bothered about that, just stamp away.


I love how these turned out. So fun!

To finish these off, I stamped up 'hugs' in Blackout Detail Ink, with the help of my MISTI. The 'hugs' is from the Bunny Hugs stamp set. When that was dry, I added these to white card bases. It was so tempting to add a little something else, but I wasn't sure exactly what so in the end I decided to keep them as they were. I know, shocker!


Thanks for stopping by today. I hope you have found some inspiration here today and will look at your stamps with new eyes and step outside the box with me.

Lots of love and happy crafting from Erica

Wednesday, June 10, 2020

Heat Embossing Surprise with Guest Designer Laura


Hi everyone! It's Laura Volpes here and today I am back with my second post as a Guest Designer for InkOn3 this month! I experimented some more with the Atelier Inks, and this time I wanted to try using them with heat embossing. The results were surprising - make sure to check out the video at the end of this post to see what happened!

For the background of my card I used the Leafy Forest Stencil. I started by blending some My Jam Purple ink through the stencil on some watercolor cardstock. I then heat embossed the leaves with clear embossing powder, so that I could go over the entire background with Peacock Blue ink without covering the leaves. I also added some shimmer with Liquid Pixie Dust.


For my focal point today I used the Forever Friends stamp set. I stamped the image with InkOn3 Blackout ink and I colored it with Karin Brush Markers Pro. Here is a list of the markers I used
  • Fox: Copper Brow, Warm Grey 1, Blush
  • Bunny: Warm Grey 3, Blush
Once I was done coloring, I cut out the image with my scissors.


I die cut a panel out of some white cardstock and I glued it to the background. I heat embossed the sentiment with white embossing powder over some black cardstock and I finished off the card with some blue crystals.

Don't forget to check out my video for a step by step tutorial and to see what happened with my heat embossing experiment!


Thank you all for stopping by and have a great day!

Wednesday, June 3, 2020

Spotlight on InkOn3 Atelier Inks | Ink Blending - Guest Designer Laura

Hi everyone! It's Laura Volpes and today I am really excited to share my first post as a guest designer for InkOn3! I love both InkOn3 inks and their lovely designs, and for this month I decide to share different ways to use the fabulous Atelier Inks! 


Today we are starting from a classic technique: ink blending!

I used this technique to create both the card background and the stenciled focal point on my white panel. I used Peacock Blue on the card base and Bee Sting Yellow and Goddess Green for the flower. The stencil I used is the wonderful Flora stencil, by InkOn3.


I blended the inks with my domed ink blenders and a finger dauber for the smaller details in the stencil. The inks blend like butter and the thing that was really cool to see is how they build onto themselves: the more you layer them, the richer the color you get! Bee Sting Yellow almost turned to an orang-ey shade, as I was building layers in the center of the flowers!


Of course, I add to add some shimmer, and Liquid Pixie Dust is just the perfect medium for that! So. much. sparkle!

The images and the sentiment are both part of the InkOn3 Fox and Bunny Hugs stamp set. I stamped them with InkOn3 Blackout ink and colored them with Illustrator alcohol markers by Spectrum Noir.
Here is a list of the markers I used:
  • Fox: TN8, BO4, BO2, BO1. BG3, BG1. FS5, FS8, FS9
  • Bunny: BG7, BG5, BG3, BG1. FS5, FS8, FS9
I glued everything to the card base, raising the front panel on some foam tape, and I finished off the card with some light blue crystals.


Here is also a video for you, showing the InkOn3 Atelier inks in action as well as the whole card making process!

I will catch you guys next week with another post and video!

Have a nice day,

Monday, May 18, 2020

Quick & Easy Stenciled card

Hi everyone! It’s Jeannie (InsideoutJeans) on the blog today focusing on Ink on 3’s stencil set named Flora. This is a large floral and perfect to create a quick card along with the Atelier Inks


I started out with two pieces of cardstock. For my first one and my main card panel, I used Bee Sting Yellow and Goddess Green to ink up the leafy areas. For my second piece of cardstock, I used Bee Sting Yellow for the middle of the flower, Marigold Orange for the middle part of the flower, and then Marilyn Red for the outer part of the flower. I actually quickly trimmed the floral portion out because I wanted to add dimension and pop it up. If you wanted to skip this step, you could. 


For the card panel, I wanted to add color the panel so I blended some Peacock Blue on the edges. Even after this, I felt like something was still missing. 

I took a scrap piece of white cardstock and blended Marilyn RedMarigold Orange, and Bee Sting Yellow together. I then trimmed two quarter inch strips from this blended piece and added it to the top and bottom. 


For my sentiment, I pulled out Lilac Dreams because there's such pretty sentiments in this stamp set. I used the Best Wishes sentiment and stamped it on black cardstock using Juicy ink. I added Arctic White embossing powder and heat set it.  

This card was so simple and easy to put together. The new stencils have been so fun to work with so I hope you're enjoying them! 

Thanks for stopping by today and I hope you get inspired to create. Come back again soon for more inspiration and ideas! Happy Crafting! 


Thursday, January 16, 2020

Quick But Bright You're Special card with Erica

Hi guys!

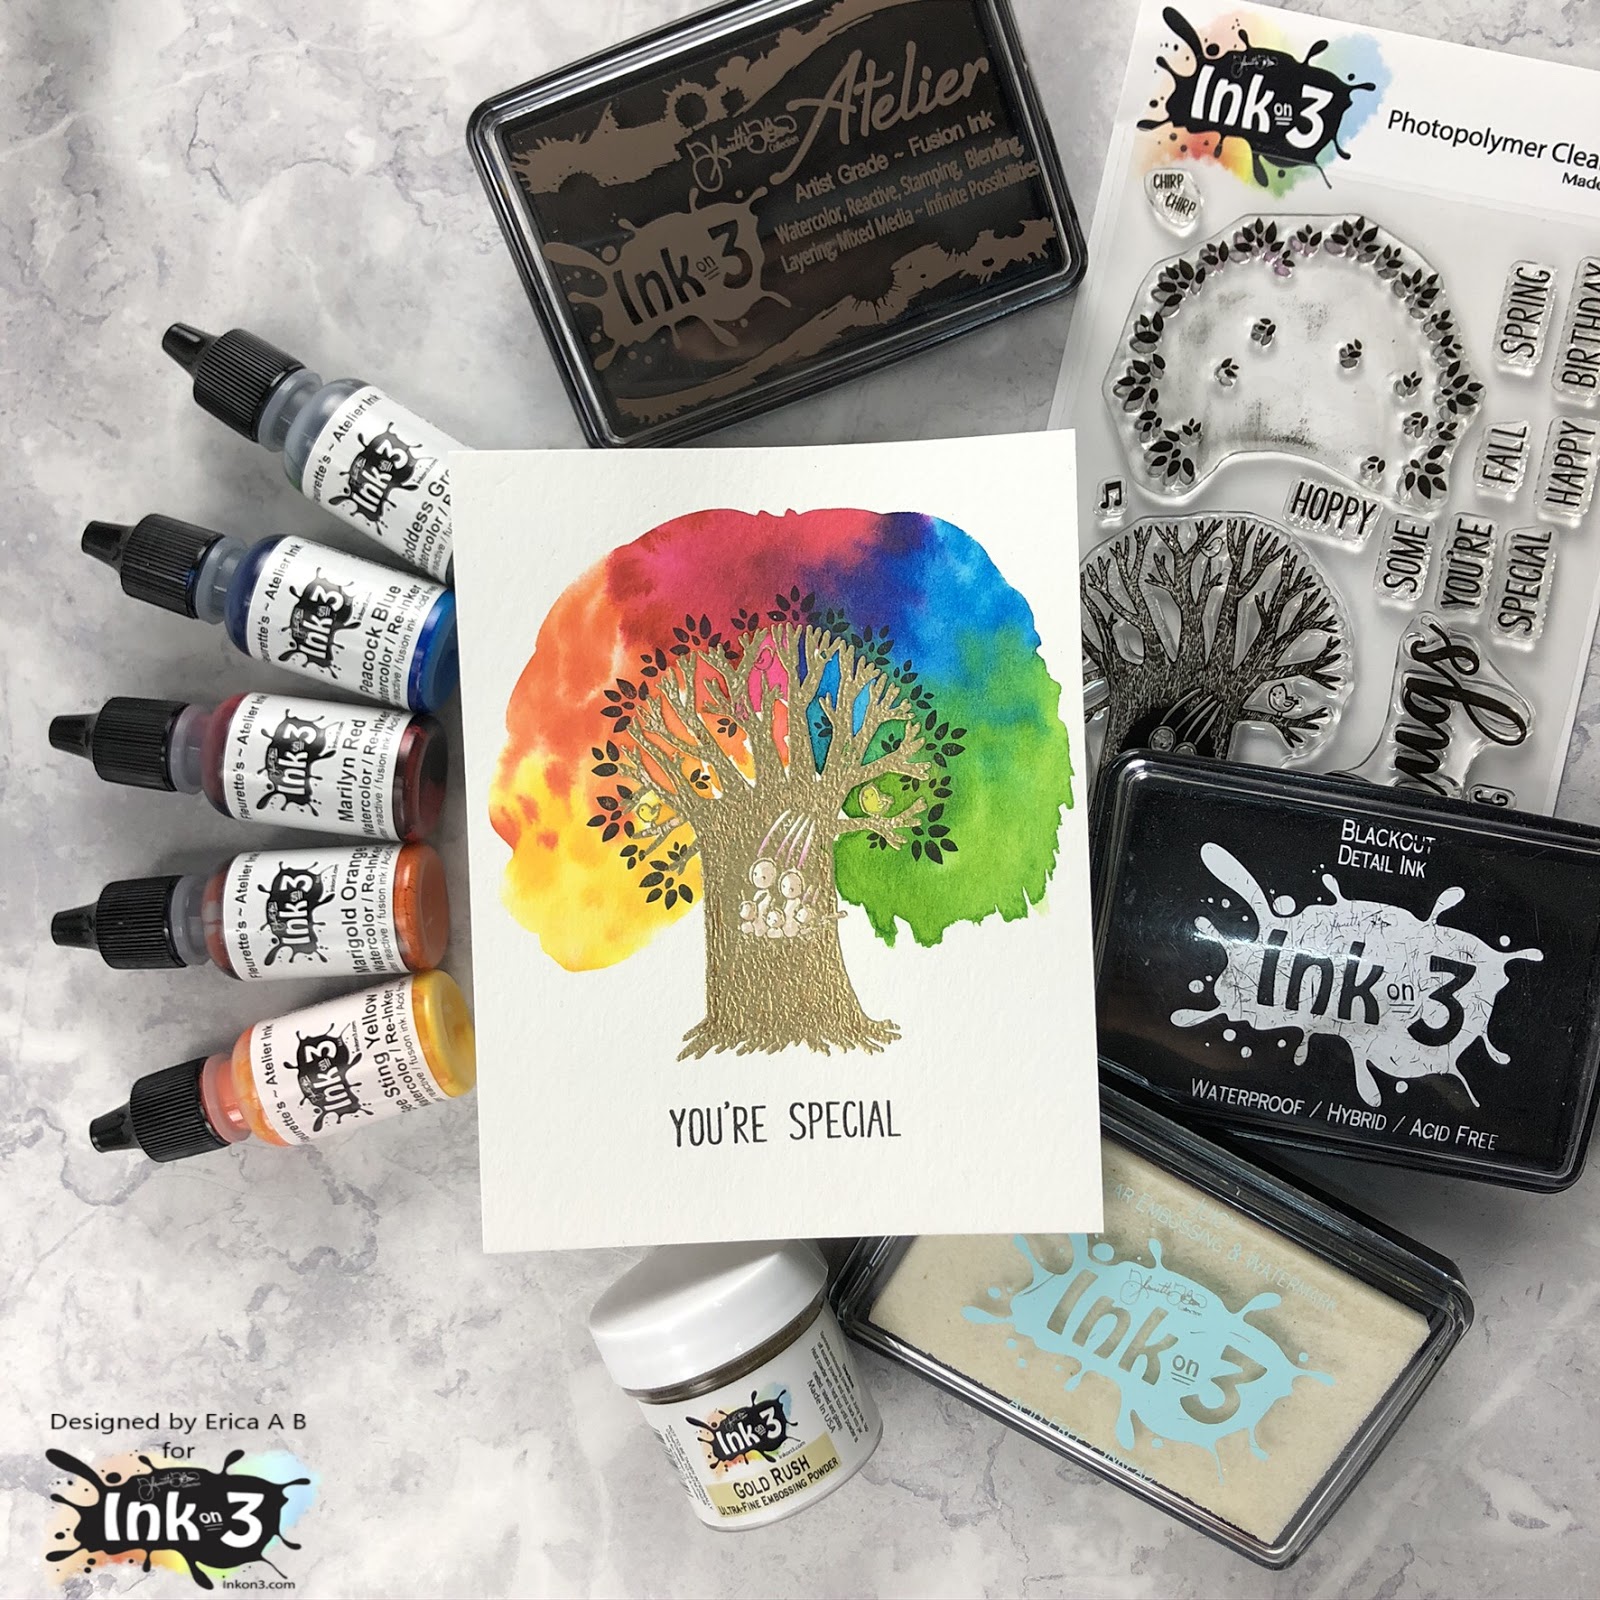
Erica back on the Inkon3 blog today with a quick but very bright card! I have used a new-to-me stamp set, Bunny Hugs, and I used the Atelier Inks to add colour.


To start with, I heat embossed the tree trunk in Gold Rush embossing powder. I used the Juicy pad to stamp it up before sprinkling the embossing powder very generously over the panel. This is water colour paper, Canson XL, that's been cut down to 4.25"x5.5".


After adding some colour to the actual tree trunk, with the help of the Twiggy Brown ink pad as I don't have the re-inker yet, I got the canopy part of the tree very wet and added colour to it by dabbing a paint brush filled with ink in it. Doing it this way, I feel, adds a bit of texture and you get that lovely natural spreading of the colour.

From left to right I have used Bee Sting Yellow, Marigold Orange, Marilyn Red, Peacock Blue and Goddess Green.


To make sure the canopy was dry, before I stamped up the leaves, I used my heat gun on the panel to set the colours. With the help of the MISTI, I then stamped the leaves with Blackout Ink until they were nice and solid. I also added a sentiment 'You're Special' from the Bunny Hugs set, under the tree.

I love a bit of heat embossing and a splash of colour for a quick card! What do you think?


If you are in the Phoenix area this weekend, Jan 18-20th, and are attending Creativation, make sure to stop by the Inkon3 and the Picket Fence Studios booths as I, and the rest of the teams, will be demoing the Atelier inks there! You will get to see these in action and try them out for yourself too!

Thanks for stopping by today, I hope you found this inspiring and will give it a go yourself. Oh, I made a video too! It's over on my YouTube channel if you wanted to have a look.

Lots of love and happy crafting from Erica

PS If you do attend Creativation, make sure to some up and say hello!