Sunday, January 31, 2021

Stolen Heart


Hello Everyone!
It's Ceal here to share with you a card using the Racoon Hugs set. I love this cute trash panda who is stealing hearts. 
To create ths card I started with a top folding card base and a stitched panel. I used a cloud stencil to create a background and then stamped the hearts and sentiment. The Racoon (Trash Panda) I stamped on a seperate piece of cardstock, colored it using alcohol markers and cut it out using the Coordinating die. I added some Liquid Pixie Dust to the balloon to give it some sparkle. 


Tuesday, January 26, 2021

Thinking Of You, BeYOUtiful!

  Hi and Happy 2021! 

It’s Erica back on the Ink On 3 blog, for the first time in 2021. It’s been a bit of a rough start to the year to be honest, so I decided to make a ‘thinking of you’ card, as I figured I am not the only one who’s feeling like 2021 is saying ‘hold my beer’.

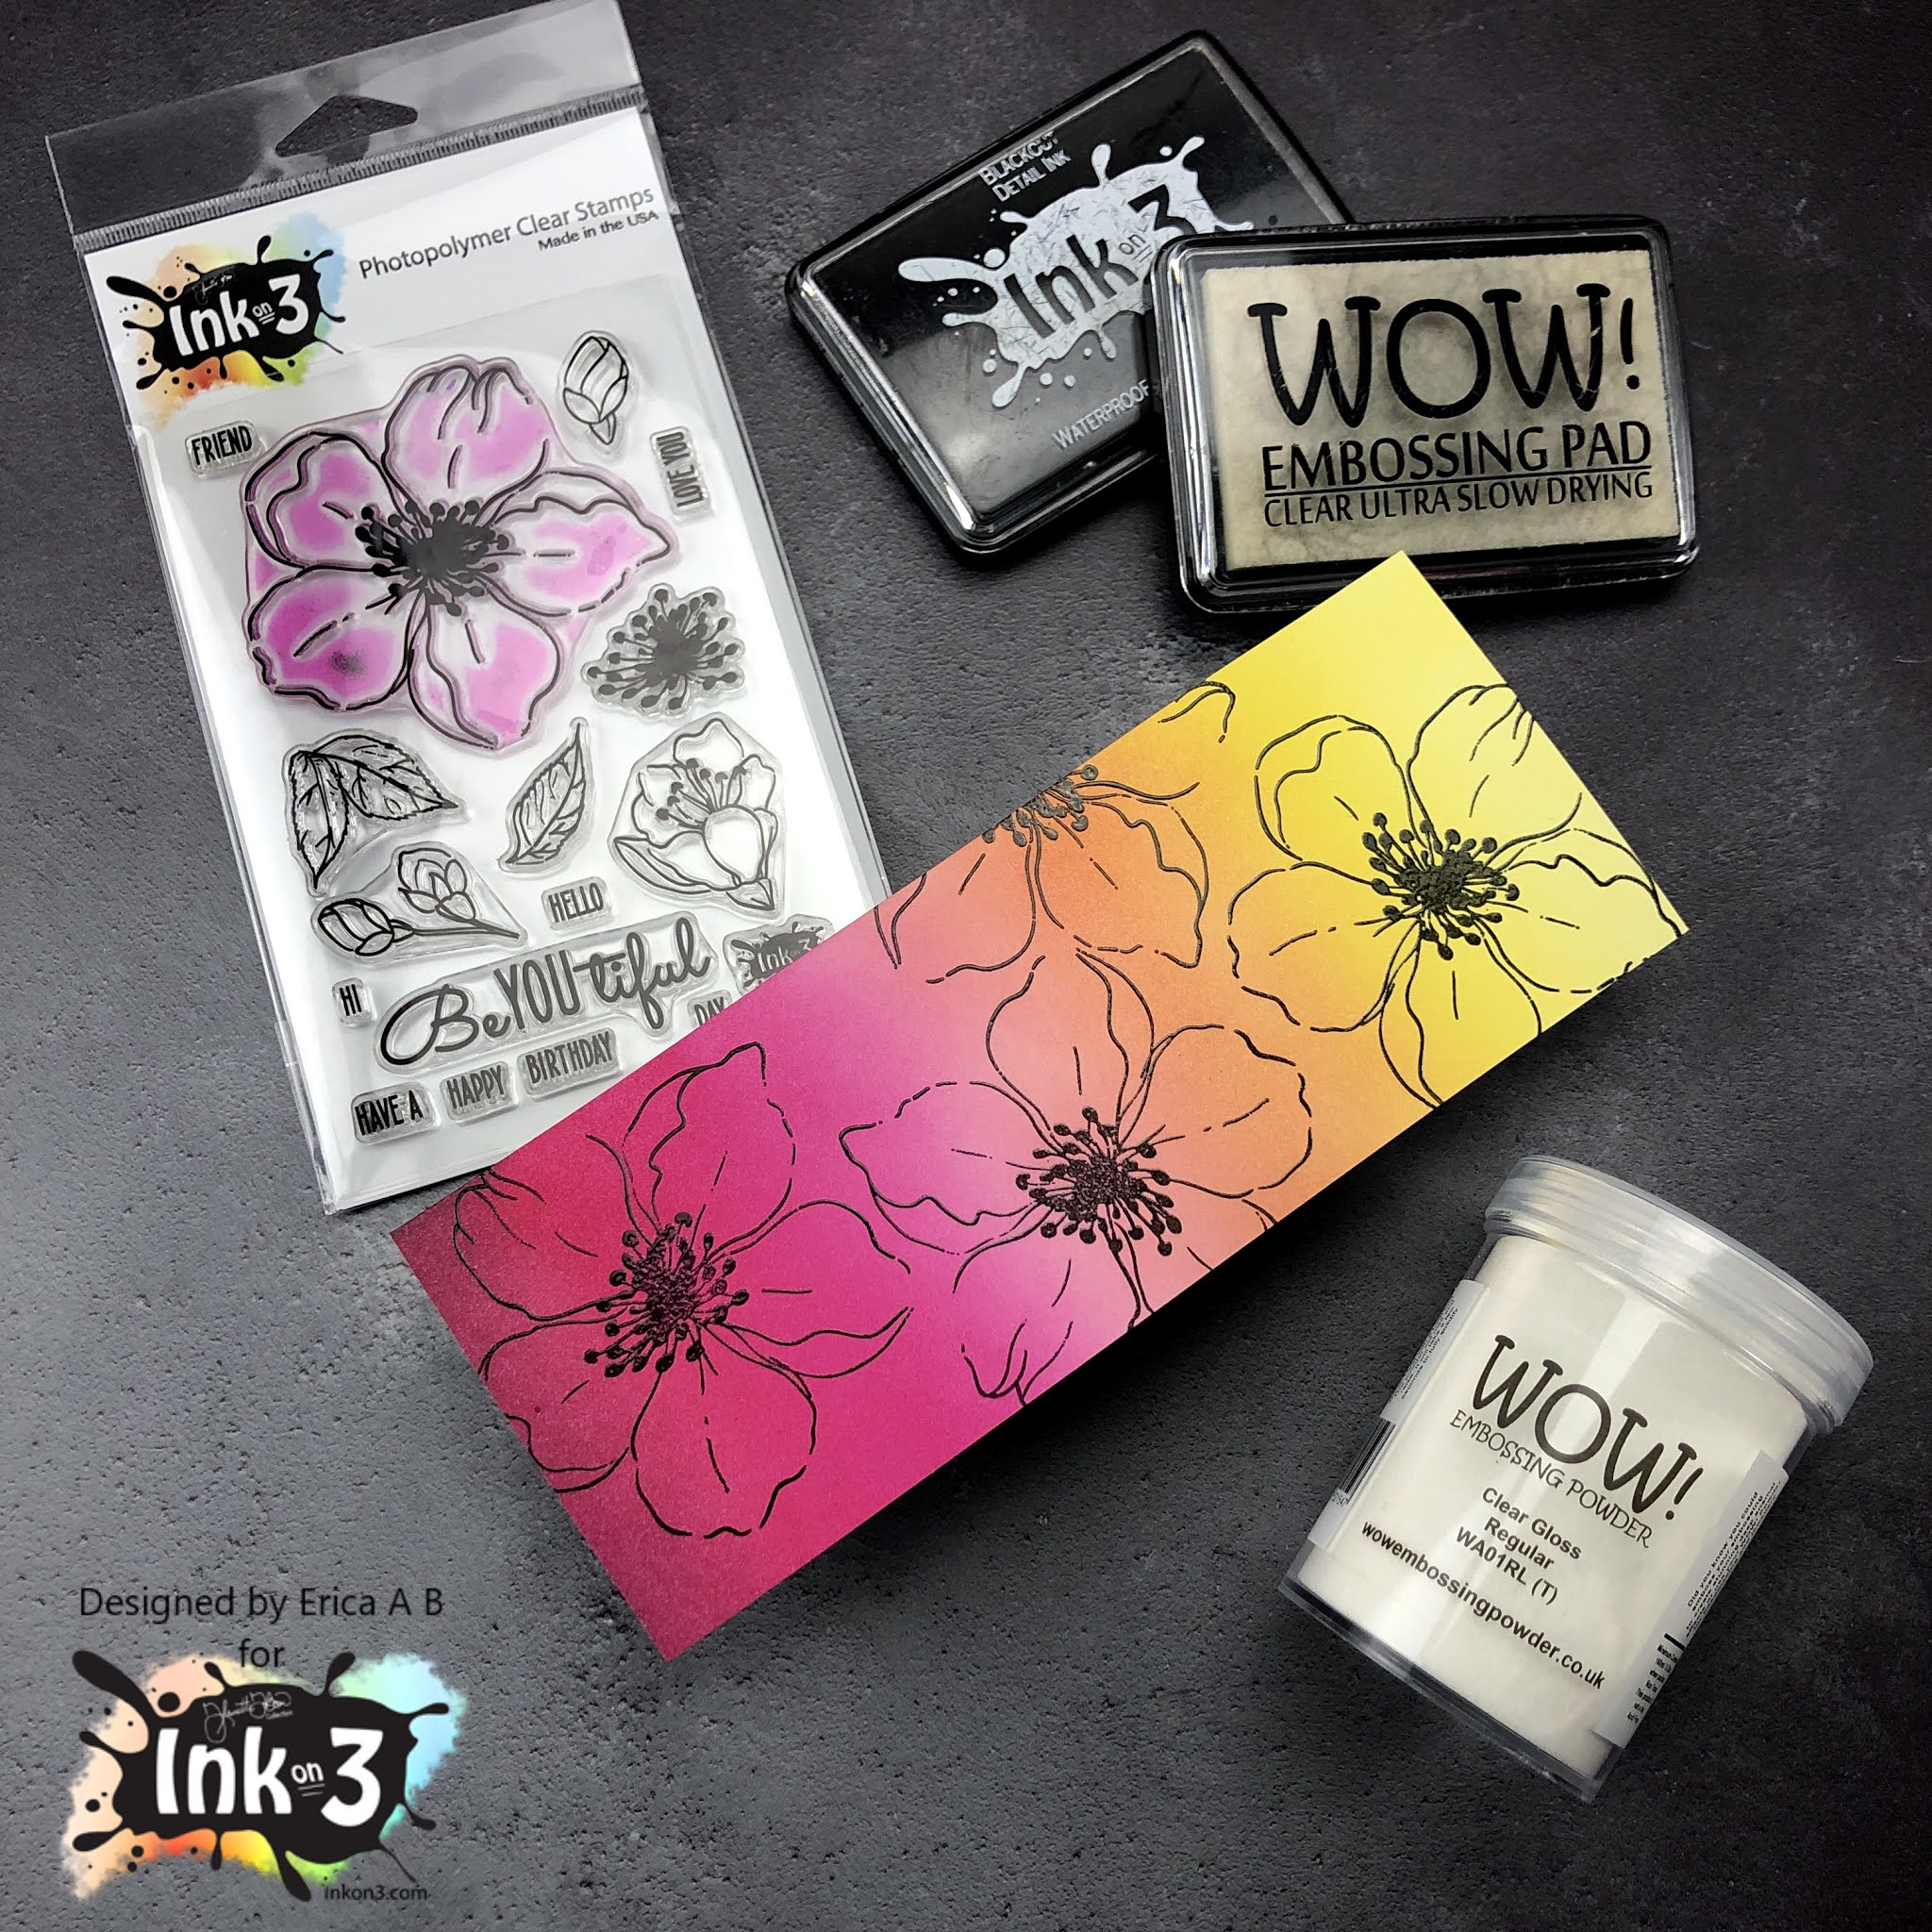
First off I did some ink blending with the goooooorgeou Atelier inks in Bee Sting Yellow, Marigold Orange, Sweet Petunia Pink and Marilyn Red using Life Changing Blender Brushes on Bristol Smooth paper. This combo has become quite a fave of mine for a variety of reasons, the main one being that it’s absolutely beautiful. I love it! 


These panels are actually one big piece that I cut up after ink blending over the whole thing. I love ink blending, and it’s always good to have some background panels done for when you need to make a card quickly! 


On the slightly smaller panel, I stamped up the big flower from the BeYOUtiful set with Blackout Detail ink and then Embossing ink. On top of these I sprinkled Clear Gloss embossing powder and set that with the heat gun. I did use a MISTI for the stamping to make sure the flower images were really solid. 

This panel I then layered up with the other one, but in different colour order. The reason I did this was to create some contrast and interest. 


To finish off this card I ended up using a diecut from Hero Arts that says Thinking Of You. I cut it out of white card stock three times, and then a fourth time in black card stock, and I layered these up to give the card some dimension. On top of this I heat embossed it with clear gloss embossing powder to give it a puffy sticker look. 


This word die I then glued down on the card with liquid glue and with that, the card was done. I contemplated adding some black gem stones or sequins, but if you can believe it, I decided against it. *GASP* I know.. 


That’s it from me for today! I hope you were inspired by this post, and will try this design for yourself. 


Lot of love and happy crafting from Erica


Monday, January 25, 2021

Quick and simple No-Line Coloring Magnolia Card

Hello Friends! It's Cheryl with the Creative Team with a tutorial on a quick and easy floral card! I love the look of No-Line Coloring and the Fadeout No Line Coloring detail ink! 


Paper Cuts:
  • White Cardstock - 5.5"x8.5", score at 4.25" to make a 4.25"x5.5" Card Base
  • Black Cardstock - 5.5"x 0.5"
  • Patterned Paper - 5.5"x3"
Stamp flowers and leaves from the Big Bold Magnolia Stamp set using the Fadeout No Line Coloring Detail Ink. Color with your choice of coloring medium, and then fussy cut the images.

Stamp the sentiment "Happy Birthday" from the BeYOUtiful Clear Stamp set using the Juicy Clear Embossing & Watermark Ink. Sprinkle Arctic White Embossing powder over the sentiment and shake off the excess powder, then heat set the powder. 

Adhere all the components starting with the patterned paper, then adhere the black cardstock aligning the black cardstock with the edge of the patterned paper. Lastly, Adhere the Magnolia flowers and leaves.


Saturday, January 23, 2021

Atelier Ink Chevron Valentine's Day Card

Hi, it's Lynnea! Sometimes I focus so much on fun techniques that I forget the amazingness of simple solid stamping! I love the smoothness of the InkOn3 Atelier Inks! I used the two new colors to stamp a pretty chevron background. 


Let's start with that pretty, colorful background! The InkOn3 Atelier Inks are great for all kinds of stamping - detail, sentiments, etc - but I really love to show them off with solid stamping! They are gorgeous and smooth from the first impression! I used the Pinkfresh Studio Nested Chevron Background Stamp to build my background. I alternated the chevrons between the new Sweet Petunia Pink and Trinity Teal Atelier Inks. I just LOVE this color combo! 


I used Blackout Hybrid Detail Ink to stamp a cute little gnome image as well as a sentiment from the Whimsy Stamps Gnome One Like You Stamp Set and colored him with Copic Markers. I covered the image with some Liquid Pixie Dust for all kinds of shimmer! I keep a little bit in a Small Fine Tip Water Brush Pen so that I can easily paint shimmer onto my colored images. 


I trimmed down my background panel to be slightly smaller than my card base and popped it up with foam and added my cute colored image in the center of the card. That's it! Cute and simple! I love that multicolored stamped background! 

Wednesday, January 20, 2021

XOXO Monochromatic Valentine's Day Cards

XOXO, Monochromatic, Valentine's Day Cards, Ink On 3, Lips Background, Hugs and Kisses, Card Making, Stamping, Die Cutting, handmade card, ilovedoingallthingscrafty, Stamps, how to, Atelier Inks,

Hello my friends, Ilda here! 

It feels so long since the last post 😬 I have been feeling a bit of the winter blues and had to take a little time away from social media. Thankfully, I am feeling a bit better and have been crafting away and have lots to share really soon 😊 Keeping my hands busy always seems to do me good!

Today I have a trio of Valentine's Day cards to share with you that were really simple to make. So if you are looking for some quick card ideas to give your Valentine/Galentine this year these are super cute.

CARD DETAILS

Basically what I did was repeat random stamping using the lips from the BAD AND BOUJEE stamp set to create the backgrounds for the cards. For this first card, I used ATELIER MARILYN RED on Hot Pink Cardstock and then used the same ink to blend the outer edge of the panel. 

XOXO, Monochromatic, Valentine's Day Cards, Ink On 3, Lips Background, Hugs and Kisses, Card Making, Stamping, Die Cutting, handmade card, ilovedoingallthingscrafty, Stamps, how to, Atelier Inks,

I then used the PHAT ALPHANUMERIC DIES to die cut the XOXO out. I then popped them up on the center of the card and that was it for this first card! Super simple.

XOXO, Monochromatic, Valentine's Day Cards, Ink On 3, Lips Background, Hugs and Kisses, Card Making, Stamping, Die Cutting, handmade card, ilovedoingallthingscrafty, Stamps, how to, Atelier Inks,

It appears I used white paper for the XOXO but it was actually Holographic Cardstock from the SILVER SERVICE paper pad.

XOXO, Monochromatic, Valentine's Day Cards, Ink On 3, Lips Background, Hugs and Kisses, Card Making, Stamping, Die Cutting, handmade card, ilovedoingallthingscrafty, Stamps, how to, Atelier Inks,

In this next card, the background was created the exact same way only this time the cardstock was red and the ink I used was ATELIER SHARK TOOTH.

XOXO, Monochromatic, Valentine's Day Cards, Ink On 3, Lips Background, Hugs and Kisses, Card Making, Stamping, Die Cutting, handmade card, ilovedoingallthingscrafty, Stamps, how to, Atelier Inks,

I then added the XOXO as before this time using white cardstock and then stamped out the sentiments using BLACKOUT INK and stamps from both BAD AND BOUJEE and FOX AND BUNNY HUGS sets.

XOXO, Monochromatic, Valentine's Day Cards, Ink On 3, Lips Background, Hugs and Kisses, Card Making, Stamping, Die Cutting, handmade card, ilovedoingallthingscrafty, Stamps, how to, Atelier Inks,

Here is a closeup 💋

XOXO, Monochromatic, Valentine's Day Cards, Ink On 3, Lips Background, Hugs and Kisses, Card Making, Stamping, Die Cutting, handmade card, ilovedoingallthingscrafty, Stamps, how to, Atelier Inks,

Here again, the same process was repeated only this time on Pink Cardstock and using ATELIER SWEET PETUNIA ink.

XOXO, Monochromatic, Valentine's Day Cards, Ink On 3, Lips Background, Hugs and Kisses, Card Making, Stamping, Die Cutting, handmade card, ilovedoingallthingscrafty, Stamps, how to, Atelier Inks,

The glitter paper also comes from the SILVER SERVICE paper pad.

XOXO, Monochromatic, Valentine's Day Cards, Ink On 3, Lips Background, Hugs and Kisses, Card Making, Stamping, Die Cutting, handmade card, ilovedoingallthingscrafty, Stamps, how to, Atelier Inks,

All the card bases are A2 sized and top folding.

XOXO, Monochromatic, Valentine's Day Cards, Ink On 3, Lips Background, Hugs and Kisses, Card Making, Stamping, Die Cutting, handmade card, ilovedoingallthingscrafty, Stamps, how to, Atelier Inks,

I hope you got some inspiration from these XOXO Valentine's Day Cards today. I think you can pull this monochromatic look with any of the Atelier Inks

Here is some more Valentine's Day inspiration, using the lips background this time in rainbow colors. Click the image below for more details.


Thank you for stopping by and until next time... Happy Crafting!

Connect with me also on my Blog, Facebook Page, Instagram, and YouTube


SUPPLIES
BAD AND BOUJEE
BAD AND BOUJEE
Shop at:
IO3
FOX AND BUNNY HUGS
FOX AND BUNNY HUGS
Shop at:
IO3
Phat Alphanumeric Dies
Shop at:
IO3
ATELIER SWEET PETUNIA
Shop at:
IO3
ATELIER MARILYN RED
ATELIER MARILYN RED
Shop at:
IO3
ATELIER SHARK TOOTH
ATELIER SHARK TOOTH
Shop at:
IO3
BLACKOUT INK
BLACKOUT INK
Shop at:
IO3
SSS 2.5 Inch ACRYLIC BLOCK
Shop at:
SSS
NEENAH SOLAR WHITE 110
Shop at:
SSS | AMZ | HBS
SILVER SERVICE
SILVER SERVICE
Shop at:
SSS | HBS | TS US
MINI MISTI
MINI MISTI
Shop at:
SSS | SB | HBS
GEMINI JR. DIE CUTTER
Shop at:
SSS | SB
INK BLENDER BRUSHES
INK BLENDER BRUSHES
Shop at:
SSS | SK
STUDIO KATIA GLUE
STUDIO KATIA GLUE
Shop at:
SSS | SK
FOAM TAPE - WHITE
FOAM TAPE - WHITE
Shop at:
SSS | SK
GUILLOTINE PAPER TRIMMER
Shop at:
SSS | AMZ | SB

Thursday, January 14, 2021

Tone on Tone Ink Blending

Hi everyone! It’s Jeannie (InsideoutJeans) on the blog today with Ink on 3’s stamp set named Bad and Boujee stamp and die set. I'm sharing four cards that I mass produced using different colors from the Atelier Ink line. 


Using Fadeout, I created a fun background using the lips from the Bad and Boujee stamp set. Because Fadeout absorbs the ink that you place on top of it, it made it for an easy tone on tone background panel for this really easy card. 

I used Sweet Petunia Pink, My Jam Purple, and Trinity Teal from the Atelier Ink line to ink blend all over the background panels. 


Isn't this such a fun technique to try out? To finish off the card, I die cut the "kisses" from the Bad and Boujee coordinating dies and layered two different cardstocks on top of each other. I also stamped the word "Sending" using Juicy Ink and heat embossed it with Artic White embossing powder


These cards are so fun and easy to put together, perfect for mass production. 

Check out the process of how I created these cards below on the Ink on 3 YouTube Channel. 


Thanks for stopping by today and I hope you get inspired to create. Come back again soon for more inspiration and ideas! Happy Crafting! 


Tuesday, January 12, 2021

Video Tutorial for Watercolor Stencil Resist with Ink on 3

Hello and thanks for stopping by! Today I'm happy to share a project with you using the Fox & Bunny stamp set and Atelier Inks with a beautiful stencil from Ink on 3 to create a watercolor resist look.


The Fox & Bunny stamp set is filled with wonderful sentiments as well as a few sweet images. My favorite saying from this set is "Sending Hugs", which is perfect to take a moment and let someone know I'm thinking about them in the crazy times we are living in.

 The background panel was so much fun to create! I started out with a piece of watercolor paper and swiped a few Atelier Ink Pads directly on the paper in a wiping movement. Once inked, Use a spray mister to add water and watch the colors mix. Either allow this panel to dry on it's own or help it along. Now take the panel and lay the Pondie stencil over it securely and dab on the Juicy Embossing ink pad to the panel, right through the stencil. Sprinkle on Crystal Clear Embossing Powder from Ink on 3 and heat set the panel. Once cooled off, spray with more water and dab up the ink from the paper that was not under the embossed area. Wow! You've got a background that is vibrant and full of a beautiful design.

I was inspired by the serene look to the Pondie Stencil from Ink on 3 and paired it with the Fox and Bunny stamp set. After stamping the larger image with Blackout Ink from Ink on 3, I added the clear embossing powder used earlier and heat set the image for watercoloring with Atelier Ink Refills. This is such an easy way to achieve a beautiful watercolor look. If you have not tried watercoloring with this method, I would  encourage you to try it today.
 
 Be sure to check out the video tutorial for a full process on coloring this card.


Here is an easy step by step how-to video for creating this card.


SUPPLY LIST:

Fox & Bunny stamp set: https://inkon3.com/products/fox-bunny-hugs-3x4-clear-stamp-set?aff=35

Pondie Stencil: https://inkon3.com/products/pondie-6x6-stencil?add=35

Blackout Hybrid Detail Ink: https://inkon3.com/collections/ink/products/blackout-hybrid-detail-ink?aff=35

Juicy Clear Embossing & Watermark Ink: https://inkon3.com/collections/ink/products/juicy-embossing-watermark-ink?aff=35

Atelier Goddess Green- Artist Grade Fusion Ink: https://inkon3.com/collections/ink/products/goddess-green-atelier-artist-grade-fusion-ink?aff=35

Atelier Trinity Teal- Artist Grade Fusion Ink: https://inkon3.com/collections/atelier-ink-pads/products/atelier-trinity-teal-artist-grade-fusion-ink-pad?aff=35

Atelier Peacock Blue- Artist Grade Fusion Ink: https://inkon3.com/collections/ink/products/atelier-peacock-blue-artist-grade-fusion-ink?aff=35

Marilyn Red Ink Refill: https://inkon3.com/products/atelier-watercolor-re-inker-marilyn-red-artist-grade-fusion-ink?aff=35

Marigold Ink Refill: https://inkon3.com/collections/re-inkers/products/atelier-watercolor-re-inker-maigold-orange-artist-grade-fusion-ink?aff=35

Bee Sting Yellow Ink Refill: https://inkon3.com/products/atelier-watercolor-re-inker-bee-sting-yellow-artist-grade-fusion-ink?aff=35

Goddess Green Ink Refill: https://inkon3.com/collections/re-inkers/products/atelier-watercolor-re-inker-maigold-orange-artist-grade-fusion-ink?aff=35

Twiggy Brown Ink Refill: https://inkon3.com/collections/re-inkers/products/atelier-watercolor-re-inker-twiggy-brown-artist-grade-fusion-ink?aff=35

Sweet Petunia Pink Ink Refill: https://inkon3.com/collections/atelier-watercolor-re-inkers/products/atelier-watercolor-re-inker-sweet-petunia-pink-artist-grade-fusion-ink?aff=35

Trinity Teal Ink Refill: https://inkon3.com/collections/atelier-watercolor-re-inkers/products/copy-of-atelier-watercolor-re-inker-sweet-petunia-pink-artist-grade-fusion-ink?aff=35

Shark Tooth White Ink Refill: https://inkon3.com/collections/atelier-watercolor-re-inkers/products/atelier-watercolor-re-inker-shark-tooth-white-artist-grade-fusion-ink?aff=35

Arctic White Ultra Fine Embossing Powder: https://inkon3.com/collections/ultra-fine-embossing-powder/products/arctic-white-ultra-fine-embossing-powder?aff=35

Crystal Clear Ultra Fine Embossing Powder:

https://inkon3.com/collections/ultra-fine-embossing-powder/products/crystal-clear-ultra-fine-embossing-powder?aff=35

Ink Off Stamp Cleaner Pad: https://inkon3.com/products/ink-off?_pos=2&_sid=e797b1832&_ss=r&aff=35

Large Waterbrush Pen: https://inkon3.com/collections/paint-brushes/products/large-water-brush-pen?aff=35

Trinity Stamps Tidy Tray: https://shrsl.com/2c4f6

MISTI Stamping Tool REDESIGNED: https://shrsl.com/2g8kw

MISTI Creative Corners: https://shrsl.com/2g8kz

MISTI Mouse Pad Cushion: https://shrsl.com/2g8l1

Teflon Burnishing Tool: https://shrsl.com/2g8md

Teflon Ergonomic Tool: https://shrsl.com/2g8me

Hero Arts Rectangle Infinity Dies:  https://shrsl.com/25kct

Dual Speed Heat Tool: https://www.ellenhutson.com/dual-speed-heat-tool-wow/#_a_238

EK Success Powder Tool for embossing:  https://www.ellenhutson.com/powder-tool-adhesive-deactivator/#_a_238

Strathmore Watercolor Paper Pad 9x12:  https://www.ellenhutson.com/strathmore-watercolor-paper-9x12/#_a_238 

Neenah Solar White 110 lb cardstock:  https://www.ellenhutson.com/neenah-cardstock-neenah-heavyweight-classic-crest-solar-white-110-lb-25-pk/#_a_238

Neenah Classic Crest Solar White 80 lb cardstock: https://www.ellenhutson.com/neenah-classic-crest-solar-white-25-pk-cardstock/#_a_238

Ebony Black 100# cardstock 25 pack:  https://www.ellenhutson.com/essentials-by-ellen-cardstock-ebony-black-100-lb-25pk/#_a_238

Spellbinders Platinum 6 die cut and emboss machine:  https://www.ellenhutson.com/platinum-6-die-cutting-and-embossing-machine-spellbinders-tools/#_a_238

Scor-buddyMini Scoring Board:  https://www.ellenhutson.com/scor-buddy-mini-scoring-board-9x7-5/#_a_238

Tonic 8.5” Guillotine Paper Trimmer by Tim Holtz:  https://www.ellenhutson.com/tonic-comfort-8-5-inch-guillotine-paper-trimmer-by-tim-holtz/#_a_238

EK Success 5” Scissors: https://www.ellenhutson.com/ek-tools-precision-5-inch-scissors-with-sheath/#_a_238

Purple Tape ½”:  https://www.ellenhutson.com/icraft-purple-tape-1-2-in-x-15-yards/#_a_238

Tonic Nuvo Deluxe Adhesive: https://www.ellenhutson.com/tonic-nuvo-deluxe-adhesive/#_a_238

Post It Adhesive Roll: https://www.ellenhutson.com/3m-post-it-adhesive-roll-white-1x400-in/#_a_238

Pixie Spray: https://www.ellenhutson.com/icraft-pixie-spray/#_a_238

Scotch Foam Tape Roll:  https://www.ellenhutson.com/scotch-foam-mounting-tape/#_a_238


Does this project bring you lots of new ideas for creating? We would love to hear from you! Thank you for visiting us today and I look forward to sharing again with you soon!

Jenny Hall