Showing posts with label No Line Watercoloring. Show all posts

Tuesday, March 30, 2021

 Hi everyone! 


It's Erica back on the Ink On 3 blog today, and I have finally got my yummy new goodies! I had to use the gorgeous Triple Rose stamp set, right away. 


Ambitiously, I decided to go for a no-line colouring look. I know, nuts, right? Especially while feeling a bit rusty, but apparently there was no stopping me, so I stamped up the image with Fadeout Ink on watercolour paper. 


I had some new watercolours to swatch and try out, these are Meeden 48 colour half pan, and in all honestly, I thought I was buying a 48 colour empty pan tin. I was more than a little surprised when they showed up and actually had colours in them, lol! Happy surprise, though. 


Using these colours, I coloured in the lovely floral image. The pinks were used for two of the roses, and I used a purple-ish pink on the middle rose. Green was the obvious choice for the leaves and buds. 


I did spend quite a lot of time on this as I was feeling slow and rusty, and left it overnight to dry properly, before going back to add some more details and depth. While I did spend lots of time on this, I am not 100% happy with the results but I guess that means I need more practice. 

Usually I fill out the background a little with a darker colour to bring the eye in to the image, but this time I didn't. I left it white and clean, but I did use a stitched rectangle die to add some interest around the edges. The only thing I added was a slim banner with a sentiment from the Here For You, this was stamped up with Dove ink from Concord & 9th. Ok, so I did add a lot of iridescent sequins too, but that was it. 


Thanks for stopping by today, I hope you enjoyed this card and will get the chance to watch the video as well. Lots of love and happy crafting from Erica 


Thursday, December 17, 2020

No line Coloring with Guest Designer Melinda

Hello everyone, Melinda here with, sadly my last post as guest designer for Inkon3. I really enjoyed sharing some ideas with you all and hope you found some inspiration.

For my last project I wanted to use Lil Birdie, it’s such a fun versatile set. I was inspired by some stamp sets I’ve seen with floral garlands on balloons and other various shapes. I decided on a heart shape for my garland and I was off and running!

I started by stamping the large flower with Fadeout ink. I watercolored the flowers with a mix of Marilyn Red and Marigold Orange, mix until you get the desired shade of peachy pink. Next paint the leaves with a mix of Goddess Green and a touch of Twiggy Brown to make the leaves a more olive green. Fussy cut the floral after it’s completely dry. Now I decided on a heart, but you can use whatever shape speaks to you. When you cut your shape out, take the flower and place it where you want it and use it as a guide for where to stamp a few extra leaves and some berries. Stamp the leaves and berries with your Fadeout ink and watercolor the leaves with the same combination of green and brown Atelier inks. Use Marilyn Red for the berries and leave a white highlight ( you can add it later with a gel pen also). Paint the berry stems with Twiggy Brown. After the berries and leaves dry take your water brush and wet the heart and add a bit of Trinity Teal. Allow everything to dry and adhere the flower using some dimensional tape. I added some die cut leaves with a bit of my green mixture. I glued some gold leaf to them for a little shine, but again, use what you’ve got in your stash. I’m big on using what bits and bobs I have around so I took the floral embossed piece and off set it on my grey A2 sized card base. I used some of the small sentiments in the Kit to make another birthday card. We can’t have enough birthday cards, right?

Thanks again to Inkon3 for the amazing opportunity to create and share with you all! Be safe and be well! Much love, Melinda

Wednesday, December 2, 2020

Lil Birdie - No Line Watercoloring with Guest Designer Melinda

Hello everyone! I'm Melinda and I'm back guest designing for Ink on 3 with another watercolored card. I hope you all are settling into winter and getting some crafty time in. I have been really putting in the time myself trying to get those Christmas cards done.


I was really excited about getting to create with the set Lil Birdie because birds and florals are my two favorite things to paint. I started this card by taking all the little leaves, buds, berries and stamped them randomly on watercolor paper with Fadeout ink. I painted the background with my Karin markers and added some watery Peacock Blue here and there to make those florals really pop. I stamped the bird on a separate piece, I painted it with Trinity Teal and Paint It Black Atelier inks and the branch with Twiggy Brown. I cut the bird out with a circle die and cut a piece of vellum with a larger die. I put the vellum behind the bird and popped it up with dimensionals on to my back ground.


I was so happy with how this card came out! There was some bleeding of the inks, which I like, it gives it that loose floral look. I hope you’ll give this background stamping technique a try. It really is great for using small bits to make a big impact. 

Thursday, October 17, 2019

Pumpkin tag tutorial

Hello my fabulous friends!

Welcome to the Inkon3 blog! Kassi here with a fun fall gift tag tutorial! 
As a kid, I was taught to say 'thank you' when people did something nice for me... I remember one time, while cooking dinner for an important event, our cheese grater broke... we didn't have time to go to the store, so I mom called our neighbor and asked if we could borrow theirs... It wasn't a big deal, and they were happy to lend it to us. However, before returning it the next day, my mom had me stick suckers into each of the grater holes, turning it into a candy bouquet... She wanted to make sure they knew that she was grateful... both for the borrowed cheese grater, and their friendship.  

That's why I make so many 'thank you' cards and treats...

Let's take a look at how to make this fabulous fall tag!

Monday, September 16, 2019

Thinking of You Roses


Hello my fabulous friends! 
Kassi here, with a project featuring a beautiful stamp, no line coloring, and little sparkle... 

I can't say that I have a favorite flower... there are just too many amazing flowers to pick one... but I will say that roses hold the most memories for me. My grandma had beautiful roses lining the walkway to her front door... We would walk through them just to smell them and see all the pretty colors. 
She died when I was 11, and that rose garden were never the same... but to this day, when I smell roses, I think of her, and it makes me my heart happy. 

Friday, August 9, 2019

Magical Unicorn Birthday Card


Hello, again my friends, Ilda here!

Today I am sharing this beautiful Unicorn card featuring the Magical Unicorn set.

CARD DETAILS

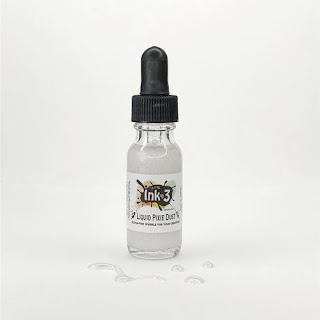
I colored in this partial stamp using Zig Clean Brushes, that I had first stamped out using Fadeout Ink for a no-line watercolored look onto Bristol Paper. Then on some areas, I added Liquid Pixie Dust for extra sparkle.

Next, I die cut some clouds and blended out some Broken China lightly to the bottom of them and also blended out Picked Raspberry onto the heart.

For the background, I used a strip of an alcohol rainbow panel that I had previously made and then popped all the elements on to the card front. The sentiments also come from the Magical Unicorn set and were stamped out using Blackout Ink.


Here is how I finished off the inside of this pretty card.


Hope you were inspired by my Magical Unicorn Birthday Card today.

Thank you for stopping by until next time... Happy Crafting!


SUPPLIES
Magical Unicorn
Magical Unicorn
Shop at:
SSS | HD
Fadeout No Line Ink
Fadeout No Line Ink
Shop at:
SSS | HD
Blackout Ink
Blackout Ink
Shop at:
SSS | HD
Liquid Pixie Dust
Liquid Pixie Dust
Shop at:
SSS | HD
Small Fine Tip Water Brush Pen
Shop at:
HD
Strathmore Bristol Pad
Shop at:
SSS | AMZ
Mini Misti Tool
Mini Misti Tool
Shop at:
SSS | AMZ | SB | SK
Zig CLEAN COLOR 60+ 80 SET
Shop at:
SSS | AMZ
Gemini Jr Die Cutting/Embossing Machine
Shop at:
SSS | AMZ | SB
BLENDER BRUSH Set
BLENDER BRUSH Set
Shop at:
SSS | AMZ | SB | PF
Oxide Ink Pad BROKEN CHINA
Shop at:
SSS | SB | HBS
PICKED RASPBERRY
PICKED RASPBERRY
Shop at:
SSS | SB | HBS
WHITE Gelly Roll Pens Set
Shop at:
SSS | AMZ | SB
EK Tools 5-Pack Journaling Pens, Black
Shop at:
AMZ
STUDIO KATIA GLUE
STUDIO KATIA GLUE
Shop at:
SSS | SK
Glossy Accents
Glossy Accents
Shop at:
SSS | AMZ | SB | HBS
Double-Sided Foam Tape
Shop at:
SSS | AMZ

Wednesday, August 7, 2019

Coral Wreath Tutorial

Hello everyone! 

Kassi here...

Have you ever had an idea for a card rattling around in your brain for a while before you decide to tackle it? I had this one sitting on the back burner for a while... My original plan was a very complicated one that left me feeling too overwhelmed to tackle... than I realized that if I simplify, not only will it make it more approachable, but it might actually look better... 

Let's take a look at how it ended up coming together...