Showing posts with label Mitsyana Wright. Show all posts

Tuesday, June 20, 2017

Rosie Posies

Hello, Crafty Friends!!
 I have another project for you all today! This time I have this lovely rosie posie card using...

Fleurette Blooms' Posies stamp set.

Image result for fleurette bloom designs posies


I stamped my image onto mixed media paper with black archival ink and colored with distress markers then blended out with a water brush.

Once completely dried, I cut each flower out by hand.


I die cut leaves from old music sheets. Then shaded them with Distress Inks and added details with Distress Markers.

I die cut a honeycomb out of chipboard using honeycomb die. I mixed white gesso, microbeads, and texture powder together and applied over the entire honeycomb. 

I allowed the mixture to completely dry then colored with distress stain then dry brushed acrylic paint.


Using my Xyron Creative Station Lite, I attached a 4.25"x 5.5" piece of burlap onto a standard A2 sized card made from cream colored cardstock. Then layered a 4"x 5.25" mat on top.

I used a bit of glossy accents as a glue and attached to my card front. The laid down my leaves before attaching my posies over top with more glossy accents.

To fish my card, I die cut the word hello from brown cardstock and attached at the bottom of the card.

And here is my finished card..


Such a simple yet beautiful card.

I hope you enjoyed this quick tutorial for today!

Until next time...
Happy Crafting!!
~Mitsy

For full supply list visit my personal blog here.

Wednesday, February 8, 2017

Hugs & Kisses

Hello Crafty Friends... Mitsyana Wright here!!
And I'm back again with Fleurette Bloom Stamps... whom has just asked me to be a part of their Design Team!!! Eeeeeek!! How cool is that??!!

I don't know about you but hearing great news like that always make me feel loved! And I've been in a very lovey-dovey type of mood lately... lots of warm fuzzies!


And what says love better than red roses...I think roses are very romantic, by the way!

 So, I made this simple, elegant, and "tres romantique" card using Fleurettes new Roses in Bloom set.


I started by stamping my image a total of three times. 

Next, I colored them  and I added highlights using a white gel pen.

I cut out two of the images by hand, and the third I die cut using a stitched circle die. Then embossed the die cut with an embossing folder.

I added foam adhesive to the back of the flowers and layered them onto each other for more dimension and removed one of the flowers for the very top layer.

I used this light green paper  and created a A7 (5"x 7" folded) sized card base.

Then die cut printed text paper  using a stitched rectangle die. 
I used a tape runner to attach my rectangle to the front of my card base.

I used the same circle die from earlier and traced around the outside diameter of the die as a template. Then hand cut out the traced shape and layered it under my paper pieced roses.

I added foam tape under the circle for more dimension then adhered it to my card front.

I die cut a pennant and the letters XOXO and adhered the little flag to the card, slightly tucking it behind the circle.

Lastly, I added a heart shaped cabochon using a clear quick dry adhesive.


You can really see all the added dimension with all the different layers (above picture).

Finished Card

I really hope you enjoyed my project for today and that it filled you with 
a bit of love, a little romance, or even some heartfelt inspiration.

Wishing you lots of hugs, kisses, & Valentine Wishes,
Mitsy

For a full list of supplies for this project please visit my personal blog here.

Friday, December 16, 2016

Merry Christmas Card

Hello Again Crafty Friends!!
Hope everyone is having a HOLLY JOLLY Christmas!!Are you in need of some last minute holiday mojo?? Well, I have a little Christmas inspiration for ya!!


I made this card using FB Stamps' Let it Snow stamps set!!

I love how elegant the Merry Christmas sentiment is in this set!! I love it so much I made it the focal point for my card!!

I stamped this image with an VersaFine Onyx Black ink and colored in the image with my Zig Kuretake Clean Color Real Brush Markers.


Then die cut the image with an oval die and layered it onto ornate oval die to frame it.

Adhered my card layers together using my Xyron Mega Runner.

The scroll borders were aso die cuts. I cut out 2 pieces then I attached them together using a glue pen. Then, I attached the joined piece onto the card with clear liquid adhesive.

I added Petaloo flowers & holly leaves. I also added berries I purchased from Dollar Tree. I used a thick clear adhesive to attach the bigger embellishments to the card. You could also use hot glue for this.

Here is a close-up of my finished card...

Hope you all enjoyed today's holiday inspiration!!

Happy Crafting, Friends!!
~ DT Mitsy

For a complete list of supplies... visit my personal blog here.

Thursday, November 17, 2016

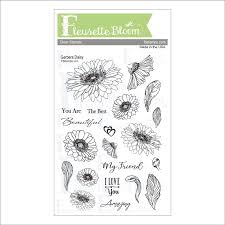
More Gerbera Daisies! Using FBstamps Clear Stamps


Happy Thursday, Crafty Friends... It's fall and can you believe Thanksgiving is just in one week?!

Thanksgiving is the time of year to be thankful for all they have. For me, I am very thankful for family and friends! I appreciate each and everyone one of them. And though I try to show them I care everyday, sometimes life just get's in the way. I guess that's what I get for "adulting"... mommy & wifey duties, house chores, design team obligations... they all pile up! 

I'm making an active effort to let my loved ones know I appreciate & love them. 

Today is my first Guest DT post for FB stamps and I made this fall themed I love you card.

Supplies Used

Gerbera Daisy (FB Stamps)
Chipboard
Whimsy Embossing Folder (Lifestyle Crafts)
Mega Runner (Xyron)
VersaFine Onyx Black (Tsukineko/ Imagine Crafts)
Clean Color Real Brush Markers (Zig/ Kuretake)
Wink of Stella (Zig/ Kuretake)
Mixed Media Paper (Strathmore)
Whipped Spackle (Faber-Castell)
3D Dots (EK Success)
PITT Artist Pen XS (Faber-Castell)
Chalklets(EK Success)
White Gel Pen (Sakura)
Glitter Enamel Dots
Hemp Twine 
Button
Scissors


I started by stamping my images in black ink onto mixed media paper. then, I colored the flowers with my Zig Markers in Yellow, Mustard, Beige,Dark Oatmeal, &  Brown and went over the centers with a clear glitter pen. I also colored the leaves in Mild Green, Olive green, & Deep Green. 

I fussy cut the flowers all the images out but if you are not great at fussy cutting or just want to save time FB Stamps have the cut files for all their stamps and the coordinating digi dies are FREE!!

I stamped doubles of the bigger blooms and cut off the outer row of petals. then layered it onto the bigger bloom with foam dots.


I wanted my flowers to be an arrangement and not just floating on the card... so, I used Eileen Hull's Tea Cup Die for the cup and the tag. I cut them from Chipboard then adhered my patterned paper onto them with my Creative Station Lite.

I shaded the edges with  abit of chalk in colors that were at least 2 shades darker than the paper.

 The little "I love You" stamp comes included with the Gerbera Daisies set.

In the picture above it looked cute it felt it was missing something...


So, I added some texture to the background with a bit of modeling paste and a stencil.
And cut out a band for my teacup and embossed it and added enamel glitter dots.

I traced around the cup and tags with an extra fine black pen and then added highlights with a white gel pen. I also went over the embossed area with the same black pan as well. 

Then finally, I finished it off with a button topped multi-looped twine bow.

Here is a close up of all the dimension in this card...


I am enjoying this stamp set very much and I'm looking forward to making more with it!!

I hope you all enjoyed today's card!!

Until next time...

HAPPY CRAFTING!!
~Mitsy

You can see more of Mitsyana on her blog 
http://www.upontippytoes.com/2016/11/love-and-appreciation.html