Showing posts with label fbstamps. Show all posts

Friday, March 17, 2017

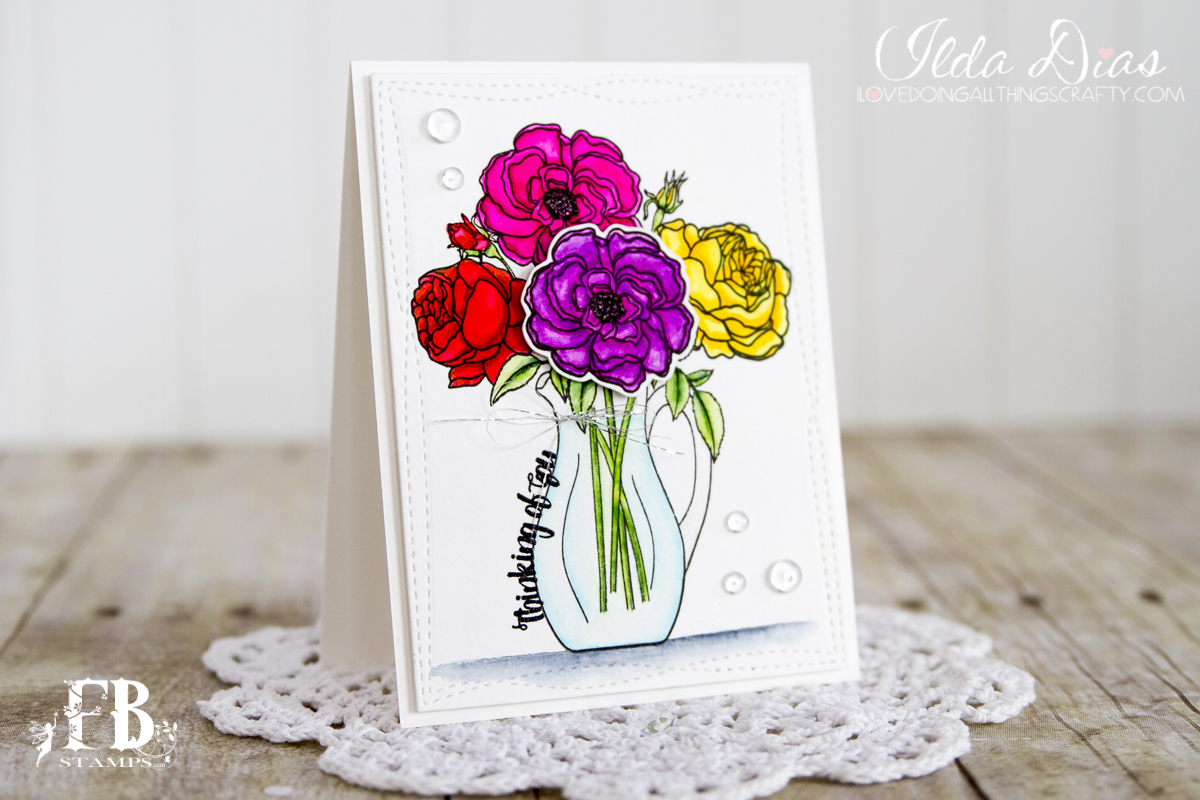
Thinking Of You Posies Bouquet by Ilda

Hello Everyone!

Who doesn't like to receive flowers? How about a gorgeous posies Bouquet? Flowers don't always have to be the real ones you know πŸ˜‰ I know I would love to receive some πŸ’—πŸŽ•

Today my card features FB Stamps Posies Stamp set that SOLD out really fast when they were just released. Well the good new is that they are now back in stock again! YAY!


Take a closer look at these pretties. I just love how this card came together!

All I did was a little bit of masking on the base layer of the card and then just cut out one of the flowers and popped it up with some foam in the center of the bouquet. Colored the images in with my Zigs and stamped the sentiment along the edge of the pitcher... and voila!
So pretty 😍


Want to know what supplies I used, click → HERE.

Hope my Thinking Of You Posies Bouquet has inspired you to send someone flowers soon. Don't forget to stop by Fleurette Blooms Shop as she just restocked her supplies!

Thanks for stopping by!
Happy Crafting  :)

Wednesday, March 1, 2017

When Pigs Fly Card - Flying Piggy by Ilda

It's true, it's true, pigs are flying!!!
Well at least in my latest card 😏


Not sure if you guys can tell, but check out the shiny little foiled pigs 🐷 in the the background (see next picture). I used Fleurette's coordinating "Three Little Pigs" Digital Foil It Paper Pack and the speech bubble is also a Foil It. Love how she has made these digi papers coordinate with the her Stamps. Just makes things a lot simpler when you are creating, takes out the guess work out of choosing papers! And using the "Foil Its" was fairly easy too, all you need is a laminator or a Minc, and if you don't have one of those... I've heard, an iron works too to transfer on the foil  πŸ˜‰

 How cute is this little flying pig?


If you love him I bet you will love the "Three Little Pigs" stamp set from Fleurette Bloom's latest release, and for a limited time you can get the Pigs and Posies Bundle Pack Special - FREE Shipping with the coupon code piggiesposies

For those of you that like watching the card making process, this is for you! Links to all the supplies I used will be listed in the video description.


Click ->HERE to watch in HD

Thanks for "flying" by!
Happy Crafting EveryoneπŸ‘‹


Monday, January 16, 2017

Fairy Wishes Card by Fleurette ~ Clear Stamps

Hi Fleurette here on the blog today :)  Sharing a whimsical, dreamy fairy card I created live on Periscope with our new Fairy Wishes stamp set and coordinating digi papers!  I had a blast making this one, so easy to put together now that we have papers that work seamlessly with our stamps!
#fbstamps # clearstamps #stamping #cardmaking #fairystamp #birthdaystamp #digitalpapers #makeawish #papercrafting #zigcleancolorrealbrushmarkers #fleurettebloom


You can see exactly how I made this card, by watching the replay video just click the link below. 
I even decorated the inside! :)

Ingredients Below


You can also get our New Release Bundle Pack for a limited time @ 20% Off Plus Free Shipping


Monday, September 12, 2016

BOO! Shaker Card

Hey guys,
Ilda here taking over Fleurette's Blog... Muhaha!

I finally got a chance to play with some stamps from Fleurette latest stamp Release.
 If you haven't seen it you will need to stop by her shop and check them out! She's got a great Fall Bundle Pack Special right now where you will get 1 FREE stamp set with purchase. Supplies are limited, so check it out :)

So on to my project for today... this is a pretty simple basic shaker card using vellum and bat sequins.

How adorable is that little ghost?
Makes me giggle a little cause it's not scary at all ;)


The Stamps I used come from the Pumpkin Friends and the Go Batty Stamp Set.

 Here is a close up!


And here is the sentiment I stamped on the inside.


Hope you enjoyed this really quick and simple shaker card.
Perfect for the little ghost and goblins in your life!

Thanks for stopping by!
Happy Crafting  :)

Monday, July 25, 2016

Quick, Cute & Easy Puppy GiftTag ~ Using Clear Stamp...

Need a quick and easy gift tag?  I had a last minute party to go to for a kid, and did not have a card.  So I whipped up this cute little puppy gift tag, that I could clip right to the top of the gift bag!  Now I didn't need a bow as the tag gave it that super cut finishing touch :)

#clearstamps #stamping #papercrafting #gifttag #dog #puppy #fbstamps #zigcleancolorrealbrushmarkers
I created this Live on my Periscope channel.  So, you can watch & follow along to create your own. 
(Keep in mind it was done live, so you have to bare with me in the beginning, we had a little technical difficulty, but it all gets straightened out quickly and I get to the crafting fun)

Supplies: 
  •  Pawsatively Fabulous ~ 4x6 stamp set
  • Markers
  • Chalkboard tag
  • Clothespin
  • Hot glue and hot glue gun
  • Adhesive
  • Foam tape

Here is how I created this adorable tag:

  • I used a rectangle chalkboard tag.
  • Hot glued a clothespin to the top.
  • Colored this adorable puppy stamp with Zig Real Color Clean Brush markers, then cut it out along with the cute little doggy bowl, using the stamp set "Pawsatively Fabulous"
  • Then I used a white gel pen to write my message. (You could also use one of the sentiments from the stamp set instead. 
  • I popped up the finished puppy with some foam tape, glued on the bowl and had the most adorable decoration and tag for my gift! :)  
It was so easy, I made a second one for a little boys birthday!


Happy Crafting!


Sunday, July 24, 2016

Welcome New DT Member Laura Wright - Plus Chance to Win Clear Stamps

Please give a Big Warm Welcome to our New DT Member Laura WrightI know you will love her creative inspiration as much as we do!  To celebrate we are having a GIVEAWAY on our  Facebook Page, pop on over there for your chance to WIN the Stamps & Sequins shown in the photo below.  I love this fun card Laura created with these!!! 

#clearstamps #stamping #papercrafting #hotairballoonstamps #hotairballoon #cardmaking #fbstamps
Happy Crafting! 

Friday, December 11, 2015

Christmas Door Card - PixScan/Scanner Silhouette Tutorial

Come and knock on my door... 
We've been waiting for you...

Hey Everyone, Ilda here today on Fleurette's Blog! So, who remembers Three's Company? I don't know why but this picture below reminded me of the theme song and now it's stuck in my head, haha!

Anyways, I'm excited to share with you this really simple yet elegant door card I made using Fleurette Bloom files with one of her latest Stamp sets! The card comes from Christmas Memories SVG Kit and the stamps come from the Peace on Earth Stamp set.


Not a lot of colouring required for this project, which makes it easy to whip up a bunch of these! In case you are wondering I used my Spectrum Noir Markers, gold embossing powder and VersaMark ink.

Take a closer look.
Aren't those stamps amazing!?!
For those of you interested, Fleurette has here Stamps Sets on SALE right now!


As many of you know I am a Silhouette girl. I love my Silhouette Cameo! It does pretty much everything I have ever wanted it to do. So when the PixScan mat for the Silhouette first came out I had to have it. The results I had when I first used it were disappointing. Some of the cuts were OK, but many were way off, so for a longest time I hadn't used it.  Then through a FB Group I heard of this fantastic machine that simply scanned an image and cut it out, the Brother Scan and Cut. So for a while now I have been debating on whether or not to buy myself one as I am starting to get a little more into stamping... damned the Stamping Enabler Group, lol! After doing a bunch of research on it, it would cost me about $400 to get one to me here in Canada, plus version 2 is not available here yet! That's quite the investment!

Well, I am happy to say that I saved myself $400 by giving the PixScan mat another try! This time instead of using my phone to take the picture I actually used a scanner, and OMG what a difference that made! You see when you use a camera, there is a high chance that the image will have a slight angle to it, distorting the image once imported. You need a flat image, because a slight angle will make a lot of difference in the cut you get! Lucky for me, last weekend at Costco they had a promotion on the HP Envy 4522 for $39.99! This thing prints, scans and copies... How can I go wrong with that! All I needed was the scanner, and for $40 I was SOLD!

So once I figured out how to install the scanner, the rest was easy! Here is what I did next...
  1. Stamped my images and load them on to the PixScan mat (Use a permanent, waterproof ink if you plan on colouring them to avoid bleeding).
  2. Open the Silhouette Studio, click on the PixScan Image Icon.
  3. Place the PixScan Mat into your your scanner, ensuring that at least one of the sides of the registration marks are in the scanning field. (Don't worry if your mat is bigger than the scanner. The silhouette will stitch the two images together later.)
  4. Select Import from Scanner.
  5. Next, select your source and then Import the image (I used the WIA- option), click Scan.
  6. Now wait for it to transfer the data.
  7. You should now have an image that shows half a page loaded on a PixScan mat on the screen. 
  8. If your image is larger, you may need to follow the next step. If all your image was imported ignore it and go to step 10.
  9. Flip your PixScan Mat around and scan the other side of the image, again ensuring that the other registration marks are in the scan field. Repeating steps 5-7. Once your image imports the whole image should look like it was stitched together.
  10. Now all that is left to do is trace your images, select the edges you want to cut out, and if you want some white space around them you will need to create the offsets of your images. Delete any unwanted cutlines.
  11. Load your PixScan mat into the Silhouette. 
  12. Finally, send to Silhouette to cut it out. Your machine will detect the registration marks and begin cutting!

Here are my results.
SO, SO, SO, happy with it! Look at those perfect outlines/offsets! No more spending money on coordinating dies for stamps! YAY!!! And the best part was that I only spent $40!!!


Well I hope you liked my Christmas Card Door Card and that this post has helped anyone debating on whether or not to purchase the Scan and Cut machine... If you have a Silhouette, I would suggest you give your PixScan Mat another try using a scanner vs a camera. You might just end up saving a ton of money! 

Thanks for stopping by!
Happy Crafting  :)

Sunday, October 4, 2015

Banana Split Stamped, Watercolor, Copic Colored Card

Hi, Fleurette here today :)  Hope everyone had fun creating cards for World Card Making Day!  I had fun playing and created this fun, colorful Birthday Card from our "Ice Cream Party" Clear Photo Polymer stamp set.  

I did a tutorial on coloring this cute stamp with Copic markers Vs Colored Pencils
You can watch it by clicking here 

I also did a fun Periscope on assembling it on WCMD
You can watch it by clicking here 

#clearphotopolymerstamps #icecreamstamp #happybirthdaystamp #stamping #watercolor #worldcardmakingday #svgcutfiles #svgcuttingfiles
To create this fun card, I simply watercolored on heavy weight cardstock, using the SVG Kit "Rockin Quick Cards" Motorcycle card base and overlays.  On the second overlay I stamped the sentiment "Your The Cherry On Top" with embossing ink and white powder, creating my own patterned paper.  I think it gives a fun contrast, almost like a chalkboard. 

Thanks for popping in and hope to see you again soon! 


Stamps and SVG Kits Used:

Ice Cream Party                      Stamp Bundle Pack - Sale                     Rockin Quick Cards SVG Kit
 6x6 Stamp set                         4 - 4x6 stamp set bundle                                         Card Kit