Monday, July 17, 2017

Have A PURR-FECT Day!

Hello there!  I am SO excited to be back on Fleurette Bloom's Design Team and glad to be crafting again!  It has been awhile!  Make sure to like her Facebook Page to see all the other wonderful ideas and products!


Here is my project for today.  I am using the NEW, adorable Purr-ific Kitty Cat Clear Stamp Set and combining it with the shadowbox from the I'm Wishing 3D SVG Kit.  The little banner flags I used come from the Hot Air Balloon SVG Project Kit.


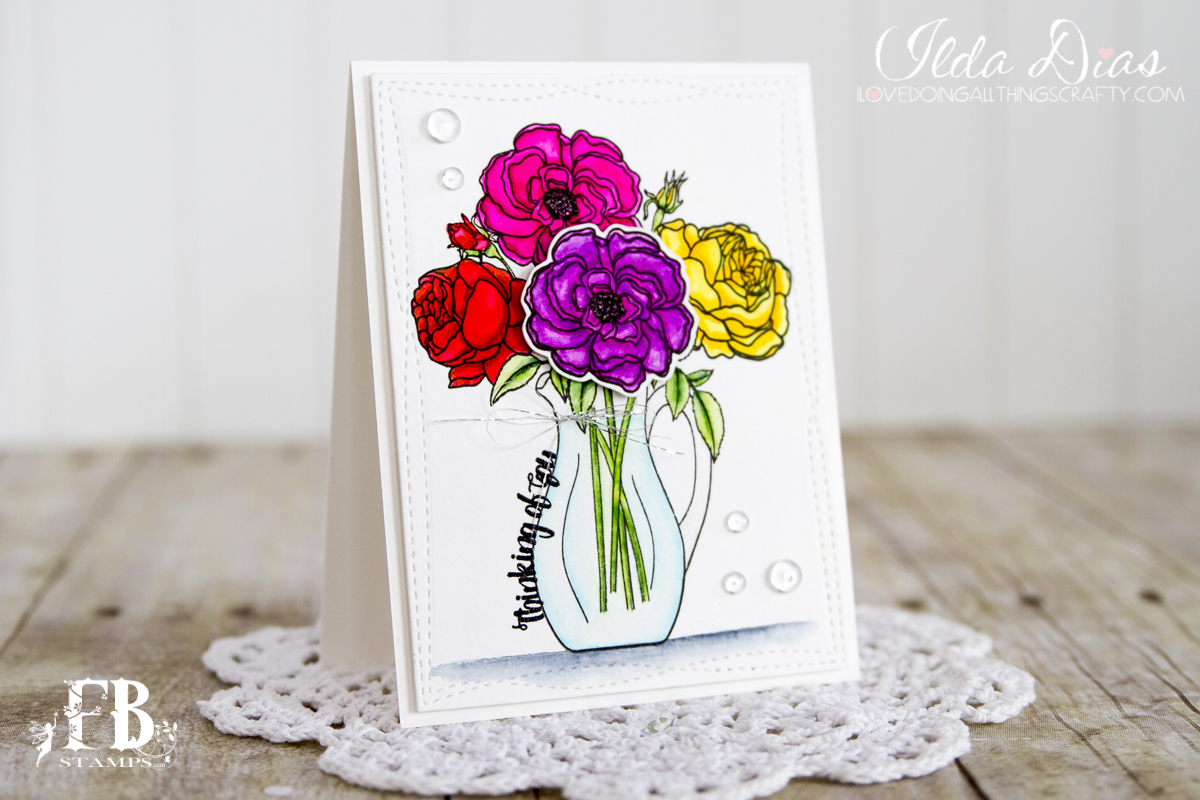
I added a few sparkly Sequins to my project, stamped the sentiment on a banner strip, and used the bubble bath and added the yarn balls.  

Here is the complete stamp set, look at all that cuteness!


A simple little project for a kitty lover and to help brighten someone's day!  
Thanks for stopping by to look ~ Have a great day!
Kristin Courtney

Friday, July 7, 2017

Happy PURRday Interactive Spin Card

Hello my friends Ilda here today on FB Stamps Blog!

Today I have a very cute and super fun card to share with you featuring the new Purr-ific Kitty Cat Stamp Set from FB Stamps.

The Kitty in the center spins all around the card so I thought it would be fun to add the googly eyes to make it look dizzy when you spin it.  Make sure you follow me on Instagram (I'll be posting this card in action for you all to see there 👀)

Happy PURRday Interactive Spin Card

I didn't have time to shoot and edit a video this time (sorry guys, I know its been a while since my last YT video). If you are wondering about all the products I used today check out the links over on my → Blog. Hopefully these pictures will help explain my process.

I first cut out then colored my kitty using my Zig Markers. Next I glued it on to a piece of paper that I had cut out in the shape of a drop. You will notice I punched a hole in the center of the drop. On the left side of the picture, I have my die cut top panel which randomly I stamped with the ball of yarn using  Peacock Feathers distress ink.


To create my ball of yarn, I wrapped twine around a die cut circle. I then inserted a brad in the center of the back of the ball. 


Next I punched a hole where I wanted the Kitty to sit on the front panel of the card. Then I hot glued the Kitty to the back of the ball.


To finish off the card I slipped the brad through center hole on the panel and bent up the arms (make sure you don't squeeze the arms flat against the card stock or it may not spin easily). Then I added some foam tape to the back of the panel to pop it up and allow for the Kitty to spin.

Here is how I finished the inside.
Love that little fish skull ♡


For a limited time you can get FREE Shipping
when you purchase the Lilacs & Kitties Bundle Pack!

Hope you were inspired by this Happy PURRday Interactive Spin Card! Stay tuned for more inspiration from the latest FB Stamps release!

Thanks for stopping by!
Happy Crafting  :)

Tuesday, June 20, 2017

Rosie Posies

Hello, Crafty Friends!!
 I have another project for you all today! This time I have this lovely rosie posie card using...

Fleurette Blooms' Posies stamp set.

Image result for fleurette bloom designs posies


I stamped my image onto mixed media paper with black archival ink and colored with distress markers then blended out with a water brush.

Once completely dried, I cut each flower out by hand.


I die cut leaves from old music sheets. Then shaded them with Distress Inks and added details with Distress Markers.

I die cut a honeycomb out of chipboard using honeycomb die. I mixed white gesso, microbeads, and texture powder together and applied over the entire honeycomb. 

I allowed the mixture to completely dry then colored with distress stain then dry brushed acrylic paint.


Using my Xyron Creative Station Lite, I attached a 4.25"x 5.5" piece of burlap onto a standard A2 sized card made from cream colored cardstock. Then layered a 4"x 5.25" mat on top.

I used a bit of glossy accents as a glue and attached to my card front. The laid down my leaves before attaching my posies over top with more glossy accents.

To fish my card, I die cut the word hello from brown cardstock and attached at the bottom of the card.

And here is my finished card..


Such a simple yet beautiful card.

I hope you enjoyed this quick tutorial for today!

Until next time...
Happy Crafting!!
~Mitsy

For full supply list visit my personal blog here.

Thursday, May 11, 2017


Hey there, crafters! Cheryl here.
I have always this turtle image and haven't ever played with it. So glad I did!
I started by stamping a full background of turtles onto watercolor cardstock. I then pulled out my Zig Clean Color markers and set about coloring the images. I then took blue and created some water background. I also stamped some of the bubbles and added Glossy Accents over the tops to make it look like real water.

I stamped one other turtle and fussy cut it out. I attached it to the card front directly over top of another one, using an Action Wobbler. So fun to see it shake about! And how much cuter it is with those google eyes! 

I stamped out a sentiment onto black cardstock and embossed it with white embossing powder. I popped it up with foam tape. Grabbed some sequins from my stash and glued them on using Ranger Multi Matte adhesive. I also added a few Nuvo enamel dots. 

This card was fun to color and to put together. Love this turtle! Hope you got a bit of inspiration. Get out your toys and play!

Happy Crafting!


All products used in this project are listed on my blog. Thanks for coming by!
DragonflyDesigns58

Thursday, April 13, 2017

Bloomin Spring Clear Stamp New Release Hop

Hello Crafty Friends!!
I am here with Team FB Stamps to bring you...

The FB Stamps Bloomin Spring Hop! 

Welcome and Thank You for hopping with us today! We are extremely excited to share with you an array of crafty projects by our talented Design Team featuring the NEW Fleurette Bloom Stamps- April Release.

In addition to some crafty inspiration, we would like to encourage you to stay to enter our
Blog Hop Prize Giveaway.

Prizes Include:
One $25.00 Gift Certificate to FBstamps.com
(One Grand Prize Winner)

 FBstamps.com Designer Sequin Mixes
(One Winner chosen from each participating blog)

*All Winners to be announced Sunday April 23rd*

Without further ado...

Please check out our 
NEW April Release 

Pansies and  Rain Or Shine

Click on images to enlarge


AND...

Our Newest Sequin Mixes


Here is what I've created with Our NEW Releases...

Fleurette here  :)  thank you so much for joining us on our Bloomin Spring hop!
I'm thinking spring as you can tell by our new stamps :)

The first card I created to share with you is very soft and pretty.
I used our new "Rain Or Shine" stamp set along with our new Digi Paper Pack "Pansies".

Card Tutorial


I printed the Pansies Digi Papers on a laser printer, inked them and then ran the pink center piece through my foiling machine, to give it the gold glimmer. 
I cut the card pieces using this FREE for a limited time SVG that I created and cut it on my 
Cricut Explore.  

#clearstamps #cricutexplore #stamping #cardmaking
I stamped the images on watercolor paper and colored the adorable vintage inspired paper doll, hat and bunny with Zig Clean Color Real Brush Markers.  I used colored pencils for some of the smaller details and shadows, then fussy cut them out.  To give it that finishing touch, I added glitter with my Spectrum Noir Clear Glitter Pen.   I always LOVE to add SPARKLE!!!  I then embossed the "Smile" sentiment on vellum and added just a few gold sequins from our  "Purple Rain" sequin mix. 


Here is a close up so you can see all that glitter :) 

For my second card, I created this elegant golden shimmery card using our new "Pansies" stamp set.


I embossed the sentiment in gold, and stamped the Pansies on black card stock using white embossing powder. I colored the flowers in first with a white colored (wax based) pencil, then added the purple colors on top of that. I used a layer of velum over a pretty gold patterned paper to give it that elegant touch.  Then I fussy cut all the flowers out and attached them with some dimensional foam tape.  For the finishing touch I added some "Purple Rain" sequins and of course added glitter to the flowers with my glitter pen.


Now hop on over to the next blog for more crafty fun! :)

We hope you are inspired by what you see and enjoy your time with us!

Don't forget to enter our GIVEAWAY!!
AND
Remember you must go to each blog and comment & subscribe!!

Here is our complete line-up:
ILDA - Up Next
FLEURETTE - You Are here

Tuesday, March 21, 2017

Thinking of You... Card with Clear Stamps

Thinking of you...

Hey all! Welcome I'm here today showcasing a stamp set from Fleurette's latest release. Love this floral image! So nice for coloring in any medium of your choice.


 I used my Zig markers to color this image. I have good days and bad days with those, lol, and this happened to turn out pretty decent. I fussy cut the image out and used foam dimensionals to lift it off the card front. I used a die I have to cut the frame in the front and added acetate to make a shaker card. I cut another piece out of gold shiny cardstock. Filled it with seed beads and added the back piece of cardstock. 
I stamped the sentiment in Versafine Black Onyx ink and snipped a banner end. Added it to the front of the shaker. This whole piece was then added to the card front and some sequins scattered around to finish it off.
Here's where to get your stamping supplies.
#flowerclearstamps #clearstamps #stamping #cardmaking #stampedflowers #photopolymerstamps #stamps


Friday, March 17, 2017

Thinking Of You Posies Bouquet by Ilda

Hello Everyone!

Who doesn't like to receive flowers? How about a gorgeous posies Bouquet? Flowers don't always have to be the real ones you know 😉 I know I would love to receive some 💗🎕

Today my card features FB Stamps Posies Stamp set that SOLD out really fast when they were just released. Well the good new is that they are now back in stock again! YAY!


Take a closer look at these pretties. I just love how this card came together!

All I did was a little bit of masking on the base layer of the card and then just cut out one of the flowers and popped it up with some foam in the center of the bouquet. Colored the images in with my Zigs and stamped the sentiment along the edge of the pitcher... and voila!
So pretty 😍


Want to know what supplies I used, click → HERE.

Hope my Thinking Of You Posies Bouquet has inspired you to send someone flowers soon. Don't forget to stop by Fleurette Blooms Shop as she just restocked her supplies!

Thanks for stopping by!
Happy Crafting  :)

Saturday, March 4, 2017

What's Shakin'... Card with Three Little Pigs Clear Stamps

Hey guys, thanks for coming by! I have a card today featuring a new stamp release by FBStamps.
Hope you enjoy! Let's get to it.

I started out by stamping several of the pigs in the stamp set and used my Pearless Watercolors. I then fussy cut right along the stamp line. Didn't want any white showing.
I then chose patterned papers I wanted to use from a Doodlebug paper pad. I found coordinating color cardstock from my stash and used some edge dies to fancy it up.

I glued down the first two piggy butts, lol, flat to the paper. I then used an Action Wobbler under the last piggy. So fun to see him shakin' his bacon, lol!


I layered up all the papers and added it to an A2 card base. Added some Nuvo enamel dots and some sequins.

So there you go, easy really! You really need to go check out the new release over at FBStamps. Such cute stuff. And while you're there, look at all the past releases too.

Here's your shopping list.


Ok, so get out your supplies and have some fun crafting!


Wednesday, March 1, 2017

When Pigs Fly Card - Flying Piggy by Ilda

It's true, it's true, pigs are flying!!!
Well at least in my latest card 😏


Not sure if you guys can tell, but check out the shiny little foiled pigs 🐷 in the the background (see next picture). I used Fleurette's coordinating "Three Little Pigs" Digital Foil It Paper Pack and the speech bubble is also a Foil It. Love how she has made these digi papers coordinate with the her Stamps. Just makes things a lot simpler when you are creating, takes out the guess work out of choosing papers! And using the "Foil Its" was fairly easy too, all you need is a laminator or a Minc, and if you don't have one of those... I've heard, an iron works too to transfer on the foil  😉

 How cute is this little flying pig?


If you love him I bet you will love the "Three Little Pigs" stamp set from Fleurette Bloom's latest release, and for a limited time you can get the Pigs and Posies Bundle Pack Special - FREE Shipping with the coupon code piggiesposies

For those of you that like watching the card making process, this is for you! Links to all the supplies I used will be listed in the video description.


Click ->HERE to watch in HD

Thanks for "flying" by!
Happy Crafting Everyone👋


Piggies & Posies Clear Stamp Sets

We are so excited about the New Stamp Release Piggies & Posies!  So stinking cute and pretty! :)  
Take advantage of our Bundle Pack @ 20% off with Free Shipping for a limited time.  


Plus we have all the coordinating goodies that work together beautifully. The new coordinating, Foil Its, Designer Tags and Digi papers make creating fun and easy, yet totally stunning and impressive! 

New Coordinating Goodies! 


So much crafty goodness!  Stay tuned as we will be showing you all kinds projects created with these great new supplies, giving you tons of inspiration!  

Happy Crafting