Tuesday, January 31, 2017

Love Birds Card with GDT Beth

Good morning my crafty friends! Beth from Beth's Beauties here with you today.   I am so happy to be guest designing for Fleurette Bloom again today!  She has some great SVG files and clear stamps.  Make sure you check them out!  I made a card using her Valentine Be Mine kit.
 I used papers from DCWV's Jet Black and DIY Wedding stacks as well as red cardstock from Recollections.  That little heart cut out is embellished with red stickles.  Isn't that bird silhouette so pretty?!
 I finished it off with a hand cut banner for the sentiment stamp and Cranberry Trendy Twine wrapped around the bottom.
The best part is this card will work for the upcoming Valentine's Day holiday but can also be used for weddings or anniversaries.

I hope you have a wonderfully crafty day!

Monday, January 30, 2017

Foil Its ~ Fairy Birthday Tag ~ FB Stamps

Foiling is soooo much fun, it's Magical! You will LOVE our new Foil Its line, 
they are sure to bring a sparkle to you eye.  

I had a blast creating this Make A Wish Fairy card with our new "Fairy Wishes" Foil Its, it was so fast and easy :) I couldn't wait to share it with you. 

#foiling #minc #foilits #fbstamps #clearstamps #stamping #foiling #fairy #timholtzdistressink #diecuts


You can also watch me make this tag on Periscope, watch the replay @ https://www.periscope.tv/w/1rmGPrMnrDdxN

Happy Crafting

Monday, January 23, 2017

Fairy Wishes Terrarium by Ilda

Well hello my crafty Friends! 
It's me, Ilda from the DT taking over Fleurette's Blog.

Today I have a fun project to share with you. As soon as I saw Fleurette Bloom's Fairy Wishes Stamp set I knew exactly what I had to create... To me it screamed terrarium!

Here is a look at it all lit up in the dark. Think this will make a great night light for my daughter! How cool is that!?

My initial thought was to do it in a terracotta pot with a glass bowl and lid. Unfortunately, I tried it and it didn't work so well as the stamped images were too big for the bowl I had. So, I found myself a taller plastic container that I had stashed away in my closet. I knew this hexagonal container would come in handy someday. It's actually a Kirkland Chocolate container from this past Christmas, so if you have one kicking around don't throw it out, just remove the label and you'll eventually find a use for it!

Here is a closer looks at this magical place!


It is so pretty in the daylight too.


Here are the supplies I used, remember to be creative and use supplies already you have.

  • Fairy Wishes Stamp Set
  • Stamped colored die cut images (fairy, rabbit, mushrooms)
  • used Spectrum Noir Markers to color images + clear Wink of Stella
  • a clear plastic container
  • battery operated light
  • hot glue and glue gun
  • dry moss
  • river rocks
  • twigs
  • silk flowers
  • wire
  • burlap
  • glue
  • star sequins
  • raffia
  • soil (optional)


Hope this project has inspired you to step out of your stamping comfort zone and create something unique, maybe even make a terrarium of your own. With a little imagination everything is possible!

If you love fairies, check out a previous post using this same stamp set.

Thanks for stopping by!
Happy Crafting  :)

Friday, January 20, 2017

I Believe In Fairies....Card - Clear Stamps

Thanks for coming by! Today I'm showcasing a stamp from the new release by FBStamps. Once again, a super cute release and great images! Nice job, F!

I chose to use the cute fairy stamp in my card today.
I stamped her a bit off the edge and then cut down to her, and then around her. I colored her using my Prismacolor pencils in a very soft pink. I then added a bit of Wink of Stella to her dress and wings.

#clearstamps #fairyclearstamps #fairystamp #stamping #cardmaking
After stamping her, I added the Make A Wish stamp in that same set. As if it were falling from her wand. I also stamped many of the dandelion bits, flying in many directions. Then I took my Sakura glitter pen and dotted lots of tiny "sparkle" also falling from her wand. The front panel was then foam mounted to the pink cardstock. And the entire front, on to a soft gray card base.


I then took a few of the stamps and stamped out the sentiment. I added the dot, dot, dot because I carried over to the inside. It is so hard to capture the amazing glitter on this front, but it is so beautiful! I also added a few tiny holographic stickers in pink. 


And so the inside...I do! I do believe in fairies, I do! Fun, right?! I thought so anyway. And then a few more of the sparkly stickers. 

I hope you like what I came up with. Head over to FBStamps and check out this release, and all the previous releases. I know you'll love what you see!


Get out some of your crafting toys and get your craft on!


Wednesday, January 18, 2017

Today we are sharing a beautiful project using our new Roses In Bloom stamp set by DTM Dana Joy, using a really cool technique!  You can check out the video below and see exactly how she Deco Foiled this tag :)  

#roseclearstamp #clearstamps #stamping #cardmaking #decofoil #gifttag #stamp #rosestamp
Watch video to see how to Deco Foil using stamps! 


Happy Stamping! 

Roses In Bloom also available in a bundle pack special for a limited time. 


Tuesday, January 17, 2017

Make a Wish Shaker Birthday Card by Ilda

Hello friends, 
It's Ilda here again!

Do you believe in Fairies?!?

Well maybe you should if you want your wishes to come true, lol!

Today I want to share with you a birthday card I made for a little girl that loves fairies.
How beautiful is this stamp from Fleurette's Fairy Wishes Stamp Set!?... and, those little mushrooms... adorable!


Here is how I finished the inside of my card.

#clearstamps #fairystamp #stamps #clearstamp #cardmaking #papercrafting #fbstamps #shakercard 
For those of you who would like to see how I created this card check out my latest YouTube video. 
I will have a links to all the supplies I used over on my blog and in the video description. 


Click -> HERE to watch in HD

Also don't forget to check out Fleurette's
Bundle Pack Special - Flowers & Fairies - 20% OFF + digi dies + FREE SHIPPING (US only) 
Hurry it's only for a limited time!
#mushroomstamp #bunnystamp #dandelionclearstamp #dandelionstamp
Thanks for stopping by!
Happy Crafting  :)

Monday, January 16, 2017

Fairy Wishes Card by Fleurette ~ Clear Stamps

Hi Fleurette here on the blog today :)  Sharing a whimsical, dreamy fairy card I created live on Periscope with our new Fairy Wishes stamp set and coordinating digi papers!  I had a blast making this one, so easy to put together now that we have papers that work seamlessly with our stamps!
#fbstamps # clearstamps #stamping #cardmaking #fairystamp #birthdaystamp #digitalpapers #makeawish #papercrafting #zigcleancolorrealbrushmarkers #fleurettebloom


You can see exactly how I made this card, by watching the replay video just click the link below. 
I even decorated the inside! :)

Ingredients Below


You can also get our New Release Bundle Pack for a limited time @ 20% Off Plus Free Shipping


Friday, January 13, 2017

Roses in Bloom Card by Ilda

Hello my friends!
Ilda here today with you on Fleurette's blog :)

If friends were flowers I'd pick you, for sure!
I'm in love these stamps from Fleurette Blooms latest Roses in Bloom Stamp set.


This card was quite simple to make, just required a little masking and then most of the time was spent coloring it with my Zig Clean Color Markers. For a the complete list of products I will link to my blog post -> HERE

Also don't forget to check out Fleurette's
Bundle Pack Special - Flowers & Fairies - 20% OFF + digi dies + FREE SHIPPING (US only) 
Hurry it's only for a limited time!
#clearstamps #stamping #cardmaking #papercrafting #stamps #fbstamps #flowerstamps #rosestamps #flowerstamps #fairystamps
Hope you were inspired by my Roses in Bloom Card today.

Thanks for stopping by!
Happy Crafting  :)

Wednesday, January 4, 2017

Birthday Card By DT Cheryl ~ Celebrate Clear Stamps

I've been a bit off in my crafting, lol. Wanna know why? My daughter had a new baby and she is now back to work...that means I'm back to work as well! Taking care of this precious baby. Cuts in on my crafting time, lol.

So anyway, I have a new card post for you today. I'm using stamps from the latest release by FBStamps. So many cute images! Make sure you go look after reading this post.

I took a set of Sizzix card dies I have and then cut a couple circles to fit. Then I stamped the largest gift stamp onto the patterned paper...two different prints. I hand cut the entire image from one and just the ribbon from the other. Then glued the ribbon on to the other piece. Foam mounted that to the green circle.


I then took the sentiment "Happy Birthday" and stamped it onto the other green circle. I took a couple of the stars and stamped those as well. For the strip down the center of the card, I measured and cut patterned paper to fit and cut banner ends. Glued those down to break up all that white space.


I went through my stash of enamel dots and gem stones and added a few scattered around. I also took a bit of twine and wrapped a bit around the front section and tied a small bow. Finished it off nicely.

So, there you have it. Quite easy really, by using the card die. Makes you look like a rock star, lol. There is ample space for writing your note on the back flap of the card. All links will be provided for the items used.


Thanks for stopping by and checking out some new products. Head over to FBStamps and see all her new release as well as past. 
Get out your toys and get your craft on!


Friday, December 16, 2016

Merry Christmas Card

Hello Again Crafty Friends!!
Hope everyone is having a HOLLY JOLLY Christmas!!Are you in need of some last minute holiday mojo?? Well, I have a little Christmas inspiration for ya!!


I made this card using FB Stamps' Let it Snow stamps set!!

I love how elegant the Merry Christmas sentiment is in this set!! I love it so much I made it the focal point for my card!!

I stamped this image with an VersaFine Onyx Black ink and colored in the image with my Zig Kuretake Clean Color Real Brush Markers.


Then die cut the image with an oval die and layered it onto ornate oval die to frame it.

Adhered my card layers together using my Xyron Mega Runner.

The scroll borders were aso die cuts. I cut out 2 pieces then I attached them together using a glue pen. Then, I attached the joined piece onto the card with clear liquid adhesive.

I added Petaloo flowers & holly leaves. I also added berries I purchased from Dollar Tree. I used a thick clear adhesive to attach the bigger embellishments to the card. You could also use hot glue for this.

Here is a close-up of my finished card...

Hope you all enjoyed today's holiday inspiration!!

Happy Crafting, Friends!!
~ DT Mitsy

For a complete list of supplies... visit my personal blog here.

Tuesday, December 13, 2016

Merry Christmas FBStamps...


Trying to get back into doing some crafting. It's been awhile as I'm now back to caring for a new grand baby! She's a honey but I deff don't get as much play time in. 

FBStamps latest release has some super cute stamp sets! And this stamp is one of my favorites!!!


I chose some patterned paper from my stash and did simple white heat embossing of the sentiment. It is so pretty and so ornate! Fleurette did an amazing job drawing this one out! Very pretty as is, but you could certainly do it on regular cardstock and do some coloring. Even watercolor would be nice.

I used some rectangle dies for the sentiment and the card base is from Sizzix. I used foam adhesive to mount the sentiment panel. The gray colored paper is actually glitter paper and so very pretty! Could not get the sparkle. :(


It's a bit hard to see, but I added some crystal clear sequins. They kind of pick up the color they are adhered to. This paper is several years old and it's still available. It's probably one of my all time favorites. I prefer non traditional colors for Christmas and this is on the rustic side. So pretty!


This image in no way does it justice! You really need to see it in real life. 

Ok, that's it. I'll provide links for products used. Check it out!
Get out what crafting supplies you have and make some pretties!
Happy Crafting!


Thursday, December 8, 2016

Midnight Moon Sky, Shaker Card ~ Clear Stamps

Hi Cheryl here on the blog today, playing around with the new release from FBstamps. Some super cute images in this release and you'll deff want to check them out!

Here's a shaker card I made using the new moon image.


I had wanted to try the night sky background for a long time now. Just never did it. Well, I did for this one, and I must say, it was fun and quite easy. Can't really go wrong. Next time I'll not be as afraid of adding black. This could have gone a bit darker. But I'm happy with my first attempt. 
I splattered white paint over all to create a starry sky.

#clearstamps #moonstamp #fbstamps #stamping #shakercard
I die cut the window opening and attached acetate on the back side and used foam tape to add the dimension needed. 

I chose a mixture of sequins and seed beads for the shaker bits and then attached the back panel on top. I stamped my sentiment and added a few sequins for some sparkle. 

Here's my shopping list.


Happy Crafting!

Thursday, December 1, 2016

Let It Snow Shaker Card ~ Using Clear Stamps

        Let It Snow, Let It Snow, Let It Snow - Cards


Bet that song is stuck in your head now... hehe!
Ilda here today, sharing a  fun winter card I made using one of Fleurette Bloom's latest Stamp Set Let It Snow.

For this first card, the stamping was super simple. I used VersaMark ink to randomly stamp the background of my shaker card and heat embossed it using some fine white embossing powder. Then used scribbled some Zig Clean Color inks on clear acetate and smooshed it on the the watercolor paper. Once it was all dry I created this beautiful shaker card with it!

#clearstamps, #fbstamps, #stamping, #cardmaking, #snowflake, #shakercard
Thanks for stopping by!
Happy Crafting  :)
http://www.ilovedoingallthingscrafty.com/2016/11/let-it-snow-let-it-snow-let-it-snow.html

Thursday, November 17, 2016

More Gerbera Daisies! Using FBstamps Clear Stamps


Happy Thursday, Crafty Friends... It's fall and can you believe Thanksgiving is just in one week?!

Thanksgiving is the time of year to be thankful for all they have. For me, I am very thankful for family and friends! I appreciate each and everyone one of them. And though I try to show them I care everyday, sometimes life just get's in the way. I guess that's what I get for "adulting"... mommy & wifey duties, house chores, design team obligations... they all pile up! 

I'm making an active effort to let my loved ones know I appreciate & love them. 

Today is my first Guest DT post for FB stamps and I made this fall themed I love you card.

Supplies Used

Gerbera Daisy (FB Stamps)
Chipboard
Whimsy Embossing Folder (Lifestyle Crafts)
Mega Runner (Xyron)
VersaFine Onyx Black (Tsukineko/ Imagine Crafts)
Clean Color Real Brush Markers (Zig/ Kuretake)
Wink of Stella (Zig/ Kuretake)
Mixed Media Paper (Strathmore)
Whipped Spackle (Faber-Castell)
3D Dots (EK Success)
PITT Artist Pen XS (Faber-Castell)
Chalklets(EK Success)
White Gel Pen (Sakura)
Glitter Enamel Dots
Hemp Twine 
Button
Scissors


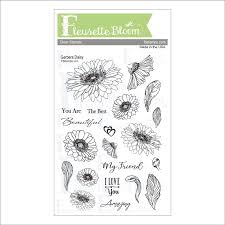
I started by stamping my images in black ink onto mixed media paper. then, I colored the flowers with my Zig Markers in Yellow, Mustard, Beige,Dark Oatmeal, &  Brown and went over the centers with a clear glitter pen. I also colored the leaves in Mild Green, Olive green, & Deep Green. 

I fussy cut the flowers all the images out but if you are not great at fussy cutting or just want to save time FB Stamps have the cut files for all their stamps and the coordinating digi dies are FREE!!

I stamped doubles of the bigger blooms and cut off the outer row of petals. then layered it onto the bigger bloom with foam dots.


I wanted my flowers to be an arrangement and not just floating on the card... so, I used Eileen Hull's Tea Cup Die for the cup and the tag. I cut them from Chipboard then adhered my patterned paper onto them with my Creative Station Lite.

I shaded the edges with  abit of chalk in colors that were at least 2 shades darker than the paper.

 The little "I love You" stamp comes included with the Gerbera Daisies set.

In the picture above it looked cute it felt it was missing something...


So, I added some texture to the background with a bit of modeling paste and a stencil.
And cut out a band for my teacup and embossed it and added enamel glitter dots.

I traced around the cup and tags with an extra fine black pen and then added highlights with a white gel pen. I also went over the embossed area with the same black pan as well. 

Then finally, I finished it off with a button topped multi-looped twine bow.

Here is a close up of all the dimension in this card...


I am enjoying this stamp set very much and I'm looking forward to making more with it!!

I hope you all enjoyed today's card!!

Until next time...

HAPPY CRAFTING!!
~Mitsy

You can see more of Mitsyana on her blog 
http://www.upontippytoes.com/2016/11/love-and-appreciation.html