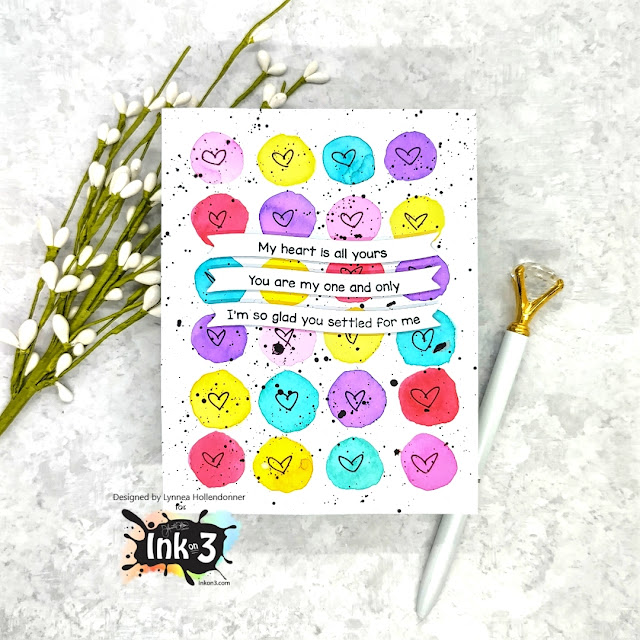
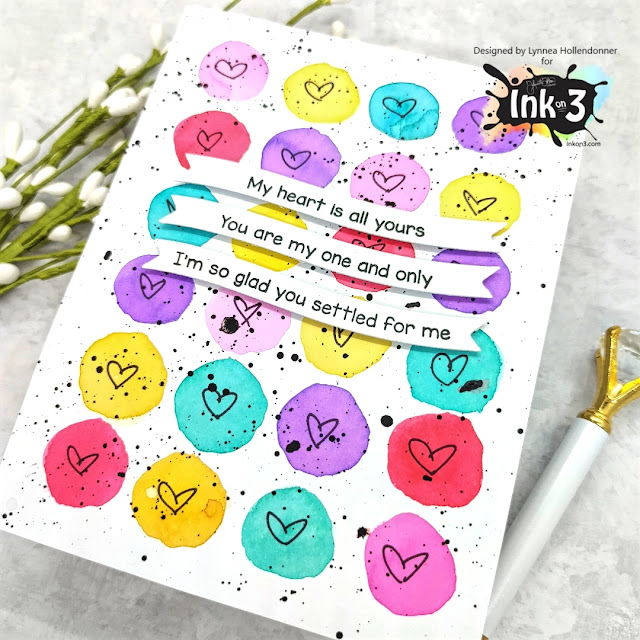
I started by smooshing a few different colors of Atelier Ink onto my glass work surface and then watercolored small hearts all over my background. I kept the circles loose and easy without any real shading. Just a simple and colorful background!
Showing posts with label Water coloring. Show all posts
Saturday, January 29, 2022
Easy Atelier Ink Watercolor Background
Easy peasy, lemon squeezy! Here's a simple Atelier Ink watercolored background for you!
I used a fine tip Sharpie and drew small hearts into each circle and then spattered the background with black watercolor.
I finished the card by adding a few sentiment strips from the LDRS Creative Love Wave Stack with Blackout Hybrid Detail Ink!
Labels:
Atelier Ink,
Atelier Ink Cube,
Atelier Ink Watercolor,
Lynnea Hollendonner,
process video,
Valentine's Day,
Video,
Video Tutorial,
Water coloring,
YouTube video
Friday, July 10, 2020
Koi Pond Inspired Friendship Cards by Ilda
Happy Friday Peeps, Ilda here!
Today I am sharing a trio of cards inspired by the new KOI POND stamp set from Ink On 3. I am in love with the latest release, which by the way I just received not too long ago because snail mail is really real right now people๐ Thanks Covid!
The first card I created was this shaker card. I first stamped out the fish using the FADEOUT INK onto Bristol Paper. I then colored them in using a variety of ATELIER INKS, I used every color on them listed below in the Supply section.
Next, I masked the fish and added a very light blend of blue using the new WAVY STENCIL and ATELIER PEACOCK BLUE ink.
I then stamped out the Lilly pads using ATELIER GODDESS GREEN by doing some second and third generation stamping to get the gradient shades. The ripples and bubbles were stamped using the ATELIER PEACOCK BLUE ink and just blurred and colored in with a water brush.
The sentiment stamped in the center also comes from the KOI POND set that I stamped using BLACKOUT INK.
Before adding the shaker window, I added a layer of LIQID PIXIE DUST to all the KOI fish for sparkle.
I then used a Rectangle Frame to create the window for the shaker panel that I filled with clear sequin bits to allow the colors to shine.
This next card was so simple to make and I love the results.
I began by adding a subtle green color of ATELIER GODDESS GREEN using the WAVY STENCIL. I then moved the stencil and repeated the process, this time using ATELIER PEACOCK BLUE. Before removing the stencil I added a layer of Glimmer Paste, removed the stencil, and allowed it to dry.
I then finished off this simple card by adding the stamped sentiment on the card from the KOI POND set and adding a few clear bubbles.
For this final card, I started by blending ATELIER BEE STING YELLOW, ATELIER MARILYN RED, and ATELIER PEACOCK BLUE together and overlapping them in areas to create the blended colors on the PONDIE STENCIL. Before removing the stencil I added a layer of glimmer paste and then set it aside to dry.
I then stamped out one of the KOI using JUICY INK, and then heat set it using GOLD RUSH EMB.PWD. I then used the same 3 colors that I used on the background to color the fish in. Once it was dry I fussy cut the fish out.
The sentiment comes from two older sets, the Hey from HEY GORGEOUS and the Friend from HEELS TO YOU set that were stamped again using JUICY INK, and then heat set it using GOLD RUSH EMB.PWD.
To finish this card, I popped the Koi onto a bed of coiled foil thread and added some iridescent bubbles.
Hope this trio of Koi Pond friendship cards inspired you today.
Thank you for stopping by ๐
Until next time... Happy Crafting ๐
![]() KOI POND Shop at: IO3 | ![]() WAVY STENCIL Shop at: IO3 | ![]() PONDIE STENCIL Shop at: IO3 | ![]() HEY GORGEOUS Shop at: IO3 | ![]() Heels To You Shop at: IO3 |
![]() FADEOUT INK Shop at: IO3 | ![]() Atelier Marilyn Red Shop at: IO3 | ![]() Atelier Marigold Orange Shop at: IO3 | ![]() ATELIER BEE STING YELLOW Shop at: IO3 | ![]() ATELIER GODDESS GREEN Shop at: IO3 |
![]() ATELIER PEACOCK BLUE Shop at: IO3 | ![]() ATELIER MY PURPLE JAM Shop at: IO3 | ![]() Atelier Paint It Black Shop at: IO3 | ![]() BLACKOUT INK Shop at: IO3 | ![]() JUICY INK Shop at: IO3 |
![]() GOLD RUSH EMB. PWD. Shop at: IO3 | ![]() SMALL TIP WATER BRUSH PEN Shop at: IO3 | ![]() LIQUID PIXIE DUST Shop at: IO3 | ![]() BRISTOL PAPER Shop at: SSS | AMZ | ![]() INK BLENDER BRUSHES Shop at: SSS | SK |
![]() ORIGINAL MISTI Shop at: SSS | AMZ | SBC | HBS | ![]() GEMINI JR. DIE CUTTER Shop at: SSS | AMZ | SBC | NEENAH SOLAR WHITE 110 Shop at: SSS | AMZ | HBS | ![]() CLEAR ACETATE SHEETS Shop at: SSS | SK | ![]() MEDIA SPATULAS Shop at: SSS | SBC | HBS |
![]() MOONSTONE GLIMMER PASTE Shop at: SSS | AMZ | HBS | ![]() SILVER DUST | SEED BEADS Shop at: SSS | SK | ![]() IRIDESCENT BUBBLES Shop at: SSS | SK | MAJESTIC FUSION Shop at: SSS | SK | CLEAR DROPS MIX 1 Shop at: SSS | SK |
![]() EMBELLISHMENT WAND Shop at: SSS | SK | ![]() FOAM TAPE - WHITE Shop at: SSS | SK |
Friday, February 7, 2020
Hey Gorgeous, Colorful Birthday Card by Ilda | Coloring with Atelier Inks
Hello, my friends. Ilda here!
I am back again today with a colorful Gorgeous Birthday Card featuring the new HEY GORGEOUS stamp set recently released from Ink On 3. I love the size of this large stamp image! Plus, it comes with a bunch of little flower accessories and great sentiments to create some great girlfriend cards.
If you know me I love all things rainbow, so of course rather then just painting one plain old hair color I had to use all of them, lol!
CARD DETAILS
For this card, I began by stamping out the image from the HEY GORGEOUS set using BLACKOUT INK onto Bristol paper.
I then began by water coloring her skin using a small tip water brush pen. To create the skin color I used a blend of Atelier Twiggy Brown, Bee Sting Yellow, Marilyn Red, and Marigold Orange. To her cheeks, I added a touch of Marilyn Red color.
Next, I colored her hair in rainbow order starting with Atelier Marilyn Red, Marigold Orange, Bee Sting Yellow, Goddess Green, Peacock Blue, and My Jam Purple.
For her hat, I watercolored it using Atelier Twiggy Brown, I love the shade you get with the brown as it resulted in a leathery kinda look.
To finish off her lips I used the ink from the Re-inker Marilyn Red because I wanted a deeper shade of red on her lips.
Once the image was dry, I stamped out the black florals on the hat using JUICY INK and heat set it using the BLACK AS NIGHT EP. For the Gold Flower, I used GOLD RUSH EP and fussy cut it out to add to the hat.
I then finished off the card by stamping out the sentiments from the HEY GORGEOUS set and then used LIQUID PIXIE DUST to add sparkle to her lips and hair. If you are on Instagram watch my feed as I will try posting a clip of the sparkle this card has as pictures can never do it justice.
For more finishing touches, I added a pearl to the flower and glossy accents to her lips for additional shine!
I hope you found this Hey Gorgeous Colorful Birthday Card inspiring. Have a colorful day!
Thank you for stopping by ๐
Until next time... Happy Crafting ๐
![]() HEY GORGEOUS Shop at: IO3 | ![]() BLACKOUT INK Shop at: IO3 | ![]() SMALL TIP WATER BRUSH PEN Shop at: IO3 | ![]() Re-inker Marilyn Red Shop at: IO3 | ![]() Atelier Marilyn Red Shop at: IO3 |
![]() Atelier Marigold Orange Shop at: IO3 | ![]() Atelier Bee Sting Yellow Shop at: IO3 | ![]() Atelier Goddess Green Shop at: IO3 | ![]() Atelier Peacock Blue Shop at: IO3 | ![]() Atelier My Jam Purple Shop at: IO3 |
![]() Atelier Twiggy Brown Shop at: IO3 | ![]() JUICY INK Shop at: IO3 | ![]() Gold Rush Embossing Powder Shop at: IO3 | ![]() Black As Night EP Shop at: IO3 | ![]() LIQUID PIXIE DUST Shop at: IO3 |
![]() Strathmore Bristol Pad Shop at: SSS | AMZ | MINI MISTI Shop at: SSS | AMZ | SBC | SK | HBS | ![]() Embellishment WAND Shop at: SSS | SK | ![]() EXOTIC ONYX PEARLS Shop at: SSS | SK | ![]() STUDIO KATIA GLUE Shop at: SSS | SK |
Subscribe to:
Comments (Atom)


