Hello Crafty Friends! I hope everyone is safe and healthy! It's Cheryl with the Inkon3 Creative Team here to show you how to make your notes pages in your planner super cute and fun! I love decorative notes pages, but when I buy them, sometimes I don't like being stuck with just one or two designs for all of my notes. SO I thought, how about taking a plain planner page and make it fun with stamps!
First I masked out a section of the page using post-it notes and then used orange distress oxide ink to make an orange rectangle. Then I stamped one of the bunnies and accessories from theBiker Bunnies Clear Stampset using theAtelier Inks Marigold Orangeonto the orange background.
Then I used a light blue distress ink to create a blue background on the bottom of the page. I stenciled in some rays using a slightly darker blue ink.
Lastly, place the stamped images or "stickers" onto the planner page, and there you have it! A super fun Notes pages that you're going to love to keep open on your desk!
Ilda here👋, back again today to share with you a couple of cards I made using the same stamps to get different looks!
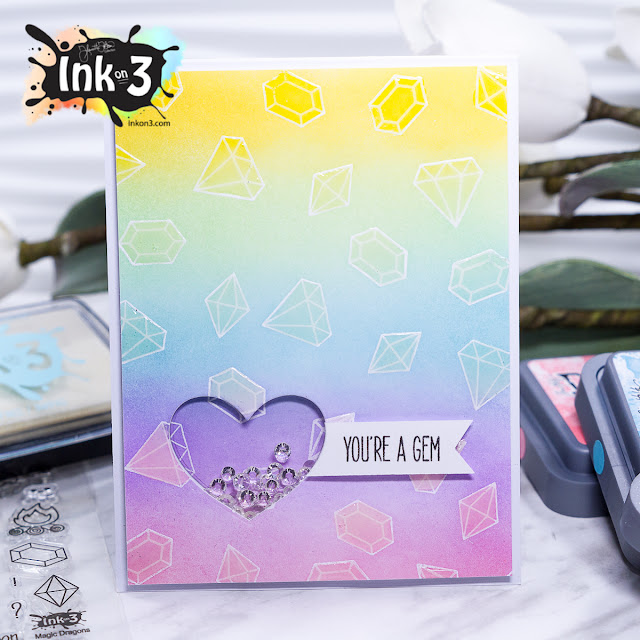
The stamps I'm using today comes from an older Ink On 3 set, Magic Dragons.
This set is super cute with lots of fun images, but for today's post I will just be using the gem stones from the set to create some friendship cards.
For my first card, I did some ink blending with distress oxide inks to add color to my background panel. I used Bristol paper, stamped the images in with the Juicy Inkpad, then I heat set it with white embossing powder to make the lines pop once colored.
To create this cute little shaker window, I used a small heart die and added these beautiful little sparkling crystals. Used the heart die to cut the sentiment banner and lined it up next to the shaker window.
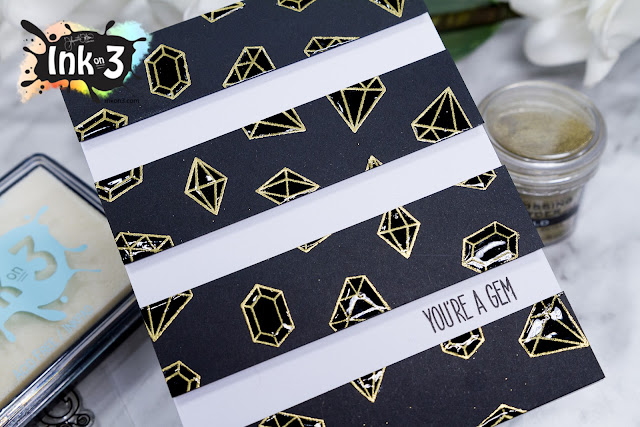
For the next card, once again I stamped the gems using the Juicy Ink only this time onto black cardstock and then used gold embossing powder.
Then all I did was cut my black cardstock piece into equal sections, then spaced them out onto the card base popping them up with foam tape. Stamped my sentiment with the Blackout Ink and then added glossy accents to each gem.
These cards were easy to do and relatively quick to make. Hope you were inspired by these Gem Cards ft. the Magic Dragons set. For a complete list of products used click →HERE
Hello Friends, Ilda here!
The snow is all gone, there are puddles everywhere and the sun is shining... finally Spring has arrived here 🙌 It feels almost as warm as today's card looks!
Today I have another card to share with you featuring the Playtirific Pondies Set from Ink On 3.
These little critters are so cute I had to use them again on another card. This time I wanted to create a shaker card.
For this card I had planned on creating a process video, but sadly lost some of the footage. So I will explain the process to you below. For now I have included a very short clip here so you can see it up close and in detail!
The first thing I did was stamp out the critters using Blackout Ink (my new favorite). I then colored them in using Spectrum Noir markers and die cut them out using their coordinating dies. Next, I moved on to the front panel.
To create the pond shaker area, first I used the second largest balloon die from Simon Says Stamp to die cut the pond shape on the right edge of the panel. I then lined up the die cut panel onto the card base to use as a guide and die cut the base. The balloon end will cleverly be hidden behind the duck so you would never know it was a balloon die you used to cut out the pond. I then used distress oxide inks to blend out the area along the pond. Once that was done blending, I stamped out the pond plants along the edge of the water and colored them in.
To create the shaker pocket, I used a clear cello bag (the kind you use to store the finished cards in) trimmed it to size, and adhered it with the finished bottom edge of the bag along the open edge of the card base. I then filled the pocket with sequins and glued the opening of the bag shut. Next, used foam tape along the edge of the pond to create a rim for the top panel to adhere to and to keep the sequins in place. There still was some areas that the sequins snuck into under the panel, so if you want to avoid that I would trim the bag all the way around the pond and use some double sided tape to close it together.
Once the top panel was adhered to the card base I added the critters in place with some foam tape. For the sentiment tag, I stamped the words out with Salty Ocean distress oxide ink and heat set it with clear embossing powder. The last thing I did was add some blue cardstock to the inside of the card and adhered it under the front panel. This did not only add color to the pond but it also hid the balloon end from being seen on the inside of the card.
Here is a closer look at this cuties 😍
Make sure to check out the links here for the supplies I used in making this card.
Have a Platirific Week and hope this card inspired you today 😀
Even if it is to go outside and enjoy the Spring weather!
Today I have a super cute card to share with you all featuring one of Ink On 3's newest Stamp sets, Magic Dragons. How cute is that little dragon?!
Even cuter when you see it move!
For this card I thought it would be fun to make it look like rainbow rays were shooting out from the candle's flames. To create the rays I made a stencil out of a plastic sleeve (cutting a long "V" like slit toward a center point that I had marked in the middle of the plastic sheet). I then used my plastic template to blend out each distress oxide ink onto some bristol paper. I wiped the plastic off after each color and rotated the template to line up with the previous color. Then I just repeated the process over again until the rainbow was complete.
Next, I die cut the panel using a square stitch frame. Then I stamped the candle, making sure the flame was centered over rainbow's vertex and also stamped out my sentiment. To the flame and the candle I added some sparkle pen and then added glossy accents. I then stamped out the dragon using Blackout ink and then colored it in with Spectrum Noir Markers. Once it was all colored, in I fussy cut the image out and mounted this cutie on a mini action wobbles spring. I finished it off by embellishing the card with some flat sequins and voila, done!
Make sure you follow me on Instagram so you can see this cutie in action 🎥
Hope this bright Make a Wish Birthday Action Wobbles Card has inspired you a little today!
Don't forget to check out the newest release from Ink On 3, cause you may want to take advantage of their awesome bundle SALE!
Bundle Special ~ 20% Off Plus FREE Shipping (no coupon needed)
* Free Ship US only - if not US you will still get 20% off the bundle.
A Savings of $19.29!!! 😲 How can you beat that!?!
Hope you all had a wonderful Christmas and are enjoying some Holiday time with your Families!
I'm back today with a few cards featuring Ink On 3's newest Stamp Set Snow Buddies! How cute are these little guys?! 😍
Since I wanted to make multiples of these cards I kept the design really simple.
To create the heart stencil, I used a large post-it note and folded the paper in half, then cut out my heart. I used the negative of the paper and distress inks to blend out the heart on the front panel of each of the cards. I then added some pen detail around each one of the hearts for fun. Once the ink was dry I stamped out my sentiment and heat set them with embossing powder. I used same stitched rectangle die to cut the panels. For the Snow Buddies, I did some stamp masking. I first stamped out the smaller image and then covered it with a mask and then stamped the larger image. I then used spectrum noir markers to do some really simple coloring.
Here are a few close up of these adorable critters.
I think these seals are my favorite, I especially love how they kinda form the shape of a heart!
To add a bit of dimension to the cards I popped up the image as well as the front panels with foam tape and added glossy accents to their eyes, nose and their little stamped hearts.
On the inside of the cards I finished them with a sentiment from the Lilac Dreams Stamp Set.
Don't forget to take advantage of the FREE Shipping + Coordinating collections are also 20% off!
Hope you were inspired by my card creations today and can't wait to see what you all design with the Snow Buddies Set! I think these cards will make the cutest cards for Valentine's Day, or even Mother's or Father's Day!
Hello friends, Ilda here again taking over Fleurette's Blog!
So have you ever seen a sexier mermaid stamp?! I sure haven't... Wowzers 😜
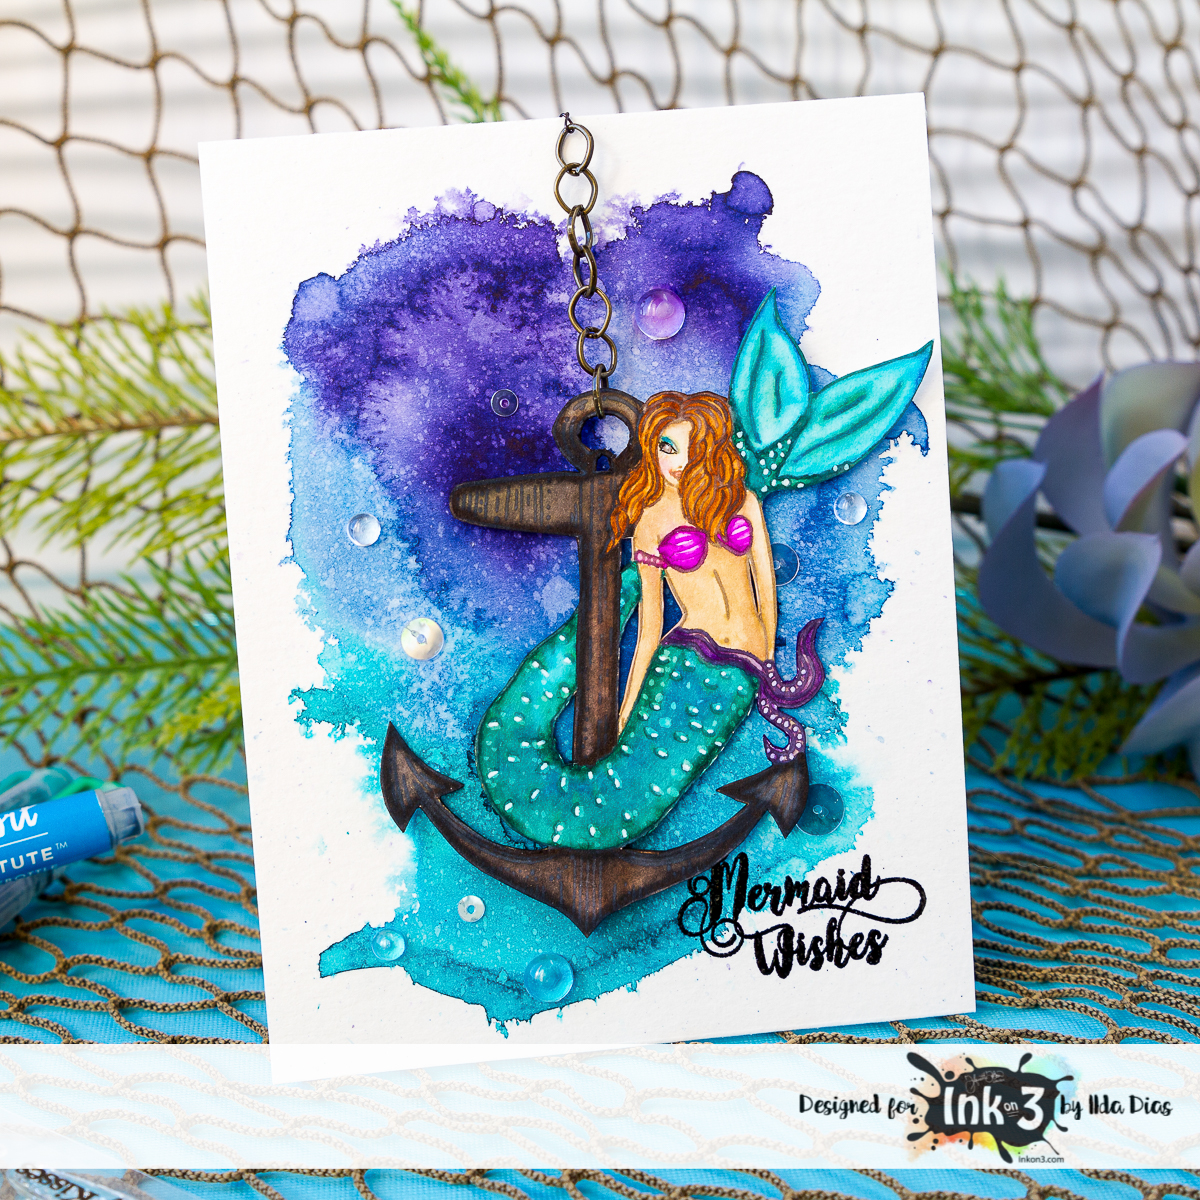
This beauty comes from Ink On 3's latest release! For this card, I didn't want to stamp the mermaid in black ink and I really didn't want to do a no line watercoloring. So I thought I would experiment by stamping the image out using frayed burlap oxide ink and I love the results. The stamped line once it came in contact with the watercolors oxidized and lightened the lines giving it a semi no line watercolor look.
To color the mermaid in, I used my Tombow Dual brush markers. Once she was dry I then fussy cut the entire image out. This is a fairly large stamp so it wasn't as difficult as it looks but I did need the help of my retractable PenBlade.
To create the background I wet the paper and then lightly touched the wet areas with Jane Davenport Mermaid Markers. These colors are so vibrant a little goes a long way. Just before the area dried I then used my distress spray bottle to splash and spread the ink around. I repeated that a few times with different colors, using by heat tool to help speed up the drying process. Once the entire background was done and dry I sprayed the background again this time picking up the droplets with paper towel.
To finish the card I then attached some jewelry chain to the anchor and used a metal wire to secure it to the top of the card panel, bending and taping the wire to the back to secure it in place. I then attached it to the A2 sized cardbase. I did not glue the mermaid down as I wanted her to swing freely on the front of the card. (see previous image)
Here is a closer look at the details 😍
Hope you were inspired by this Mariner Mermaid Card today.
Don't forget you can pick up the latest release that is on SALE now, plus you also get FREE shipping for a limited time!
Can you believe Halloween is less than a month away!?
Where has this year gone😲
Today I have a fun Halloween Shaker card to share with you featuring a few stamps sets from Inkon3, formerly know as FB Stamps. Click here for links to supplies used.
To create this little scene I began by stamping and masking my pumpkins, on the smaller pumpkins I actually masked off their entire face as I just wanted the larger one to be in the spotlight. I then colored the images in using spectrum Noir markers and then fussy cut the entire image cluster.
Next I went to work on my background. To create the moon, I cut out a circle from masking paper using a circle die. Then I used the negative of the circle cut out to mask the panel. I blended out the moon first and then masked it off once it was dry. Then I removed the negative piece and blended out the rest of the background. Once I was done, I sprayed it with water and used a paper towel to soak up the droplets leaving behind the illusion of a starry night sky. Then I stamped a few fly away bats to the background.
To finish the card I created the top panel using a Studio Katia die, then added acetate behind it to create the top of the shaker sandwich. Next, I added foam tape behind the border and added sequins. Finally I added my pumpkins to the card front and made the little Boo tag that I attached to the top center of the card.
Doesn't it look like the pumpkin is really scared when the shaker card is in motion?
I kept the inside quite simple with just the Happy Halloween sentiment.
Hope this Pumpkin Boo Shaker card inspired you today, or at least got you thinking of Halloween fun.
Make sure you stop by the New Inkon3 Store↓
Lots of Stamps on Sale for a limited time!