Wednesday, January 29, 2020

Ink On 3 Inks - What's the Difference? + Video


Hi everyone, welcome back to the Ink On 3 blog!  I hope your 2020 is off to a wonderful start!  Over on my insta, I have seen a few people making crafty resolutions or rekindling their love for card making.  I know not everyone understands the multitude of inks and mediums that Ink On 3 has to offer.  So I thought this would be a great opportunity to show you all; beginner or expert, the four families of inks that complete your crafty collection.


Which of the four ink families from Ink On 3 do YOU use most on your card projects?  I hope you found the video helpful in shopping your stash and trying new ways to color.  There are so many combinations when mixing the four ink families as well.  Try coloring your Blackout Detail Ink images with the Atelier Fusion Ink Watercolor Refills!  You will be surprised at how easy it is to blend the colors and achieve smooth results.  Speaking of Atelier Fusion Inks, make sure you follow the video on this blog post with THIS POST specific to Atelier Inks!

Hey thank you so much for checking out my video on how I made these cards!  Do you all have stamp sets from Ink On 3 that you would like me to use in a future project?  Let me know in the comments below!  If you like what you've seen from me, make sure you subscribe to my YouTube channel and give me a follow over on Instagram!  Talk to you all very soon!

Materials:
Ink On 3 - Blackout Detail Ink
Ink On 3 - Juicy Clear Embossing Ink
Ink On 3 - Fadeout No-Line Ink
Ink On 3 - Atelier Fusion Ink
Ink On 3 - Strawberry Champagne Embossing Powder
Ink On 3 - Gold Rush Embossing Powder
Ink On 3 - Water Lily Stamp Set
Ink On 3 - Bad & Boujee Stamp Set
Ink On 3 - Bad & Boujee Die Set
Ink On 3 - Dogwood Flower Die Set

Ink On 3 - Raccoon Hugs Stamp Set
Ink On 3 - Raccoon Hugs Die Set


Jaycee Gaspar

YouTube | Instagram | Blog

Monday, January 27, 2020

Big Bold Magnolias Ombre Card with Atelier Inks

Hello Crafty Friends! It's Cheryl here to show you a quick and easy card using Atelier Inks and the Big Bold Magnolias Stamp set!


Preparations:
- Cut white card stock 4.5"x 9" and then score at 4.5" to create a card base.
- Cut white card stock 4" x 4" for front panel of the card.


Around the perimeter of the card base, use the Marilyn Red Atelier Ink and a blender tool to add color to the border, you'll only need about .25" of a colored border.

Next, stamp out three to four flowers from the Big Bold Magnolia Stamp set with Juicy Clear Embossing and Watermark ink, then sprinkle some Arctic White ultra fine embossing powder over the embossing ink, tap off any excess powder, then heat set. Use the Marilyn Red and Marigold Orange Atelier Inks with a blender tool to create an ombre effect on the flowers. Fussy cut the flowers.

On the white card panel, stamp the "You're Beautiful" sentiment from the Heels to You Stamp set. I created an ombre effect by tapping Marigold Orange ink on the middle of the sentiment, then I tapped the Marilyn Red ink on the remaining un-inked portion of the stamp.


Now it's time to put the card all together! Adhere the white front panel centered on card base. Then adhere the flowers as you'd like. I put a large flower on the left, then a medium flower on the far right. I put a small magnolia bud behind the flower on the right. Then I used some foam tape to adhere the medium sized Magnolia between the other two flowers for added dimension.


Inkon3 Products Used: 

Thursday, January 23, 2020

Hey Gorgeous!


Hi everyone! It’s Jeannie (InsideoutJeans) on the blog today with Ink on 3’s newest stamp set debuted at Creativation called Hey Gorgeous. It's such a pretty stamp set that speaks to me! The main image from this set is obviously this gorgeous girl, which I decided to no-line color using Fadeout ink with copic markers.

There's no coordinating dies for this set but it's large enough for me to fussy cut quite easily. Then I had to figure out what to do with it. I pulled out the Atelier inks to help me create a fun background. First, I used three Atelier re-inkers to watercolor a card panel. I used Marilyn Red, Marigold Orange, and Bee Sting Yellow.


Once the watercolored panel was created, I splattered water all over since these inks are water-reactive. I also splattered some of the ink using all three colors: Marilyn Red, Marigold Orange, and Bee Sting Yellow. 

To finish off the background, I stamped out the floral images randomly using the Marilyn Red ink pad. 


For the sentiment, I stamped Hey Gorgeous using Blackout ink. I just quickly fussy cut out the larger sentiment and added the "hey" using a strip. 


I'm loving how this all came together and I'm so excited to use these inks more! They are so versatile and fun. Have you tried them? 

Thanks for stopping by today and I hope you get inspired to create. Come back again soon for more inspiration and ideas! Happy Crafting! 

- Jeannie 

Thursday, January 16, 2020

Quick But Bright You're Special card with Erica

Hi guys!

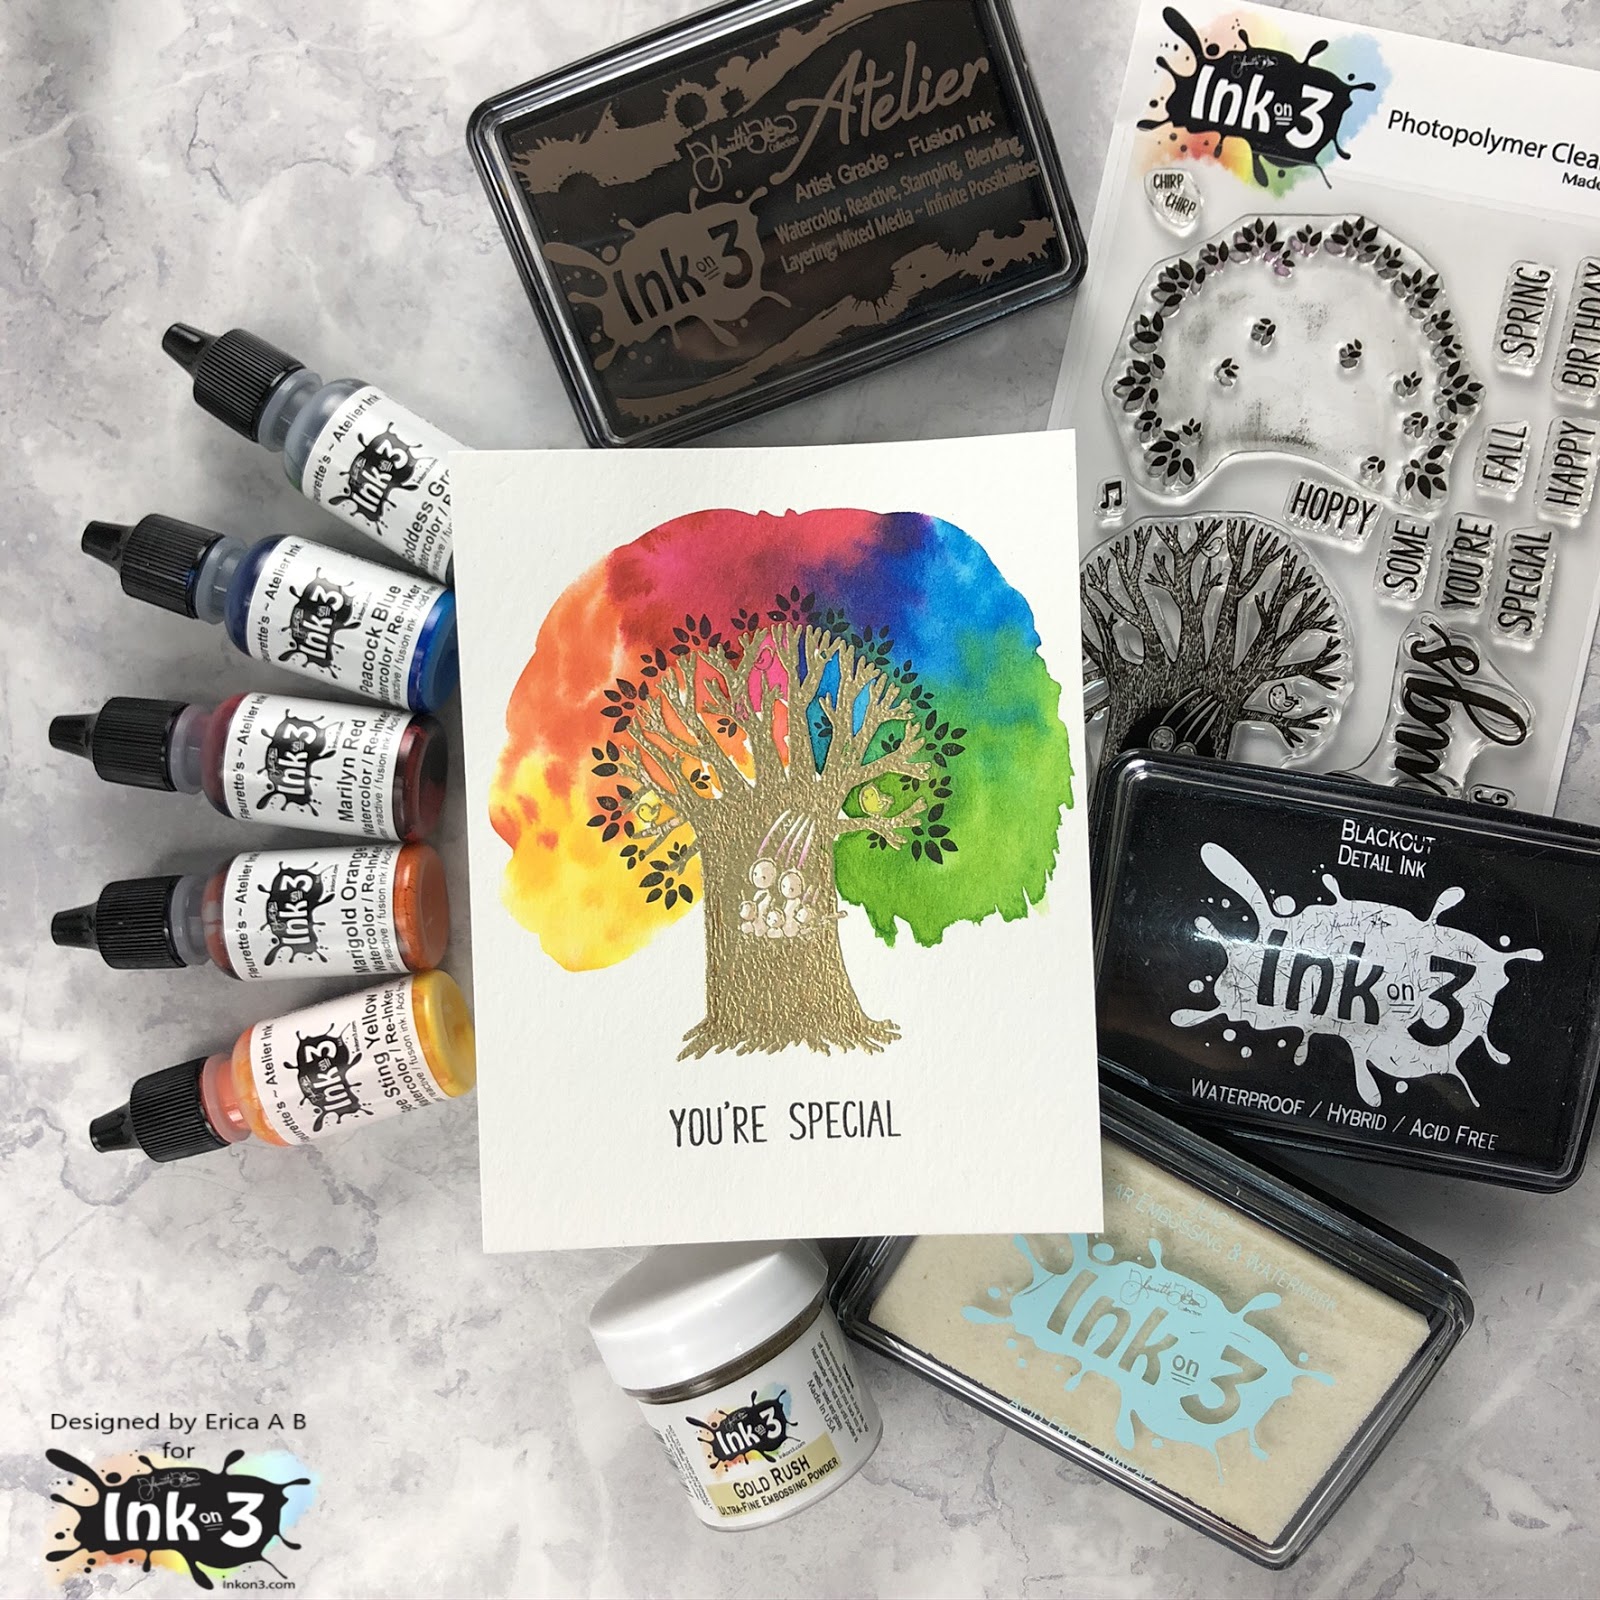
Erica back on the Inkon3 blog today with a quick but very bright card! I have used a new-to-me stamp set, Bunny Hugs, and I used the Atelier Inks to add colour.


To start with, I heat embossed the tree trunk in Gold Rush embossing powder. I used the Juicy pad to stamp it up before sprinkling the embossing powder very generously over the panel. This is water colour paper, Canson XL, that's been cut down to 4.25"x5.5".


After adding some colour to the actual tree trunk, with the help of the Twiggy Brown ink pad as I don't have the re-inker yet, I got the canopy part of the tree very wet and added colour to it by dabbing a paint brush filled with ink in it. Doing it this way, I feel, adds a bit of texture and you get that lovely natural spreading of the colour.

From left to right I have used Bee Sting Yellow, Marigold Orange, Marilyn Red, Peacock Blue and Goddess Green.


To make sure the canopy was dry, before I stamped up the leaves, I used my heat gun on the panel to set the colours. With the help of the MISTI, I then stamped the leaves with Blackout Ink until they were nice and solid. I also added a sentiment 'You're Special' from the Bunny Hugs set, under the tree.

I love a bit of heat embossing and a splash of colour for a quick card! What do you think?


If you are in the Phoenix area this weekend, Jan 18-20th, and are attending Creativation, make sure to stop by the Inkon3 and the Picket Fence Studios booths as I, and the rest of the teams, will be demoing the Atelier inks there! You will get to see these in action and try them out for yourself too!

Thanks for stopping by today, I hope you found this inspiring and will give it a go yourself. Oh, I made a video too! It's over on my YouTube channel if you wanted to have a look.

Lots of love and happy crafting from Erica

PS If you do attend Creativation, make sure to some up and say hello!


Tuesday, January 14, 2020

Sparkly Faux Enamel Die Cuts

Hello everyone, Kassi here..

It's no secret, I love doing no-line coloring, and keeping my cards CAS... but I also like including elements that make it pop... Just a little something to add a bit of sparkle or dimension...

One of my recent favorites is sparkly faux enamel die cuts.... They are beautiful, customizable, and look fabulous without adding much bulk.... which means you can keep your cards easy to mail, while still having some sparkle and dimension!

 Let's take a closer look at how this card is made, and I'll show you how easy it is to make sparkly faux enamel sentiments....  

Thursday, January 9, 2020

Hugs Kisses and Warm Wishes Valentine's Day Cards with Ilda

Hugs Kisses and Warm Wishes Valentine's Day Cards | Ink On 3 by ilovedoingallthingscrafty.com

Happy Wednesday Friends, Ilda here from I Love Doing All Things Crafty. I hope your week is going well for you all, I sadly still have a nasty cold but I guess shouldn't complain too much as I haven't been sick for the longest time, guess it's going around and it was my turn😒.

At least a cold can't stop me from creating, so today I have some colorful Valentine inspired cards to share with you featuring a few goodies from Ink On 3.

CARD DETAILS

For this first card, I started by stamping out the lips from Bad and Boujee Stamp set randomly but in a rainbow order all the way down the panel. Beginning with Marilyn Red, Marigold Orange, Bee Sting Yellow, Goddess Green, Peacock Blue and ending with My Jam Purple Atelier Inks. I just love these ink names!!!

Hugs Kisses and Warm Wishes Valentine's Day Cards | Ink On 3 by ilovedoingallthingscrafty.com

I then stamped the "hugs and warm wishes" from the Raccoon Hugs set on vellum and heat set the ink using Black As Night Embossing Powder. I also used the "&" from the Bad and Boujee Stamp set and the Kisses die from the Coordinating Bad and Boujee Die Set that I coated using Juicy Ink and Crystal Clear Embossing Powder.

Hugs Kisses and Warm Wishes Valentine's Day Cards | Ink On 3 by ilovedoingallthingscrafty.com

For this next card, I began by gluing paper scraps onto my card panel that I had cut into random strip sizes to create the background.

Hugs Kisses and Warm Wishes Valentine's Day Cards | Ink On 3 by ilovedoingallthingscrafty.com

I then stamped out the lips horizontally across the panel. Here I used Marilyn Red, Marigold Orange, Bee Sting Yellow Atelier Inks.

Hugs Kisses and Warm Wishes Valentine's Day Cards | Ink On 3 by ilovedoingallthingscrafty.com

I then stamped out the sentiments from the Bad and Boujee Stamp set and then used Crystal Clear embossing powder to heat set them. I then popped on the stamped image strip onto the colorful card panel and Voila all done!

I hope these cards have inspired you. Both these cards could be used for Valentine's Day but they also could be used as friendship or encouragement cards. 

Thank you for stopping by 😊
Until next time... Happy Crafting 👋

Hugs, Kisses and Warm Wishes, Ilda

SUPPLIES
Bad and Boujee Stamps
Shop at:
IO3
Bad and Boujee Die Set
Shop at:
IO3
Raccoon Hugs
Raccoon Hugs
Shop at:
 IO3
Atelier Marilyn Red
Atelier Marilyn Red
Shop at:
 IO3
Atelier Marigold Orange
Shop at:
 IO3
Atelier Bee Sting Yellow
Shop at:
 IO3
Atelier Goddess Green
Shop at:
 IO3
Atelier Peacock Blue
Shop at:
IO3
Atelier My Jam Purple
Shop at:
 IO3
Vellum Value Pack
Vellum Value Pack
Shop at:
SSS | AMZ
JUICY INK
JUICY INK
Shop at:
IO3
CRYSTAL CLEAR Emb Pwd
Shop at:
 IO3
Black As Night Embossing Powder
Shop at:
 IO3
Neenah  80 LB SOLAR WHITE
Neenah 80 LB SOLAR WHITE
Shop at:
SSS | AMZ
VersaFine ONYX BLACK Ink
Shop at:
SSS | AMZ | SBC | HB
Ruler Stamping Block
Shop at:
SSS | SK
Mini Stamping Block
Mini Stamping Block
Shop at:
SSS | SK

Friday, December 27, 2019

Atelier Inks: Colorful Splatter Card


Hello Crafty Friends! It's Cheryl here to show you how to get messy with Inkon3's Atelier Inks to make a colorful splatter card!


Pre-Prep: 
- Card base: cut out a sheet of white card stock that is 8"x8.5", then fold in half for a 4"x8.5" card.
- Cut a piece of Water color paper 4"x 8.5".
- On Watercolor paper-stamp and fussy cut five of the little mouse with a present from the Dance and Twirl Stamp set.
- Put a few drops of Atelier Inks Water Color/Re-inker in a watercolor palette, add a few drops of water to dilute the ink. I used the following colors: Peacock Blue, Goddess Green, Bee Sting Yellow, Marigold Orange, and Marilyn Red.
- Die cut small black banner, for the "Happy Birthday" sentiment.

Directions:
On the 4"x8.5" watercolor paper, use a large watercolor brush that is slightly damp and brush get a 2"x2" area wet on the far left center. With a smaller wet brush, drop the Peacock Blue ink into the wet area of the paper until the you get your desired color saturation. To add the next color, use the large damp brush again and brush out another 2"x2" area, starting from right to left, leaving a little room between the two colors. Next drop in the Goddess Green ink into the uncolored wet area, and use your paintbrush to pull the green ink into the blue ink. Repeat these steps with the next colors. The color order I used was: Blue, Green, Yellow, Orange, and Red.

To add small splatters of color, dip the small brush into the Peacock Blue ink, aiming the brush tip at the 4"x8.5" watercolor paper, tap the brush on the side of your hand. When doing this make sure the area is easy to clean and that you've cleared your area of anything you're not worried about getting splatters on! It can get messy! Repeat the process with the other colors. Don't forget to wipe down the area after you're done! :P


Next watercolor the five little mice with the present. I colored the bows with each of the colors I used for the background. While the mouse and present are white, I used a very watered down Atelier Ink - Paint it Black to add some shading details to the mouse. I used a watered down Atelier Ink - Peacock Blue for the shading of the present. I watered down the Marilyn Red to color in the Mouse's ears.

On the small black banner, using an embossing ink, stamp the "Happy Birthday" sentiment from the Dance and Twirl stamp set. Then sprinkle Arctic White Embossing powder over the sentiment and tap off any excess powder. Heat set the embossing powder.


Now we're ready to assemble the card! Adhere the 4"x8.5" water colored paper onto the card base. Then adhere each of the mice to match the background color. Add some skinny washi tape on the top and bottom of the card. I left a little bit of room on the bottom so that I can center the black banner over it. Lastly, adhere the black banner to the far right of the card.


I hope you like this card! I really love seeing how the watercolor take shape when dropping colors onto slightly damp paper!

Inkon3 Products Used:
Peacock Blue Re-Inker
Goddess Green Re-Inker
Bee Sting Yellow Re-Inker
Marigold Orange Re-Inker
Marilyn Red Re-Inker
Paint it Black - Atelier Ink
Blackout Hybrid Detail Ink 
Dance and Twirl Stamp Set
Arctic White Ultra-Fine Embossing Powder


Tuesday, December 24, 2019

Mass Card Production Tips & Tricks + Video


Hi everyone, welcome back to the Ink On 3 blog!  My name is Jaycee Gaspar, and I'm a holiday card procrastinator *cries.* Gradient backgrounds and beautiful die cuts make the suffering less painful and the NEW Artist Grade Atelier Fusion Inks take care of the stunning ombré backgrounds.  Below is a video where I share my tips and tricks on mass producing cards.  The occasion doesn't have to be holiday or Christmas, you can apply these tips to mass produced birthday cards, thank you cards, or whatever your stash needs!


Do you all have helpful tips and tricks to revive your card stash?  Like I said in the video, making this many cards does require some time, but there are still ways to remain efficient while making many cards at once.  Card projects usually require at least two hours of my creative energy, so spending four hours to make twelve is a personal achievement!  Happy Holidays and Merry Christmas from the Creative Team at Ink On 3!

Hey thank you so much for checking out my video on how I made these cards!  Do you all have stamp sets from Ink On 3 that you would like me to use in a future project?  Let me know in the comments below!  If you like what you've seen from me, make sure you subscribe to my YouTube channel and give me a follow over on Instagram!  Talk to you all very soon!

Materials:
Ink On 3 - Atelier Fusion Watercolor Re-Inkers
Ink On 3 - Water Brush Pen
Ink On 3 - Blackout Detail Ink
Ink On 3 - Juicy Clear Embossing Ink
Ink On 3 - Arctic White Embossing Powder
Ink On 3 - Strawberry Champagne Embossing Powder
Ink On 3 - Gold Rush Embossing Powder
Ink On 3 - Oh Deer Stamp Set


Jaycee Gaspar

YouTube | Instagram | Blog

Monday, December 23, 2019

Atelier Ink Magical Unicorn card with Erica


Hi guys!

Erica here on the InkOn3 blog with another Magical Unicorn card. I can't help it, I love that stamp! To check out my no-line colouring card, click HERE. There is also a YouTube video for that card HERE.

For this card I have created a very colourful background by ink blending all the Atelier Inks, except Paint It Black and Twiggy Brown. I used a stencil and the Life Changing Blender Brushes from Picket Fence Studios. The stencil is called Basket Weave.


I started out by adhering the stencil to a panel of Bristol Vellum paper. It was still a little bit tacky from the Pixie Spray I had used during another crafting session, but I secured it with some purple tape at the top and bottom just to be on the safe side. Then I blended the colours in a rainbow look, from bottom to top it's Bee Sting Yellow, Marigold Orange, Marilyn Red, My Purple Jam, Peacock Blue and Goddness Green. I added the Goddess Green over the blue thinking it would go turquoise but it went a dark teal instead. Because I wanted some green on the panel as well, I added a little bit of Goddess Green to the bottom of the yellow.


I trimmed this panel down to 5"x4.25" and this was adhered to a white card base. The reason I trimmed it shorter than the height of the card base was to give it a while border at the top and the bottom.

The Magical Unicorn I heat embossed by stamping up the image with Juicy Ink and sprinkling Chrome Embossing powder on it. Once set, it was ready to be coloured. I did some loose water colouring using the Atelier ink re-inkers and lots of water. To add sparkle I used a little bit of Paint It Black re-inker and Liquid Pixie Dust to colour in the actual head of the unicorn.

On a piece of white card stock I stamped up the sentiment 'Hugs, Kisses and Unicorn Wishes' with Blackout detail ink. This was trimmed down to a slim strip and adhered to the card with liquid adhesive. As was the unicorn itself once it was cut out using the coordinating diecut.


I wanted to add some sequins to it as well but managed to rein myself in, as it already has a lot going on. Look at that, I am making progress with my sequin addiction!! LOL!

That's it from me for today blog-wise but if you want to watch the whole card making shenanigan routine I call crafting, hop on over to YouTube for a video.

Thanks for stopping by, I hope you found some inspiration here with me today.

Lots of love and happy crafting from Erica